

A Posnerian Cueing task is named after its creator, Michael Posner, and is designed to orientate (in other words ‘prime’) attention (Posner, 1980). The task is simple and attempts to draw participant’s attention to either the left or right of the screen. The phenomenon is that we are quicker at detecting objects in the places we were cued to look.
For example, let’s say an arrow appeared in the middle of the screen pointing left and a circle stimulus appeared soon after this on the left hand side of the screen. Our job is to tell the experimenter what side of the screen the circle appeared (left or right). We would orient our attention to this type of trial quicker than if the arrow had pointed in the other direction (away from the circles future position) or no directional cue was given. The literature either names trials either as congruent/valid cues (i.e., the arrow points in the direction of the future stimulus location), or incongruent/invalid cues (i.e., the arrow points in a different direction to where the future stimulus will appear).
Naturally the strength of the effect depends on how informative or reliable the cue is. A cue with a 50% probability of being congruent/incongruent with the future stimulus location will produce a weaker effect than if the cue was informative 75% of the time. In the experiment with a cue that is informative 75% of the time, participants come to rely on this source of information, orient their attention quicker to congruent trials, and it takes longer for them to ‘course-correct’ their vision to the 25% of trials where the cue points the wrong way (incongruent).
We will use the Friesen and Kingstone (1998) variant of this experiment where the traditional arrow cue is replaced by eyes looking either left or right and instead of responding with what side of the screen a stimulus is, you need to tell me what letter (either F or H) appears by pressing either z if its an F, and m if its an H. You can access the paper here. Below is an example of an incongruent trial

Figure 1: An incongruent Posner trial. The target is the F, the foil/distractor is the X, and the cue in this case is a face with eyes facing toward the foil/distractor (i.e. an incongruent/invalid trial). As its an F, you need to press z to be correct.

PsychoPy started life as a bunch of libraries and objects for the Python programming language to help cognitive neuroscientists create experimental procedures. It quickly grew in popularity and now has a massive user base, and most recently, the ability for experiments to be presented online in the browser using its sister library for JavaScript called PsychoJS. The good news is that due to its extensive development, a lot can be achieved without writing any computer code at all. To do this we need to use its ‘builder’ interface, shown below.
)
Unlinke Opensesame, the timeline is horizontal rather than vertical. We will dig into a lot of its features and its terminology as we go along in this tutorial.
Lets build this, shall we?
Start by creating a study folder called posner and within that folder create two more folders, one called img and one called audio.
Then, on Blackboard under the PY0544 - Posner folder, download the zip file called posnerMats.zip. It contains the following items:
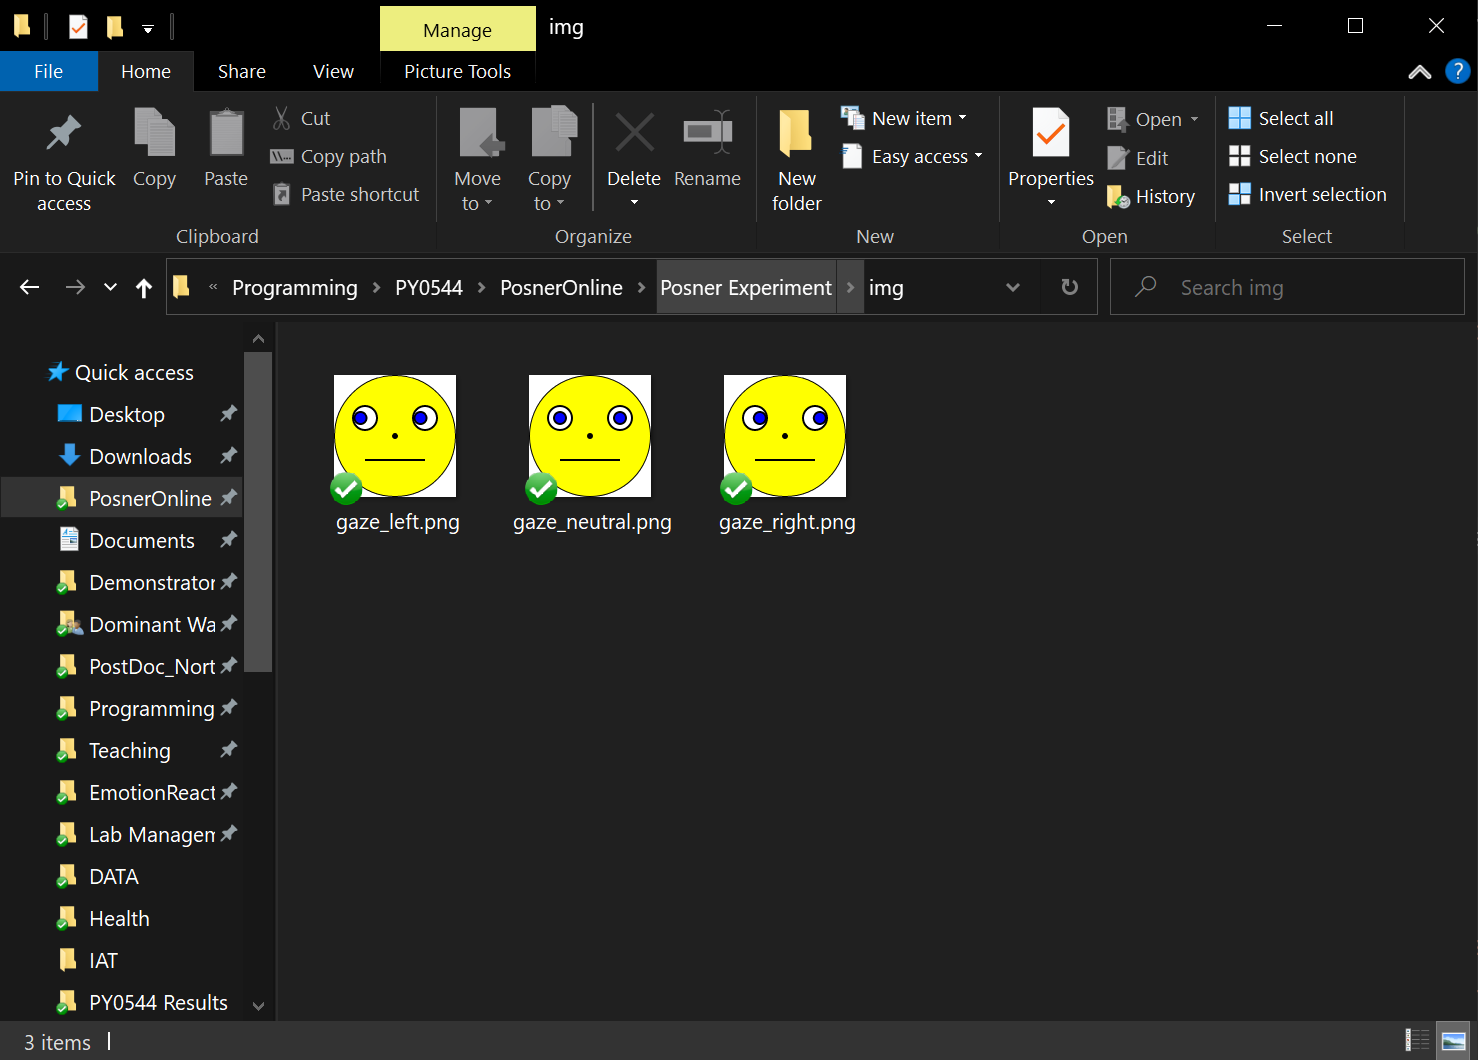
gazeleft.png gazeneutral.png gaze_right.png incorrect.ogg (an audio file)
Extract the zip file to your study folder, put the images in the img folder, and the incorrect.ogg file in the audio folder. Below is my img folder for reference.
This design is within-subjects (because all participants do all conditions) and is fully-crossed (or full factorial), because all combinations of conditions occur. There are three factors, each with 2 levels:
gaze side with two levels (left, right) target side with two levels (left, right) target letter with two levels (F, H)
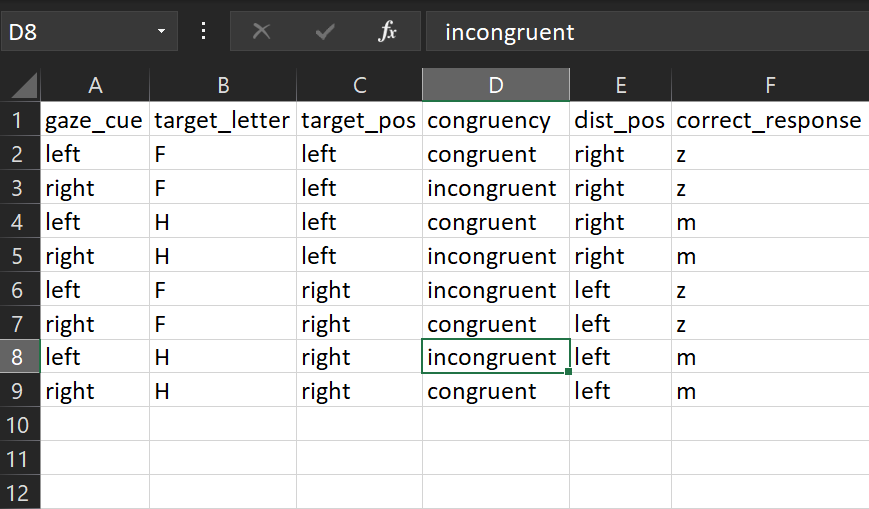
So, we need to create a trial list that the experiment can loop through to ensure all of these combinations of trials are completed. Below is a table of all such combinations.
| gaze_cue | target_letter | target_pos | congruency | dist_pos | correct_response |
|---|---|---|---|---|---|
| left | F | left | congruent | right | z |
| right | F | left | incongruent | right | z |
| left | H | left | congruent | right | m |
| right | H | left | incongruent | right | m |
| left | F | right | incongruent | left | z |
| right | F | right | congruent | left | z |
| left | H | right | incongruent | left | m |
| right | H | right | congruent | left | m |
lets walk ourselves through all of these columns:
gaze_cue - this will form part of the filename that shows which direction our eyes will face. For example on row 1 gaze_cue is 'left', so when we apply this to the experiment it will form the 'left' portion of the filename 'gaze_left.png'

target_letter - this is the letter that will appear during the trial (F or H)

target_pos - this is where the F or H will appear on the screen, left or right.

congruency - this is a descriptive variable that simply tells us whether the eye direction matches where the target will appear (i.e. congruent) or not (incongruent). We can see that in row one, the gaze_cue was 'left' and the 'target_pos' was  also left, which corresponds to a congruent trial.

dist_pos - This is where our X (distractor letter) appears. It is the opposite of the target pos, so when the target_pos is left, the dist_pos will be right.

correct_response - This is key participants must press to be considered correct on a given trial. If you recall, they should press z if the letter is F, and m if the letter is H.PsychoPy is flexible with what you can use as a trials list. The easiest way for you to feed it a trials list though, is using an tabular formatted file such as an Excel workbook (.xlsx or .xls), or comma separated values file (.csv or .txt).
We are going to make an Excel file. So, open a blank Excel worksheet and copy the above table ensuring the column headers form the top row starting at cell A1. Save the file as trials.xlsx in your main project folder.
First of all, head to psychopy.org and download the latest version. It should autodetect your operating system and there are standalone installers for Windows and MacOS. You should see a big blue button that says something like Standalone PsychoPy2020 for .... Installation for Windows is a simple double click on the downloaded installer following the prompts. On MacOS, you open the downloaded .dmg file and drag the PsychoPy.app to your application folder. In both instances, you may get a security warning as its not ‘signed’ software, click Run anyway on Windows and whatever the equivalent is on MacOS.
Note: as of time of writing, PsychoPy does not run on the latest iteration of MacOS Big Sur.
When you first open PsychoPy, you will be greeted with quite a few windows: coder, runner, builder, tip of the day, and benchmarking tool (see below for the array of windows). You can close all of them except the window titled ‘Builder’.
NB: Sometimes a command/terminal window will appear, just leave this open (as if you close it, it will hard quit the program and you'll lose what you haven't saved).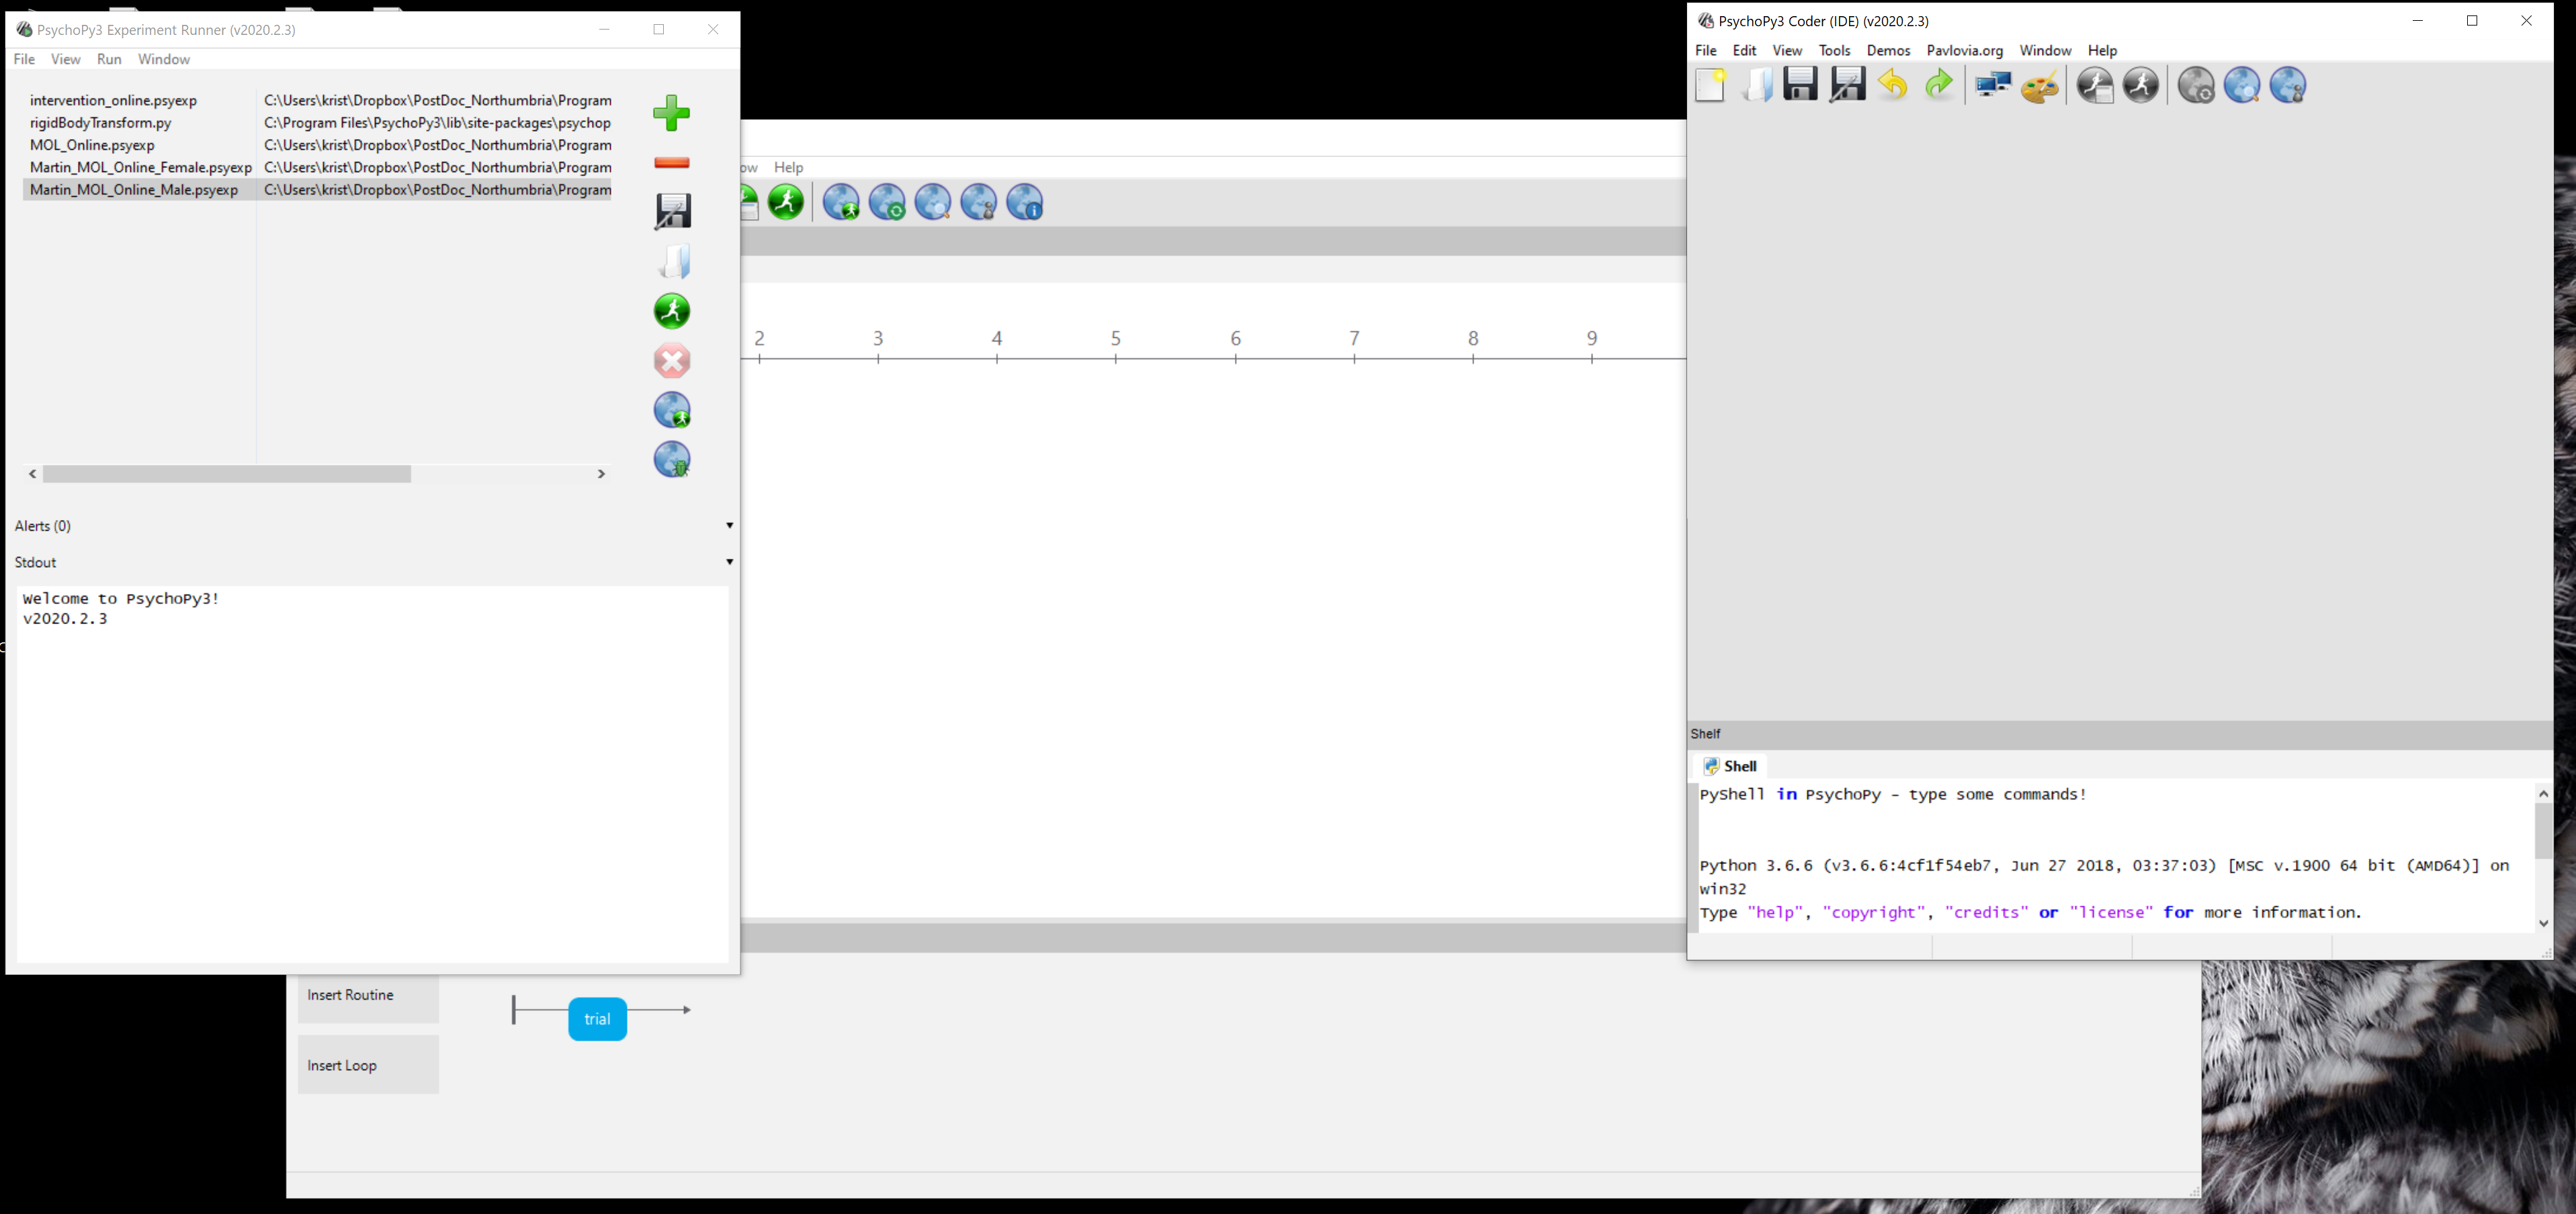
NB: if you accidentally close a window and need to re-open, simply click 'Window' on the toolbar of any open PsychoPy window (e.g. Coder, Runner) and select 'Builder'. Below is a blank Builder window.
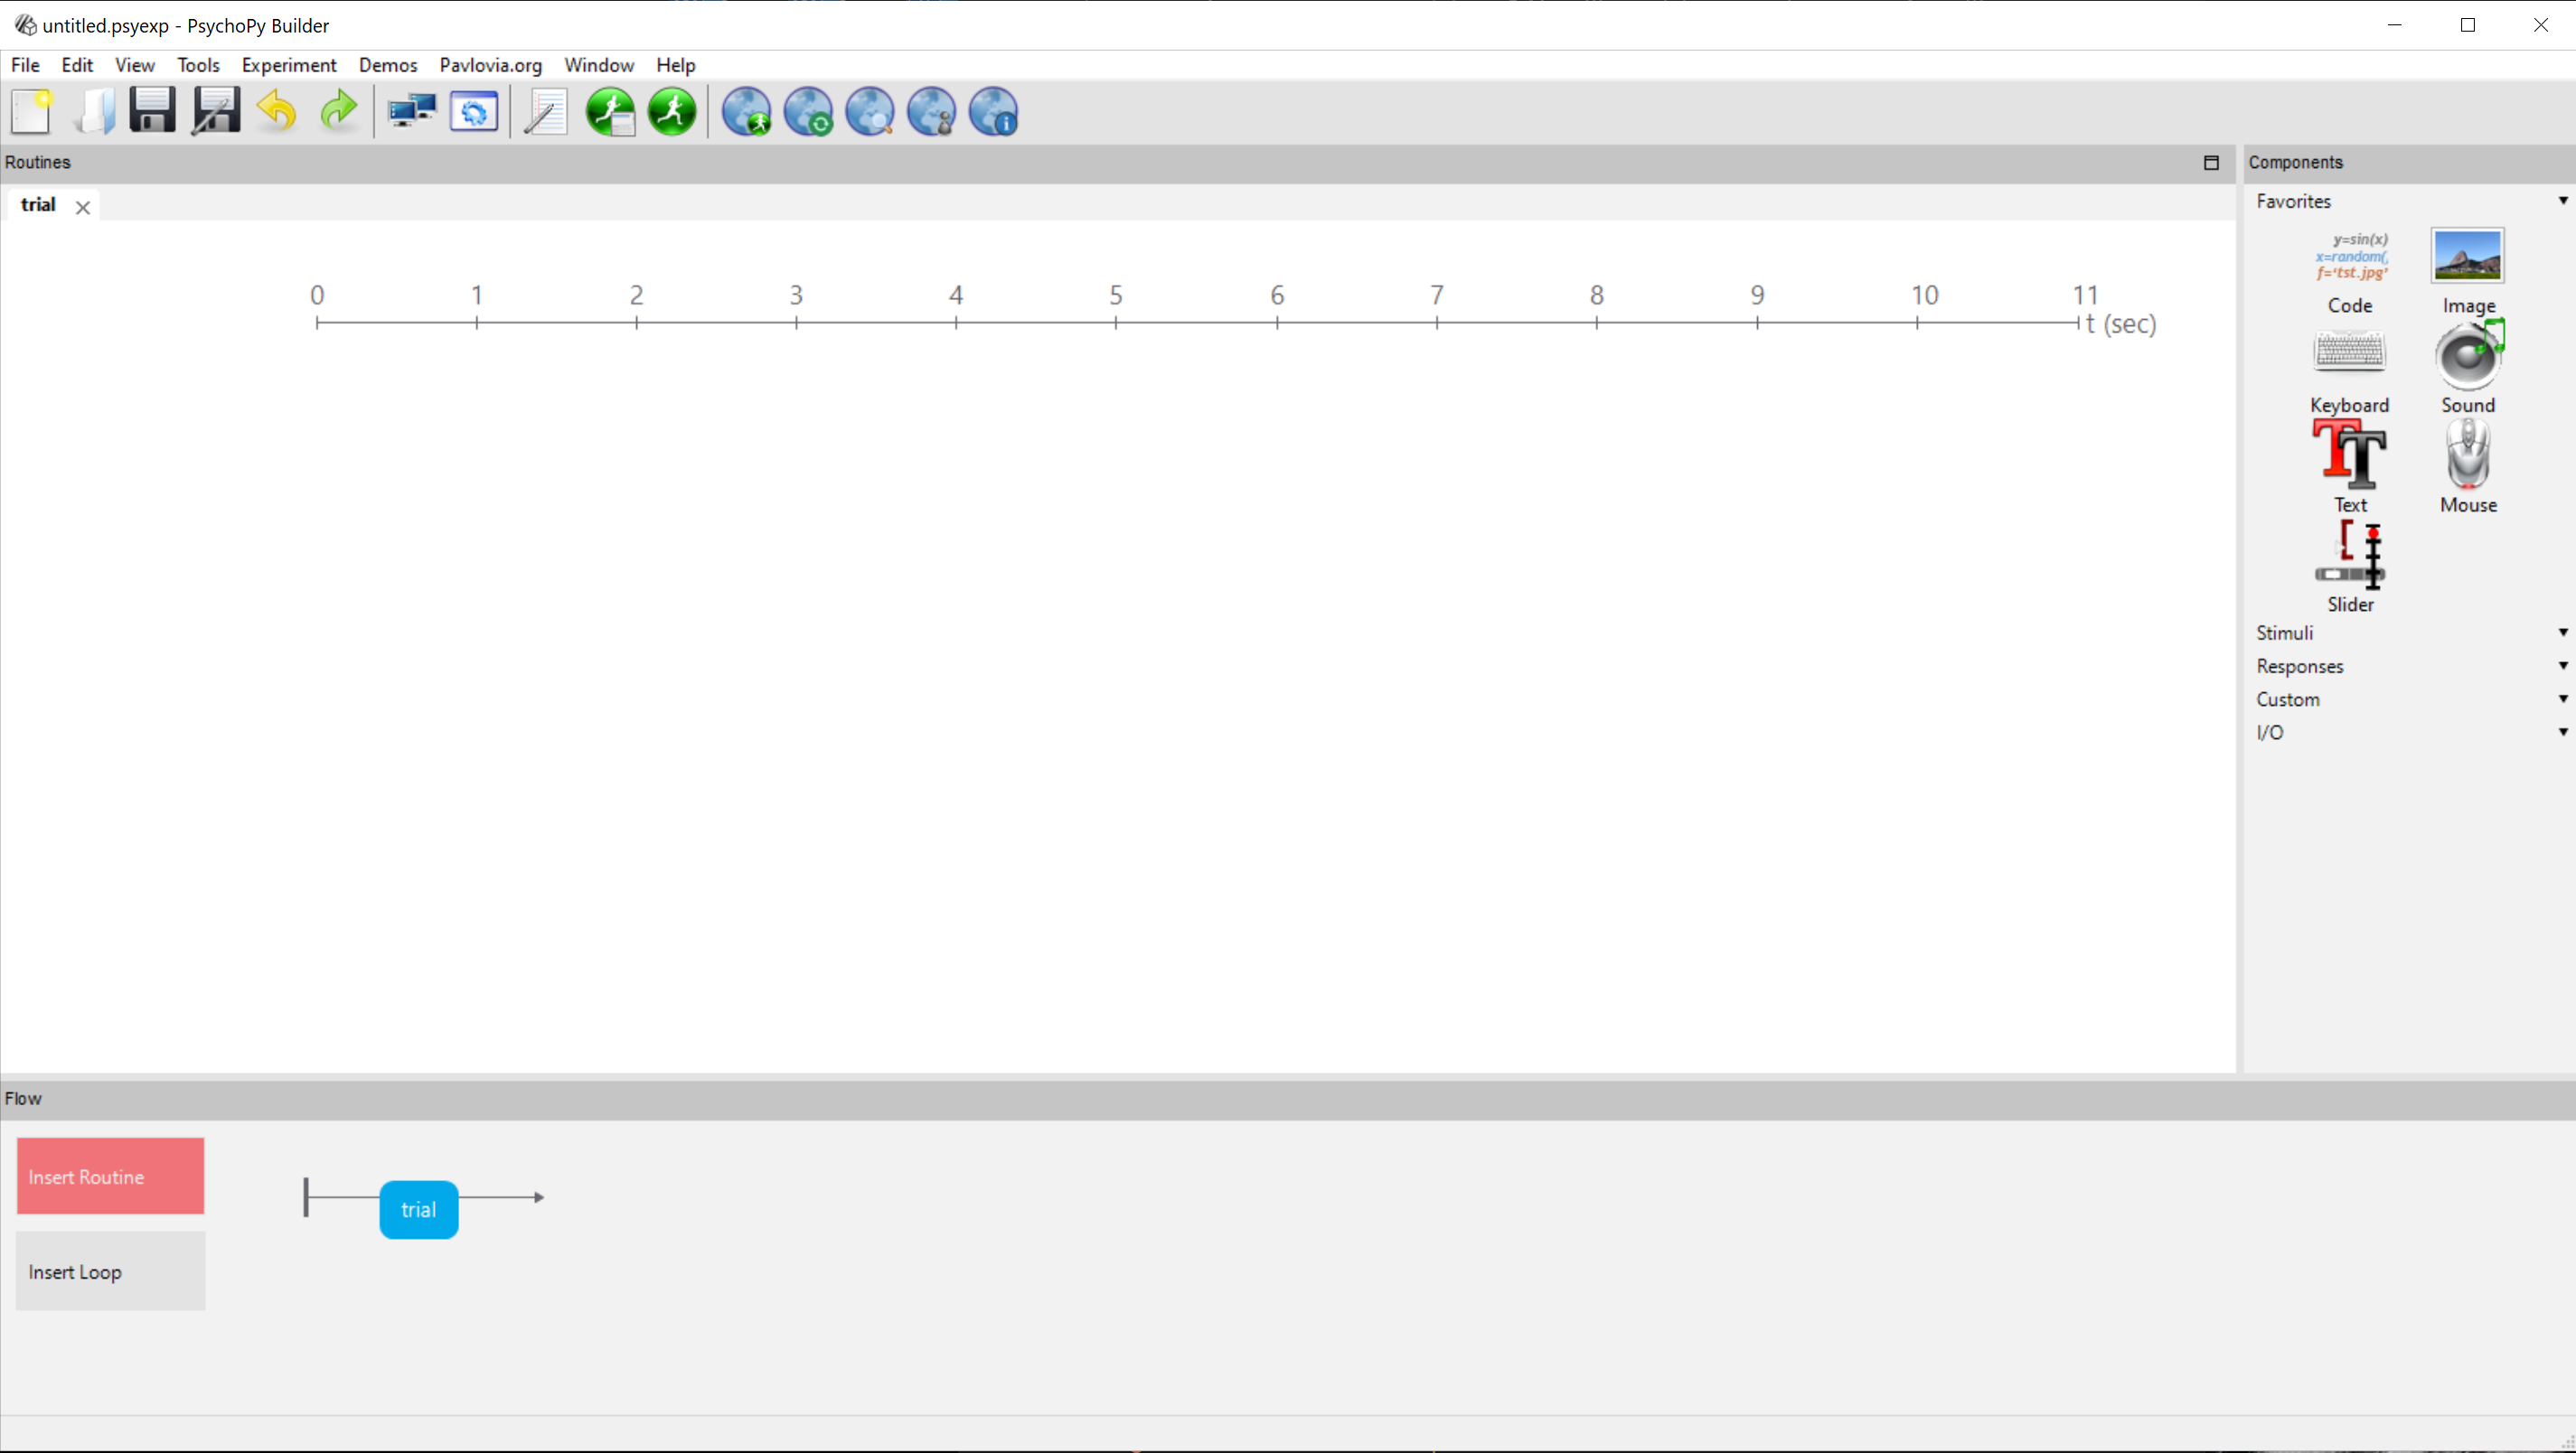
Now, lets get you up to speed with some terminology and what some of the key window features are.
If you are familiar with Opensesame, you will know that a ‘Sequence’ is a combination of objects such as fixation crosses, stimuli, keyboard objects etc. A common sequence would be a trial (e.g. a fixation cross for 500ms followed by a word on the screen, followed by a keyboard response). In PsychoPy, these are known as Routines. We might have a Routine for the introduction, a routine for a trial, a routine for feedback etc.
The overall study Flow is presented at the bottom:
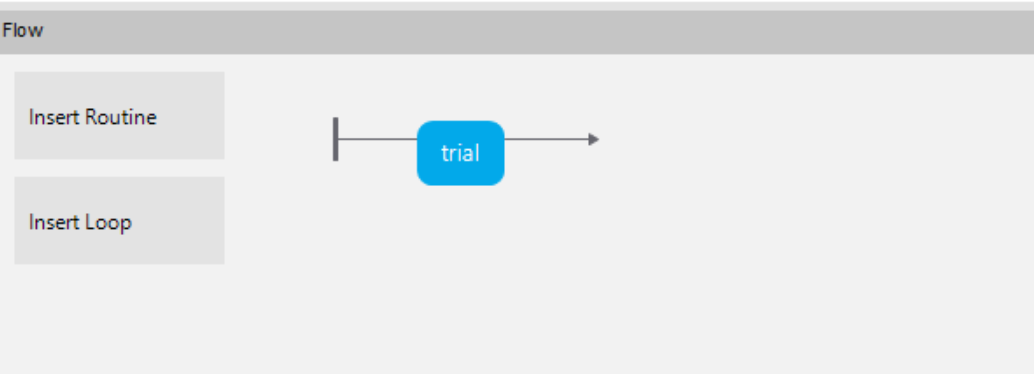
Here we can see the timeline contains one Routine called ‘trial’. We also see two buttons, Insert Routine and Insert Loop.
Next up is the main window, this is tabbed like a web browser in that if you click on any routine in the flow, it will show whats included in the main window. As an example, below is a routine I made for a recent experiment.
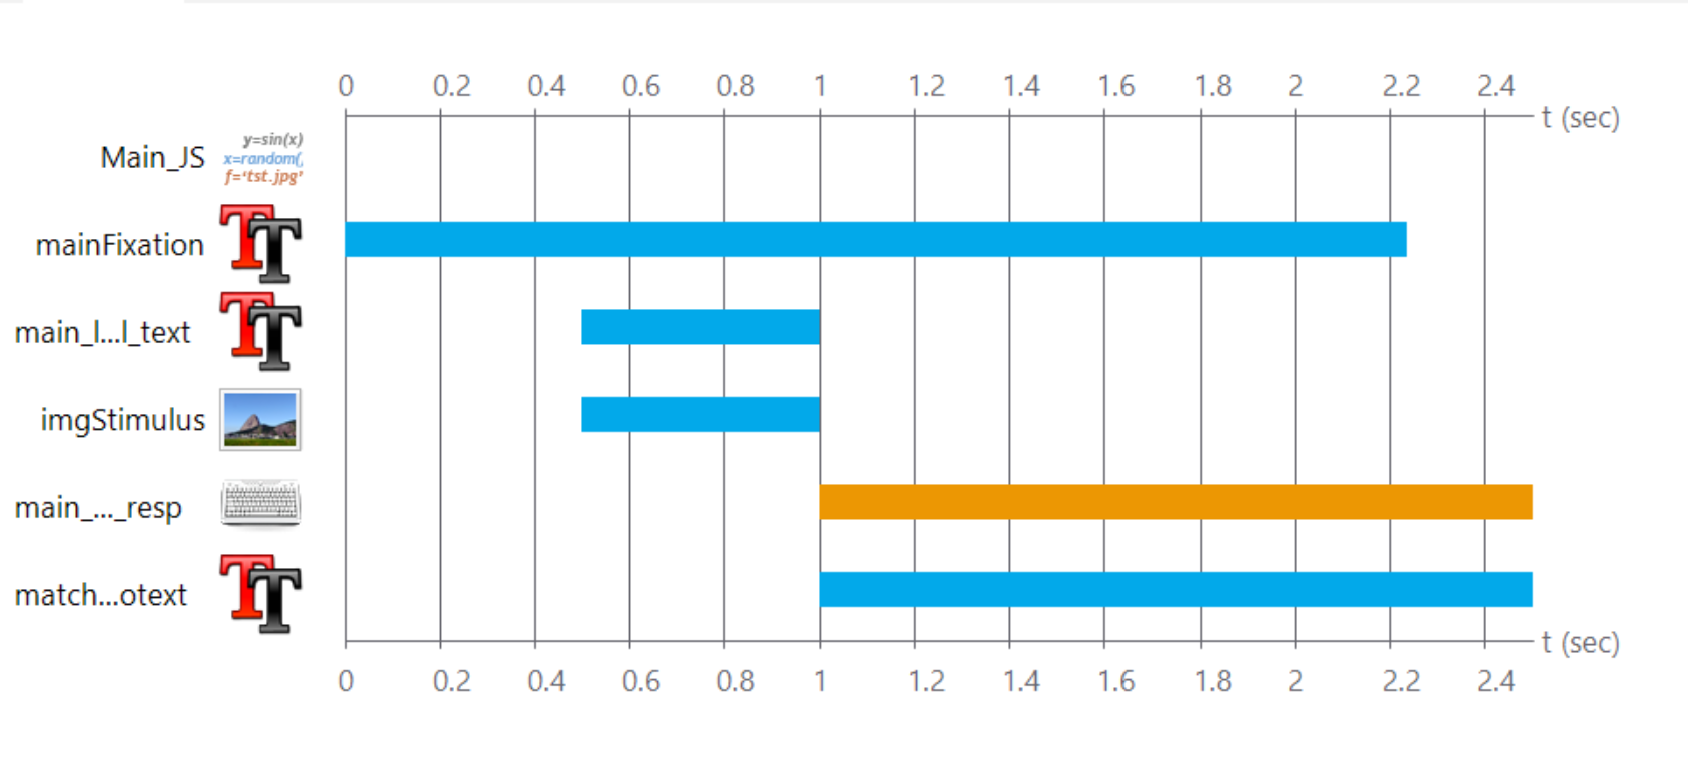
Like the Flow window, time is illustrated horizontally and looking at the Gannt-like chart, we see objects like ‘mainFixation’ start at 0, and end around 2.2 seconds, whereas others such as mainL…Ltext (truncated name) start getting displayed at around 0.5 seconds, and end at 1 second (i.e. they are presented for 0.5 seconds). Some objects like MainJS don’t have any time bar. This usually means they are presented all of the time.
NB: You should create/stack objects in the order you want them to appear from top to bottom. This has two benefits: firstly it keeps things looking sensible in the window, and secondly, behind the scenes the program creates the objects in that order meaning if you want to reference them later on in the routine, you can as long as they have been previously created.Finally, there is the Components pane on the right. If you click on any of these ‘objects’ it will add them to the currently selected routine (no need to click and drag like Opensesame).

Every Routine and Object needs to have a unique name without spaces. Make these meaningful.
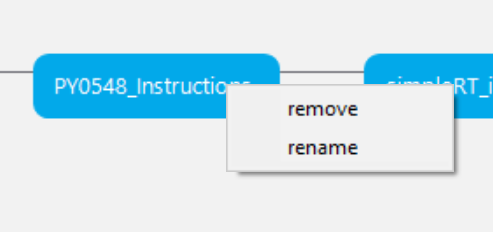
You can remove or rename an entire Routine by right clicking on it
Important Note: If we run our experiment, by default it will run using the Python library on your computer, this is the ‘native’ language. We will first build this experiment to run in such a way and after we know it works, we will convert it to JavaScript.
First things first, lets save our blank experiment to our experiment folder (where our audio and img folders are). Click File > Save As > and call the experiment file something like posnerTask.
NB: PsychoPy builder files have an .psyexp file type.Lets start by changing some settings under the hood to change the background colour and other important stuff
NB: In PsychoPy, it always uses the USA spellings of words like 'color'Start by clicking the ‘Experiment Settings’
 icon on the top toolbar.
You will then be greeted with a tabbed window as in the figure below.
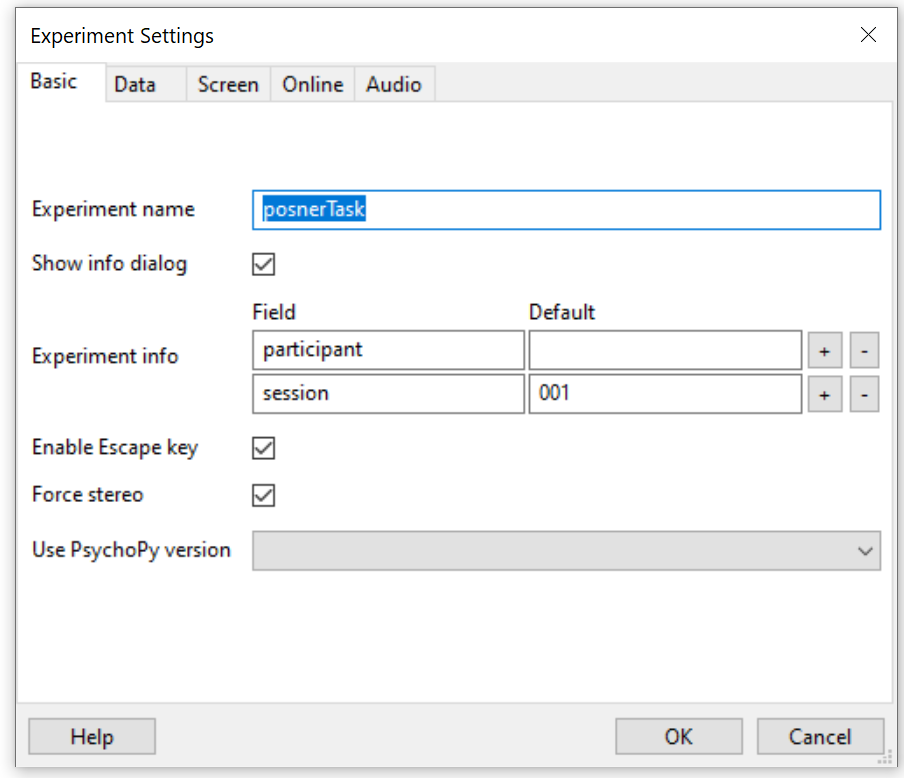
The only thing we need to change in the Basic tab is to remove the ‘Session’ experiment information as all of our participants do the same task. To do this, simply click the minus (-) button next to it.

As you may have gathered here, if we needed to collect other info from participants like Sex, Age etc, we could add fields using the plus (+) icon. For this example, we are actually going to collect that info via Qualtrics.
Next up we have the Screen tab. Here we can change information relating to the screen. What is meant by screen is actually not what you think it is. Screen relates to the ‘window’ rather than your monitor. In the context of an online study, screen means ‘viewport’, or in other words, ‘browser window’.
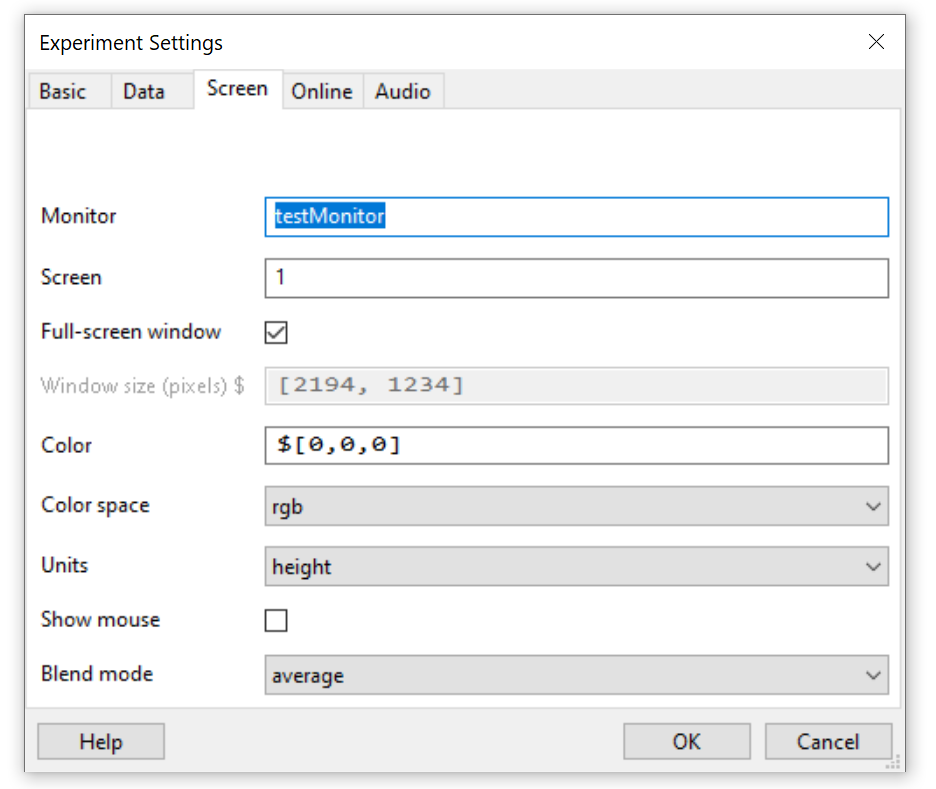
We want to change the color. I actually prefer black backgrounds, but this of course depends on the needs of your study. For example, a gray background might be good for eye tracking. You will see rather confusingly that the Color value is $[0,0,0]. you might be forgiven for thinking this refers to RGB values (0-255), but it actually ranges from -1, -1, -1 (white) to 1, 1, 1 (black). A quick hack is to simply type black.
The next field of interest is the Units. We have lots of options, but for online studies with lots of different screen sizes etc., we need to use ‘Height’. This essentially is a relative unit whereby the screen height ranges from 0.5 (top), to 0 (middle), to -0.5 (bottom). The x-axis is calculated relative to this height unit. Read more about units here. don’t worry too much about this yet. We will get to it later. I would leave Full Screen ticked.
Next tab is Online. There are only two important things here: 1) to ensure here is the Output path is empty. This basically means when you save and export to online format (a combination of HTML and JavaScript), it will save the structure in the root folder, where your .psyexp is. 2) under the additional resources tab, its probably worth clicking the '+' and adding your pictures and sound files. Click OK to save an continue...
After you’ve changed all those settings click OK.
Lets start putting our experiment together. The first thing we want to show is some instructions and wait for participants to press the spacebar once they are ready.
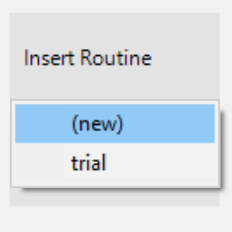
There is already a trial routine in the Flow, which we will leave for later. Lets create a new routine call ‘instructions’. click Insert Routine (left of the flow pane). A drop down menu will appear with either (new) or trial. We want (new) as per the image below.
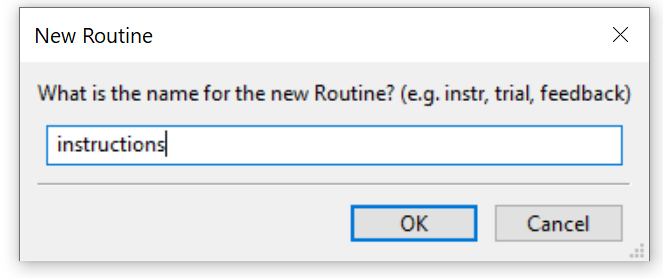
Next, we will be asked to give it a unique name with no spaces or symbols. I have called mine instructions as below
When you click OK, you now have to place it in the timeline. Where it will be inserted depends on where the black dot appears. When its in the right place (i.e. the dot is to the left of the trial - as in appears before the trial routine) left click and it will insert itself. See below
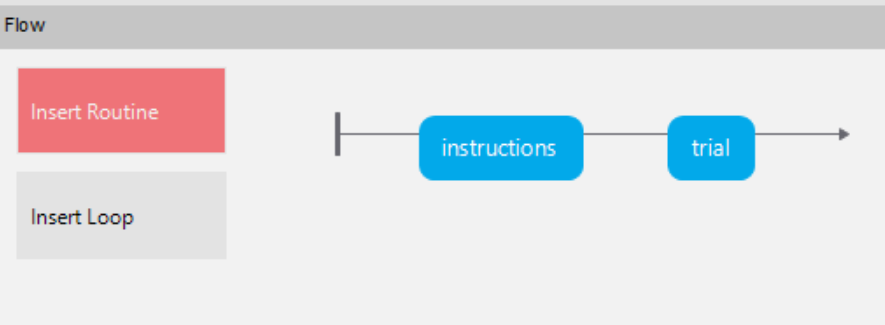
NB: You can move a routine by right clicking it, clicking 'remove', then clicking Insert Routine again, and instead of clicking (new), click the routine's name.Now we need to build what will be shown/included in this routine. Click it in the flow to ensure it is displayed in the main window (you can also ensure this by looking at the tab at the top of the main window).
We want to display text and wait for a response so the first thing we need is a text stimulus . look over to the Components tab and click the ‘Text’ icon
 , it will either be under Favourites or under Stimuli. You will then get the following window:
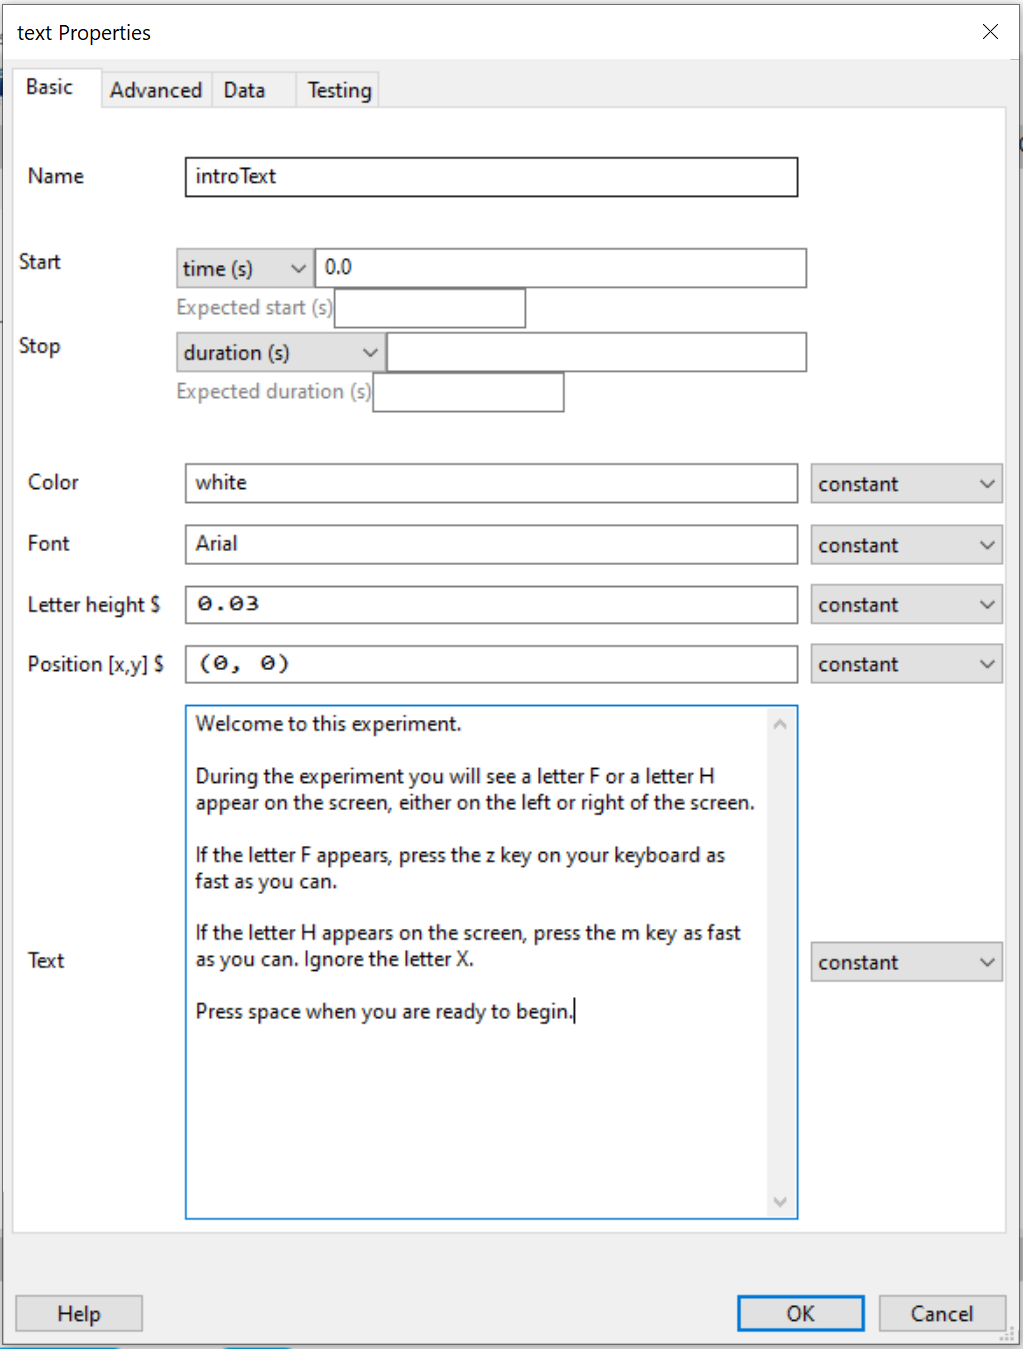
As you can see above, I have changed the following settings:
I have given it a sensible name (introText)
I have left the start time as 0 but changed the duration to blank (which means endless)
Changed the letter height to 0.03 (so 3% of the height of the screen).
Added the following Text with some extra spaces:
Welcome to this experiment. During the experiment you will see a letter F or a letter H appear on the screen, either on the left or right of the screen. If the letter F appears, press the z key on your keyboard as fast as you can. If the letter H appears on the screen, press the m key as fast as you can. Ignore the letter X.
After you’ve made those changes, click OK. Your text object should appear in the timeline as below. Notice how the blue bar extends beyond the window? - This just means its displayed or ‘running’ for unlimited or undetermined amount of time. In this case we are configuring the routine so it should display our instructions until the participant presses the space bar.

Now, if were to run our experiment it would load and display our text. However, as we didn’t tell the experiment how to end that text display (i.e. listen for a keyboard response), it would be stuck there forever with no way to interact with the experiment!
Lets now add a keyboard response component to allow us to end that routine and advance through the study.
Under the Components pane, click the keyboard component
 appear:
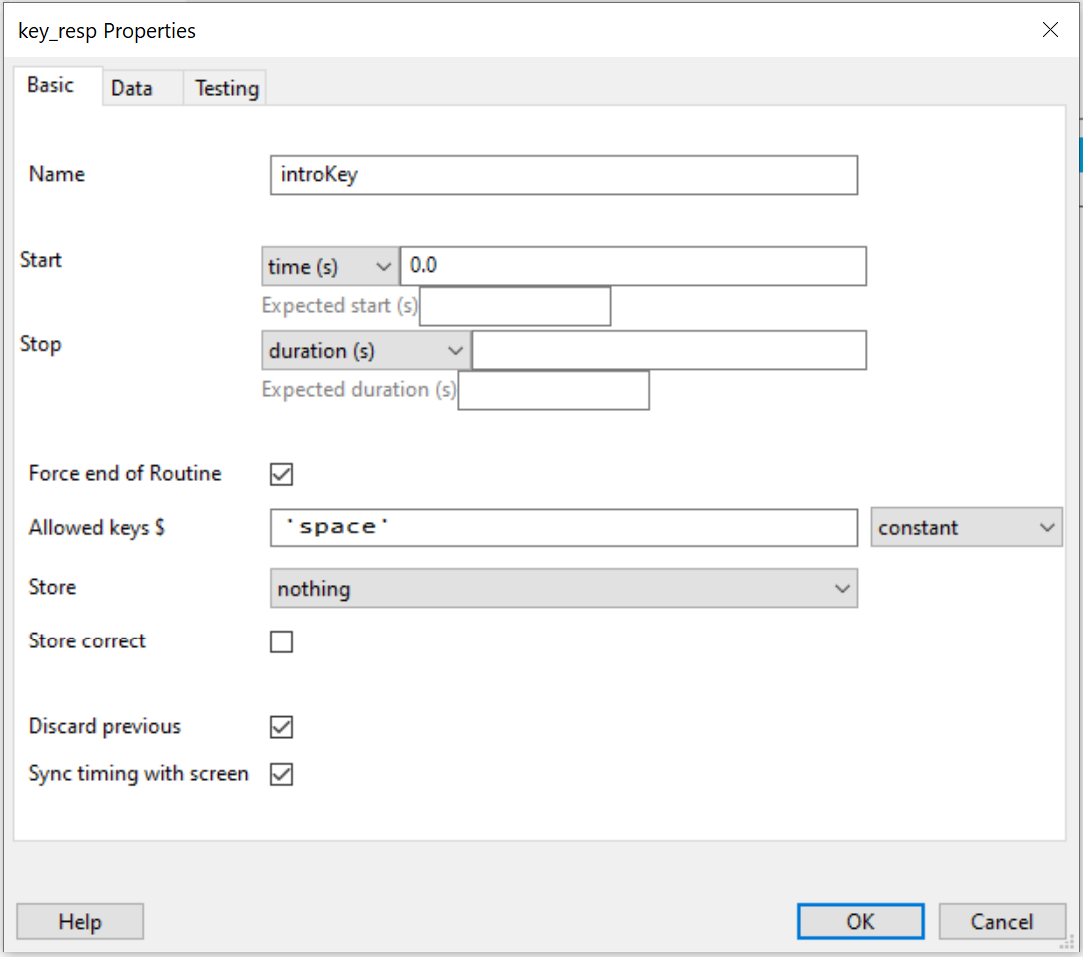
As you can see, I have edited the settings to the following:
I have given it a sensible name (introKey)
Left the start as 0, and changed the duration to blank (so on for unlimited/undetermined time).
Ensured Force end of Routine is ticked so that upon valid key press, it ends the intro routine.
Changed the allowed keys to ‘space’ (including the quotes). What this field asks is what are the allowed keys? If a key is pressed but isn’t in the list, it won’t accept it or end the routine.
Changed Store from ‘Last Key’ to ‘Nothing’. As this is an arbitrary keypress, we don’t need to store what was pressed or how long it took participants to do so. This helps reduce necessary clutter in our data file.
Once you have made such changes, click OK to accept and you should now see your keyboard under the text in the routine timeline.

Lets test our program. Click Save, and then click the Run button on the top toolbar

You will be asked to input a Participant code, juist make this up for testing purposes.
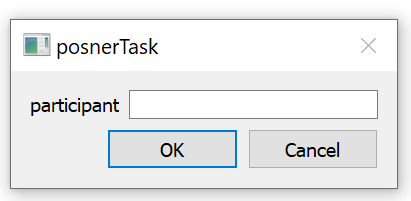
Your experiment should run full screen and when you press spacebar it should end.
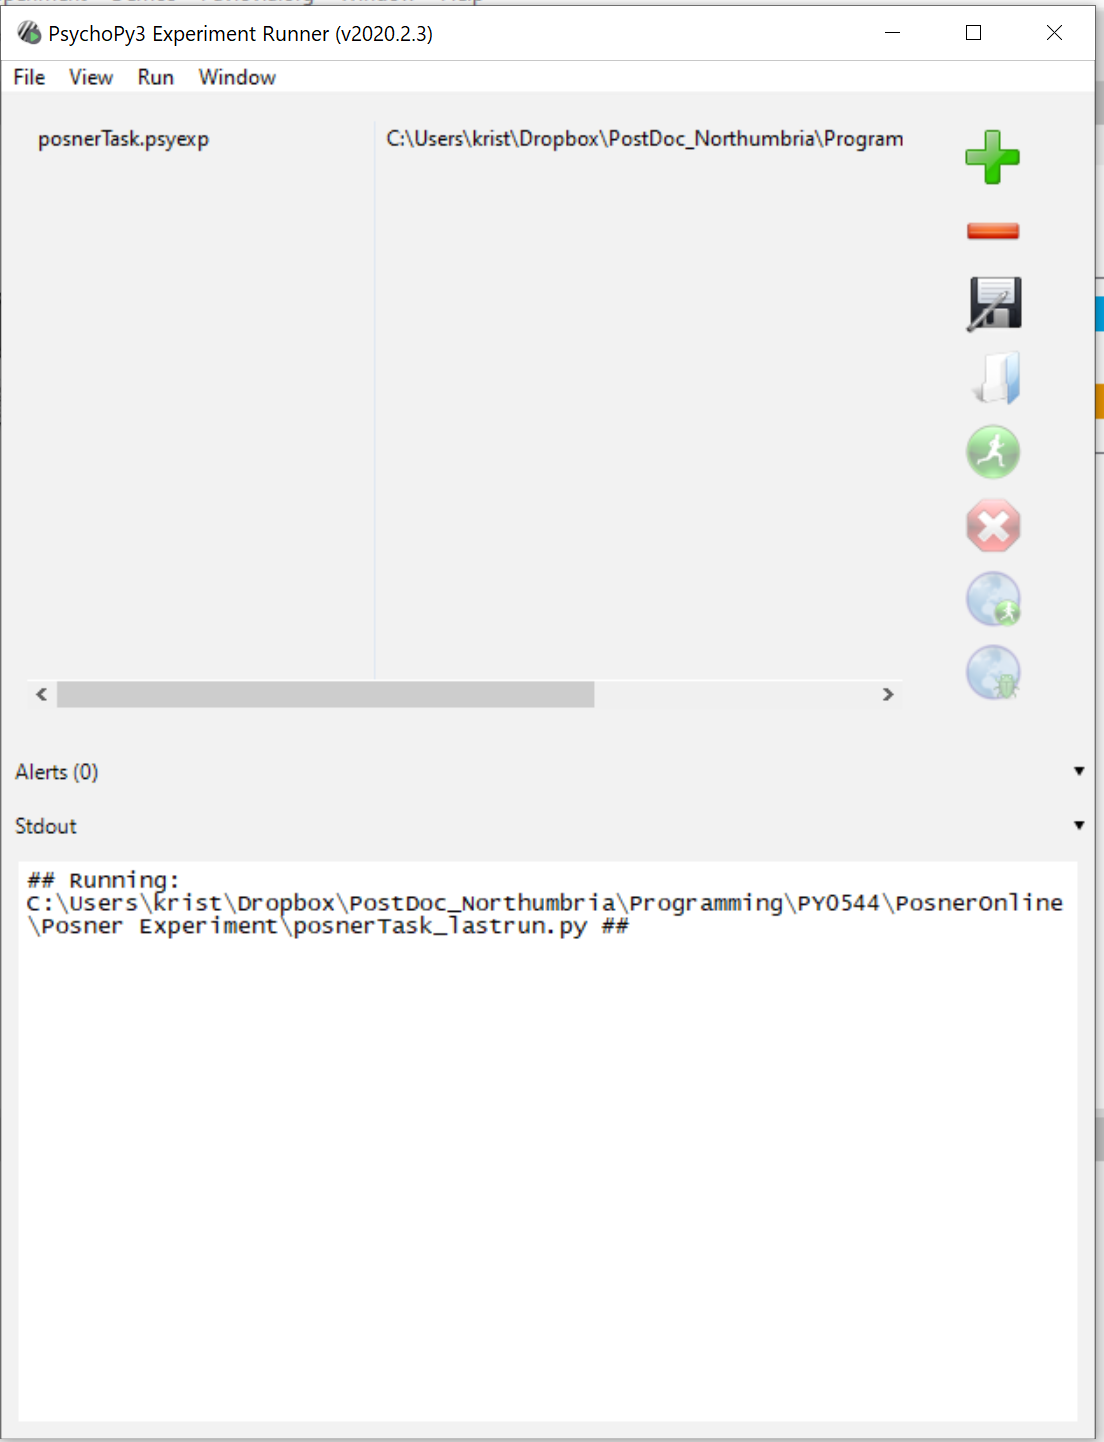
When it finishes you may see the Runner window below. You can close this if all went well. If not, make a note of the text in the ‘stout’ window as it will give us a clue of what went wrong.
A trial in our experiment runs in the following way:
To start with, why don’t we ‘hard code’ a single trial, make sure it looks ok, and then once we are happy we can make it dynamic.
Lets start by clicking on the trial routine to show its (currently blank) contents in the main window.
NB: If you deleted the trial routine, create a new routine after the introduction by following the instructions in the introduction routine above.To keep things simple, lets make our fixation cross a simple + in the centre of the screen. We will use a text object for this

start time (s) remains at 0, but the duration needs to be set to 0.75Here is my fixation object:
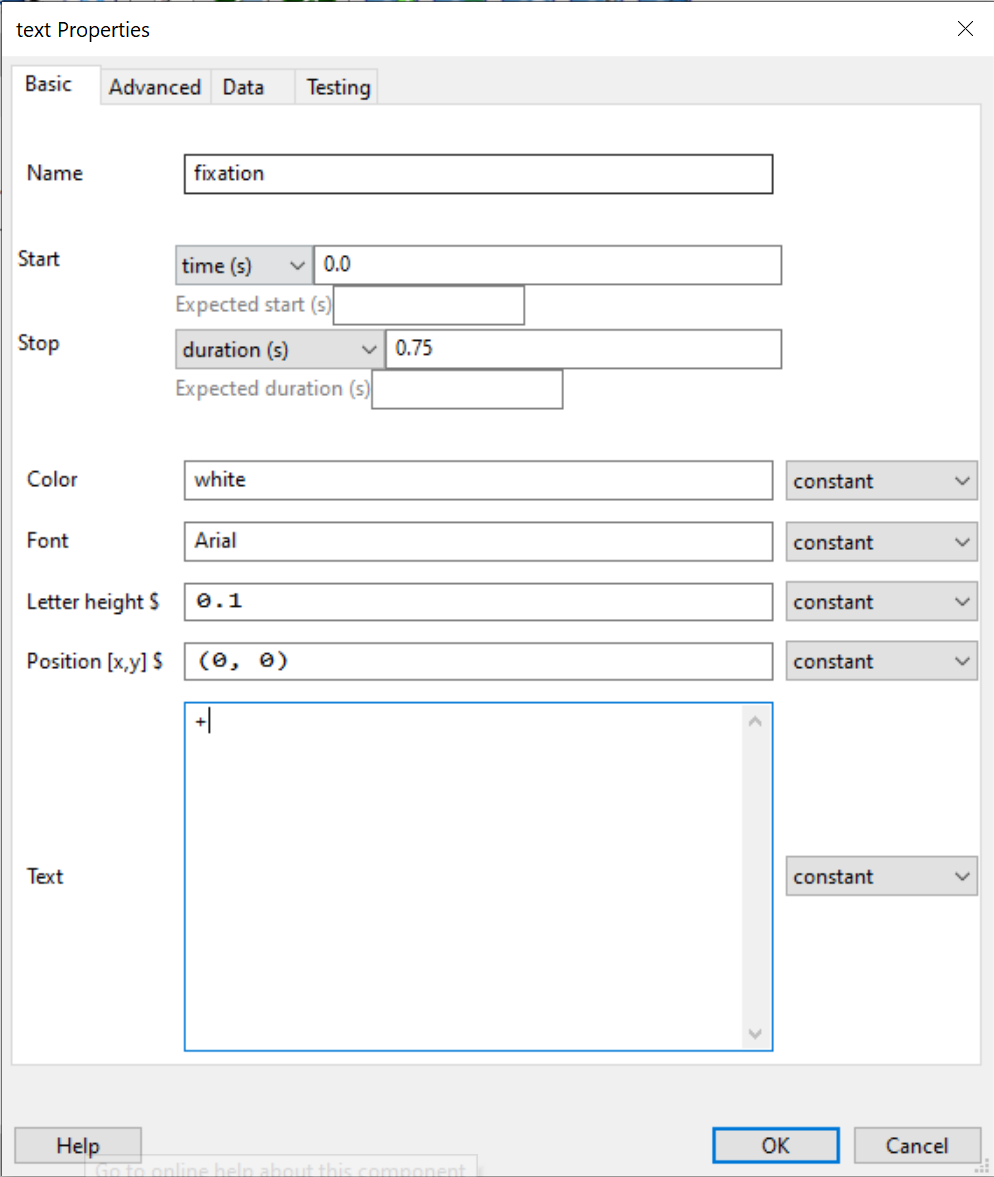
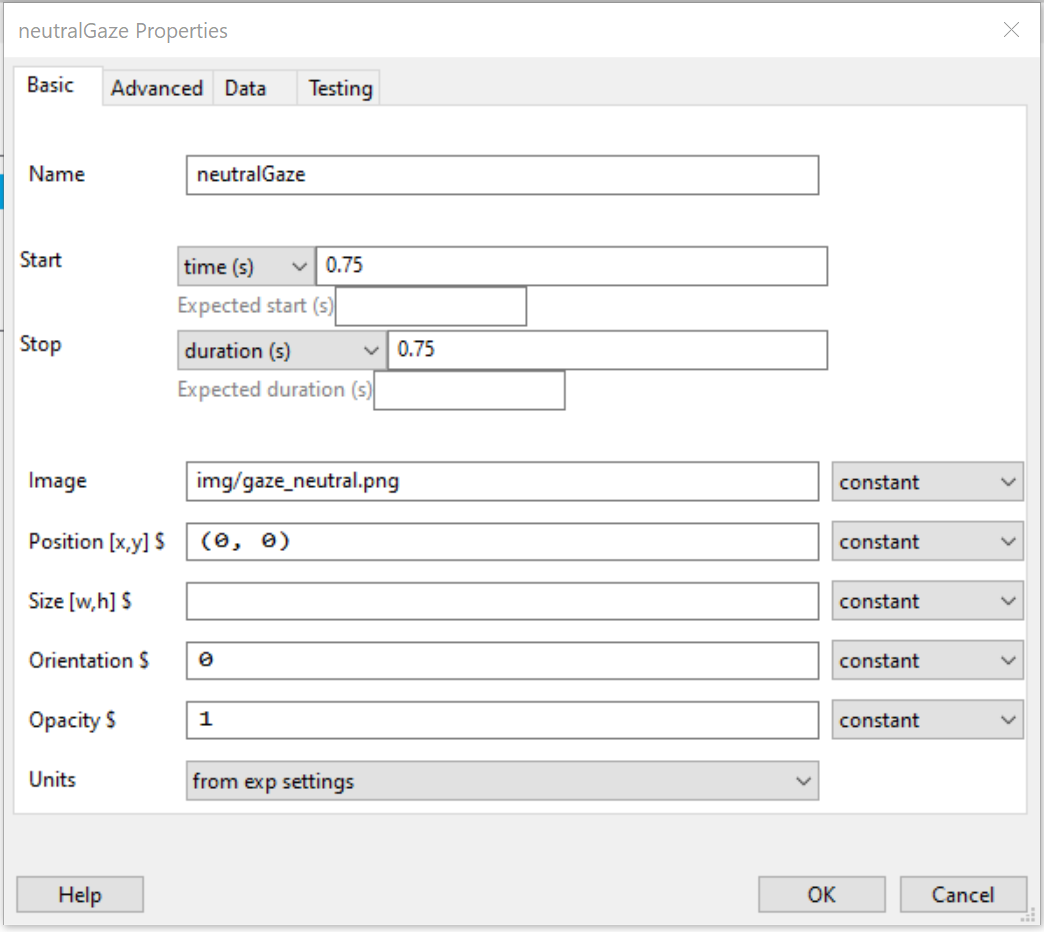
Next up we have the Neutral Gaze image, which is on the screen for another 750ms. For this we need the image object
![]()
Image field needs a file path. My path is simply img/gaze_neutral.pngSize boxMy neutralGaze image object looks like:
The Gaze Cue is next (i.e. what direction the eyes look). Now, in our experiment this will change trial by trial. However, for this first pass lets just hard-code it to look left (so we can see it displays correctly).
Using the instructions from the Neutral Gaze section above, see if you can figure out how to display the Left Gaze Cue image for 500ms.
How did that go? Below is my gazeCue object settings
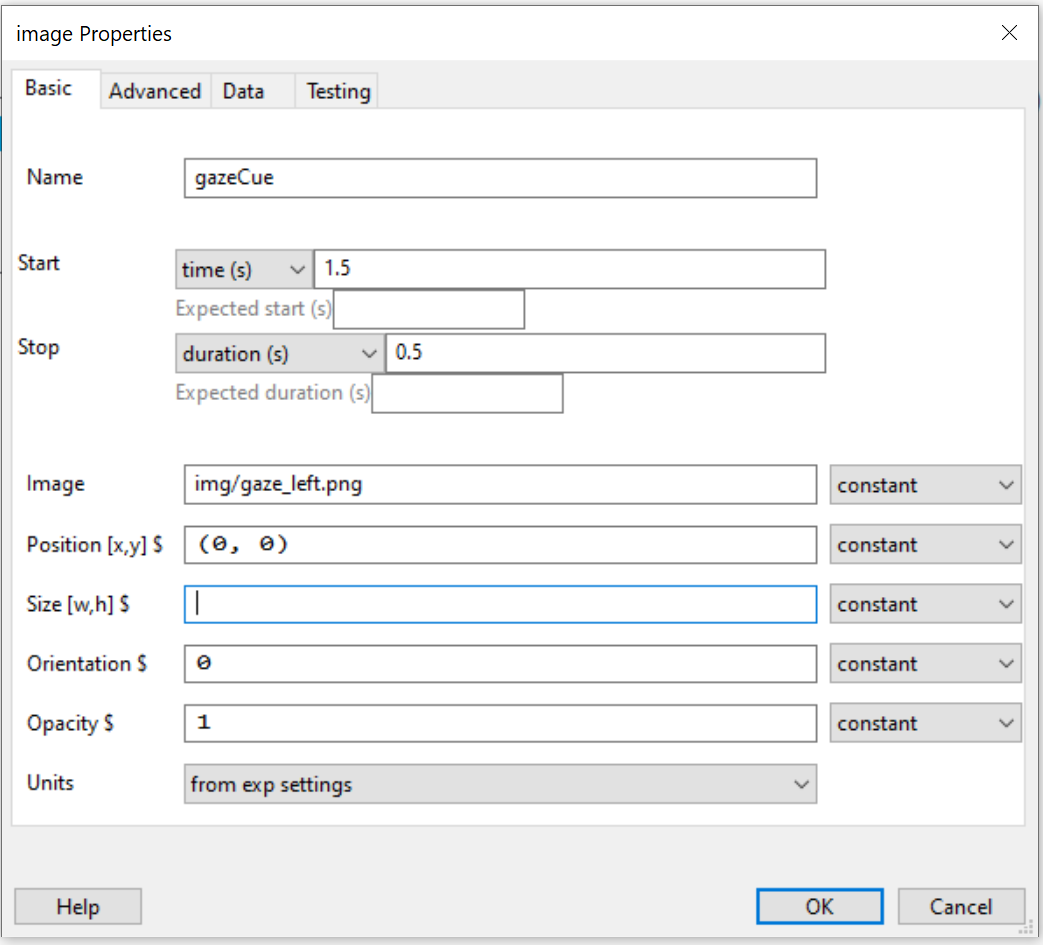
The target is either a letter H or a letter F and will appear either on the left or right hand side of the screen. Like the gaze cue, this would be dynamic in the real experiment.
For our first pass though, lets make it the letter F, and it appear on the left of the screen. The distractor should be an X and appear on the right hand side of the screen.
If you create your text objects as normal, but now we need to interact with the Position field to place these on the left and right of the screen……
Just like Opensesame, we place or plot objects in our window/viewport using Cartesian Coordinates:
We are using Height Units. The details from the PsychoPy Units website says the following:
Height units
With ‘height’ units everything is specified relative to the height of the window (note the window, not the screen). As a result, the dimensions of a screen with standard 4:3 aspect ratio will range (-0.6667,-0.5) in the bottom left to (+0.6667,+0.5) in the top right. For a standard widescreen (16:10 aspect ratio) the bottom left of the screen is (-0.8,-0.5) and top-right is (+0.8,+0.5).
So if we create a grid with these extremes, you get the following:
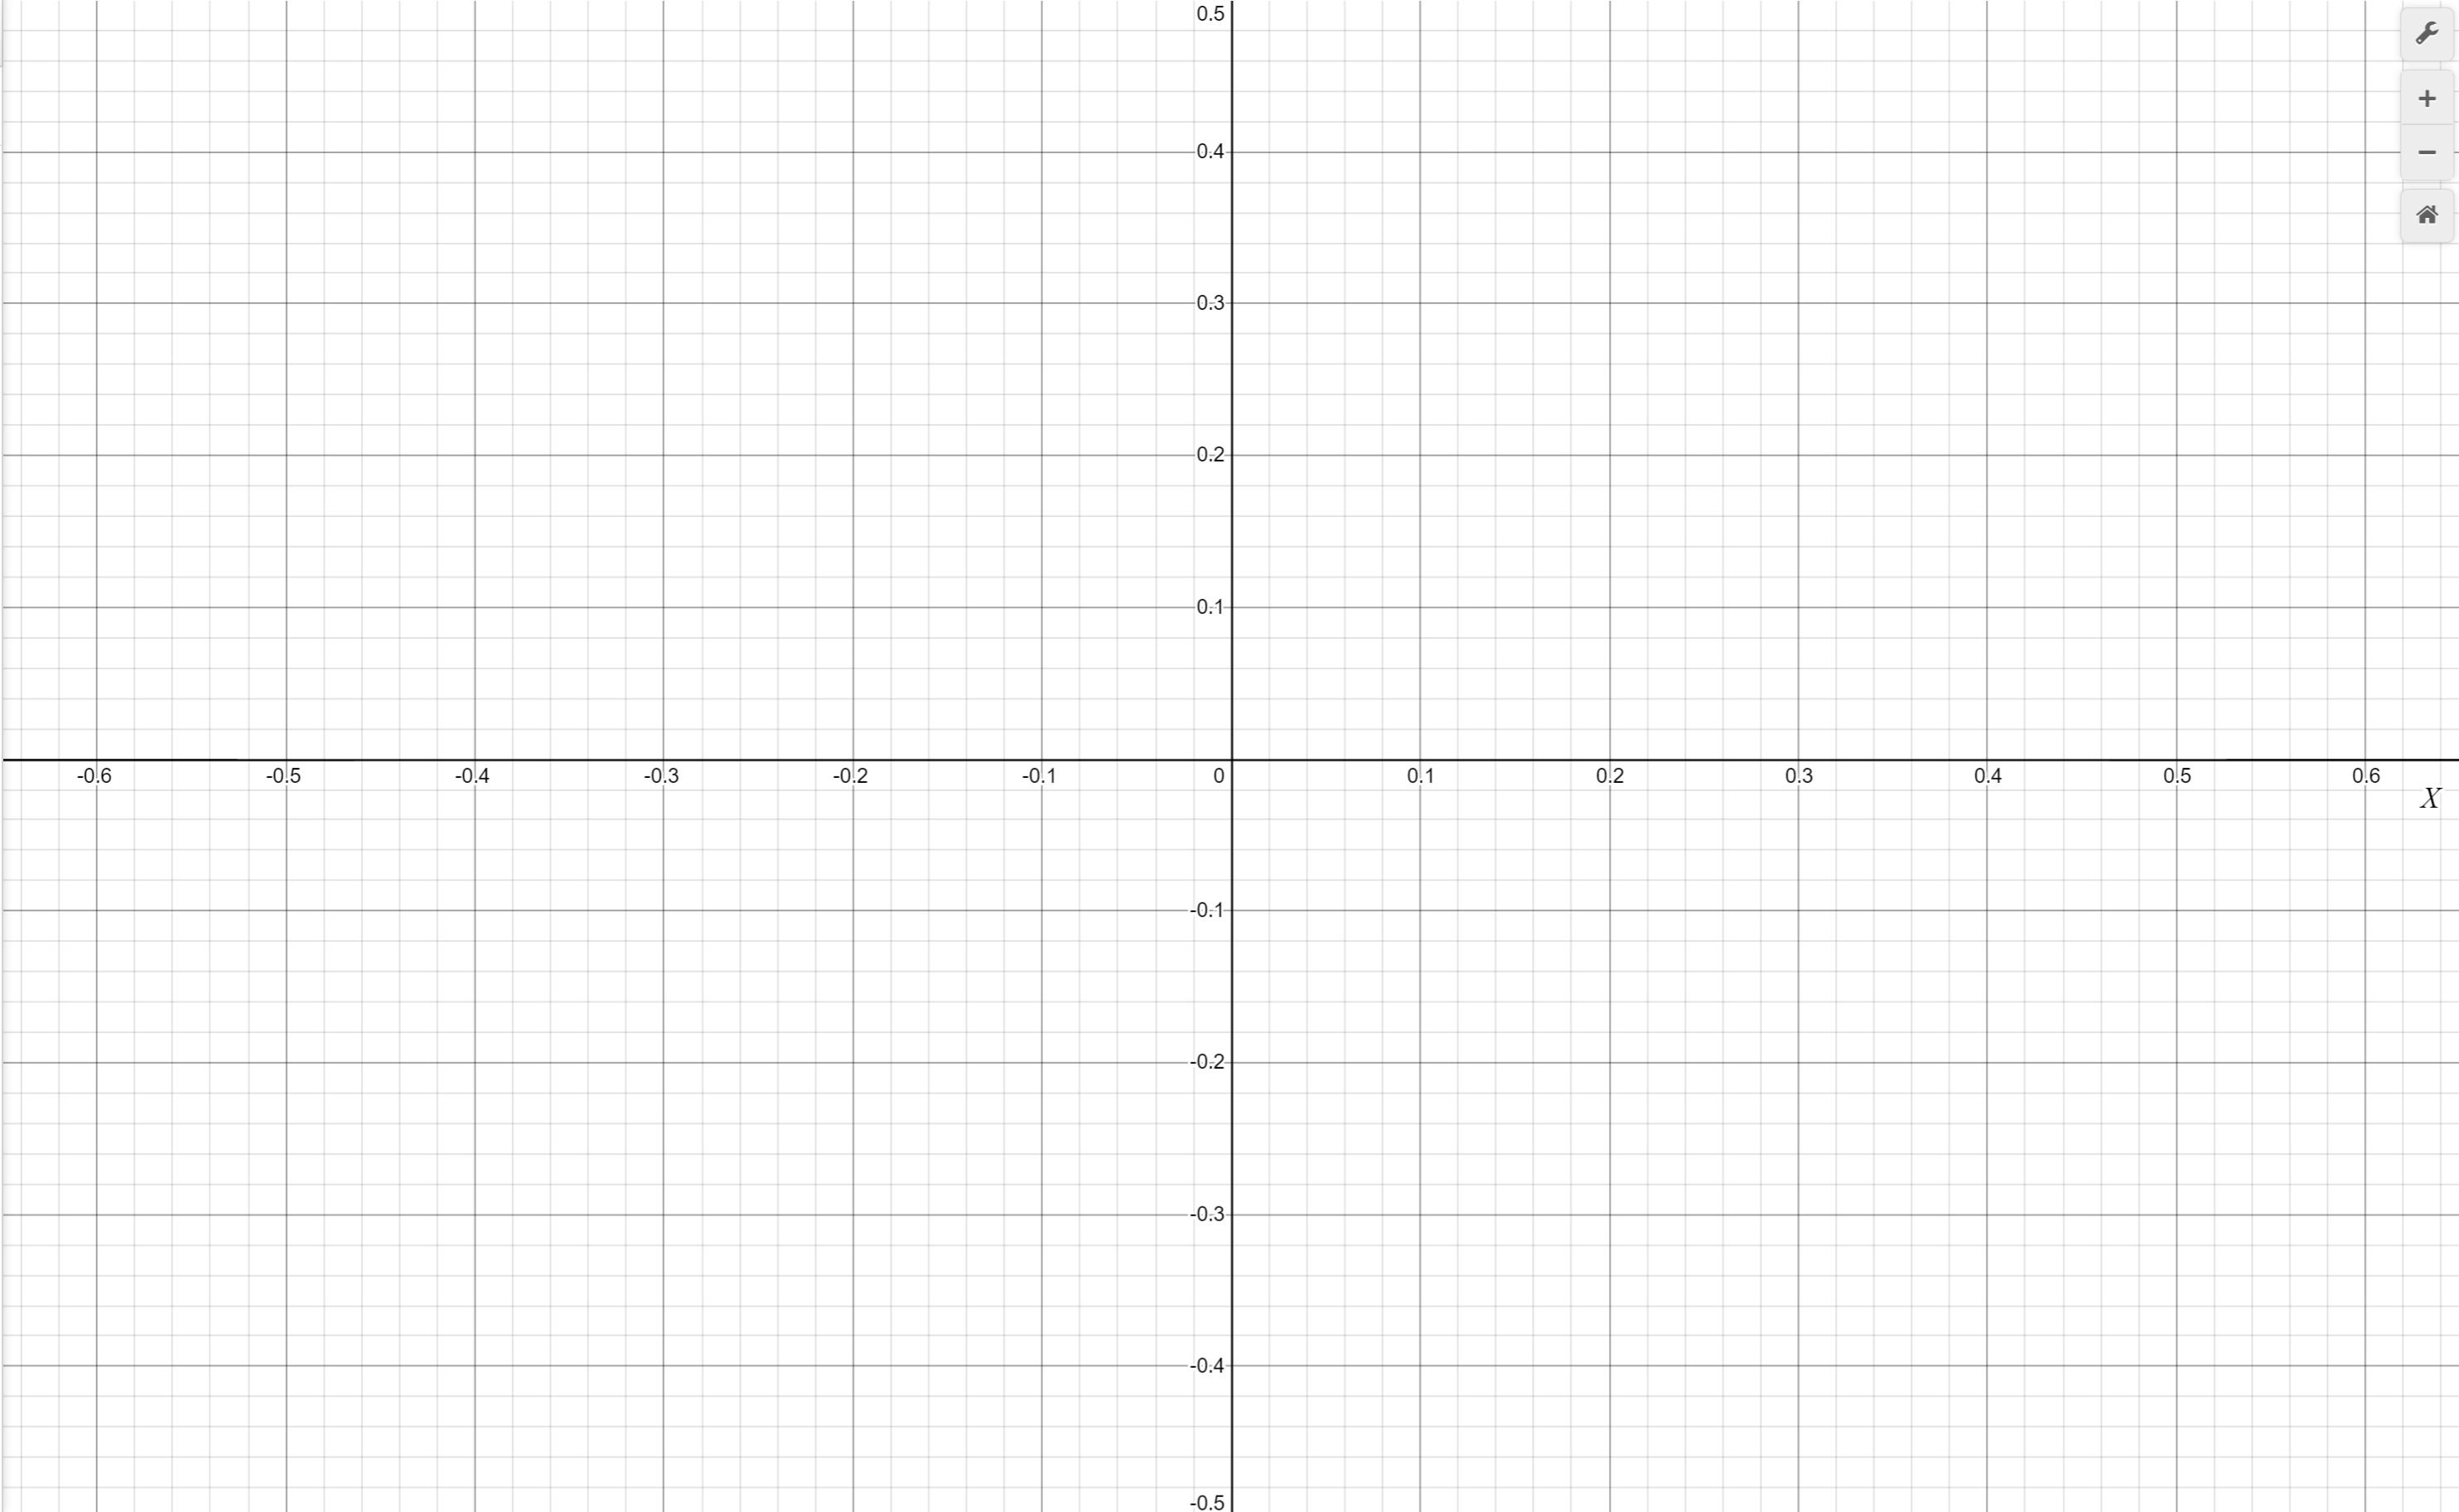
We want our F (target) and X (distractor) letters to be placed in the middle-left and middle-right respectively. Can you work out what your x, y coordinates will be for this? - Have a go using the grid as a guide.
What I got for my target letter was x =-0.65, y=0, and for my distractor I went with x=0.65, y=0. If you got stuck here, see if you can plot my coordinates on the grid above.
So, We now know how to position our target and distractor for our trial, which means you now have all the tools to make your objects, remember they both should start after the gaze cue. Below are my settings for each, did you get the same?

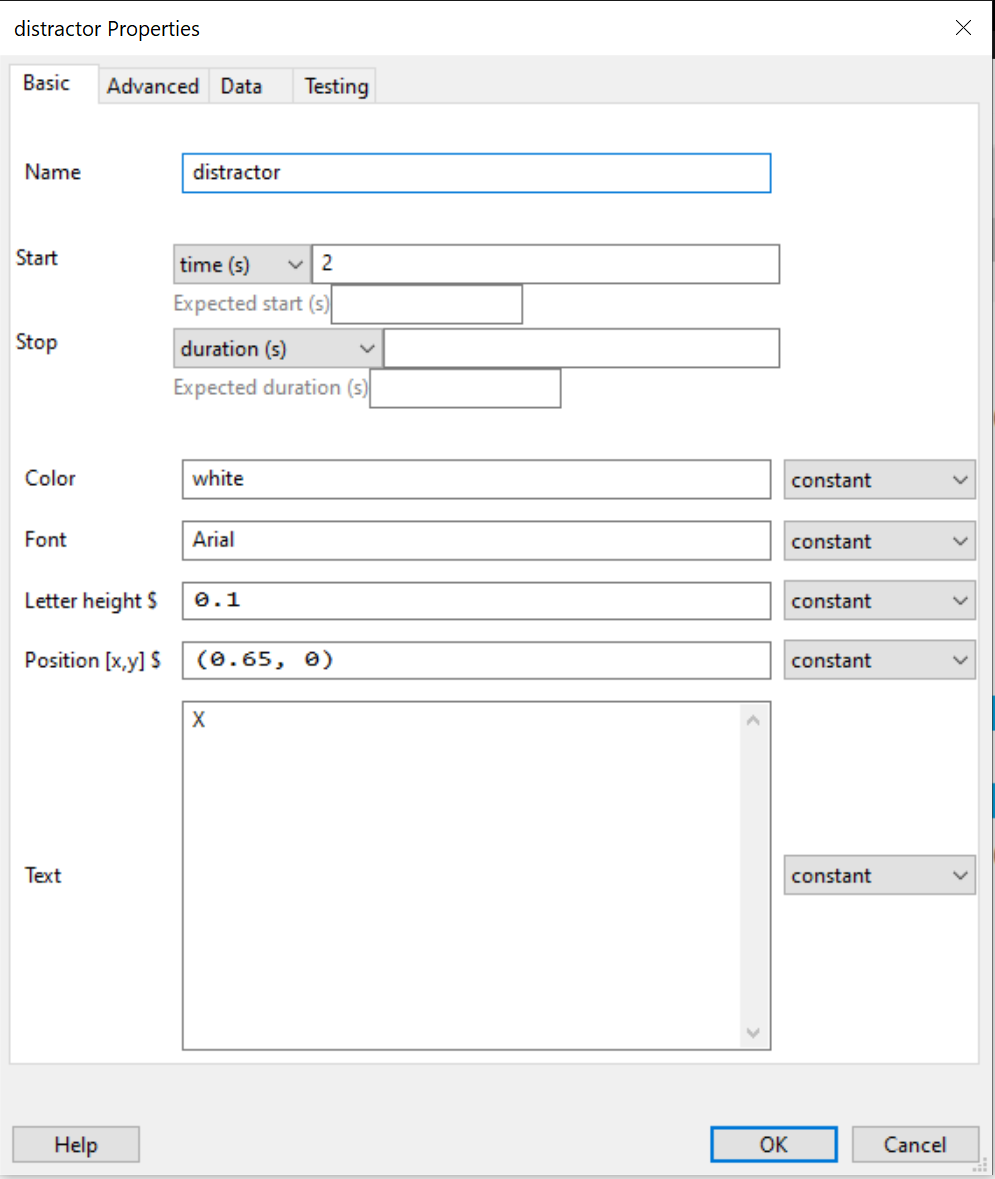
Notice how the duration fields are blank again? - remember this simply means ‘undetermined’.
The final thing to do in our trial is record the participants response using the keyboard. This object should begin when the target and distractor begin, and again go on until the participant makes a response.
We only want to capture either the z key or the m key. This means that in the Allowed Keys field, we need to put 'z', 'm' with the quotes and the comma.
This time we want to Store the Last Key, otherwise the datafile won’t save what they pressed, nor their reaction time.
Finally, in the final version of this we also need to store the correct response, but we will get to that later.
Below is my keyboard object settings
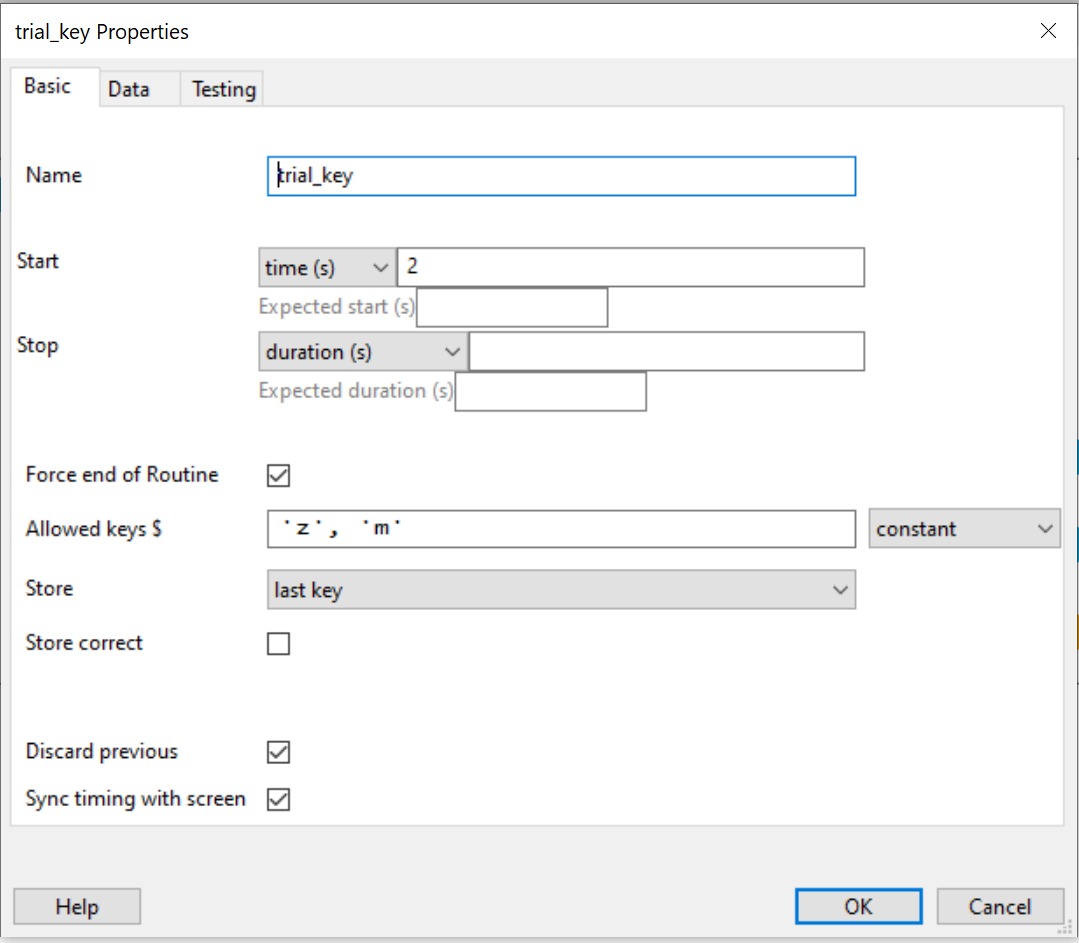
Ok, so we have added the nuts and bolts to our trial routine. We hard coded it to see how it will look. So, your routine should look like the following:
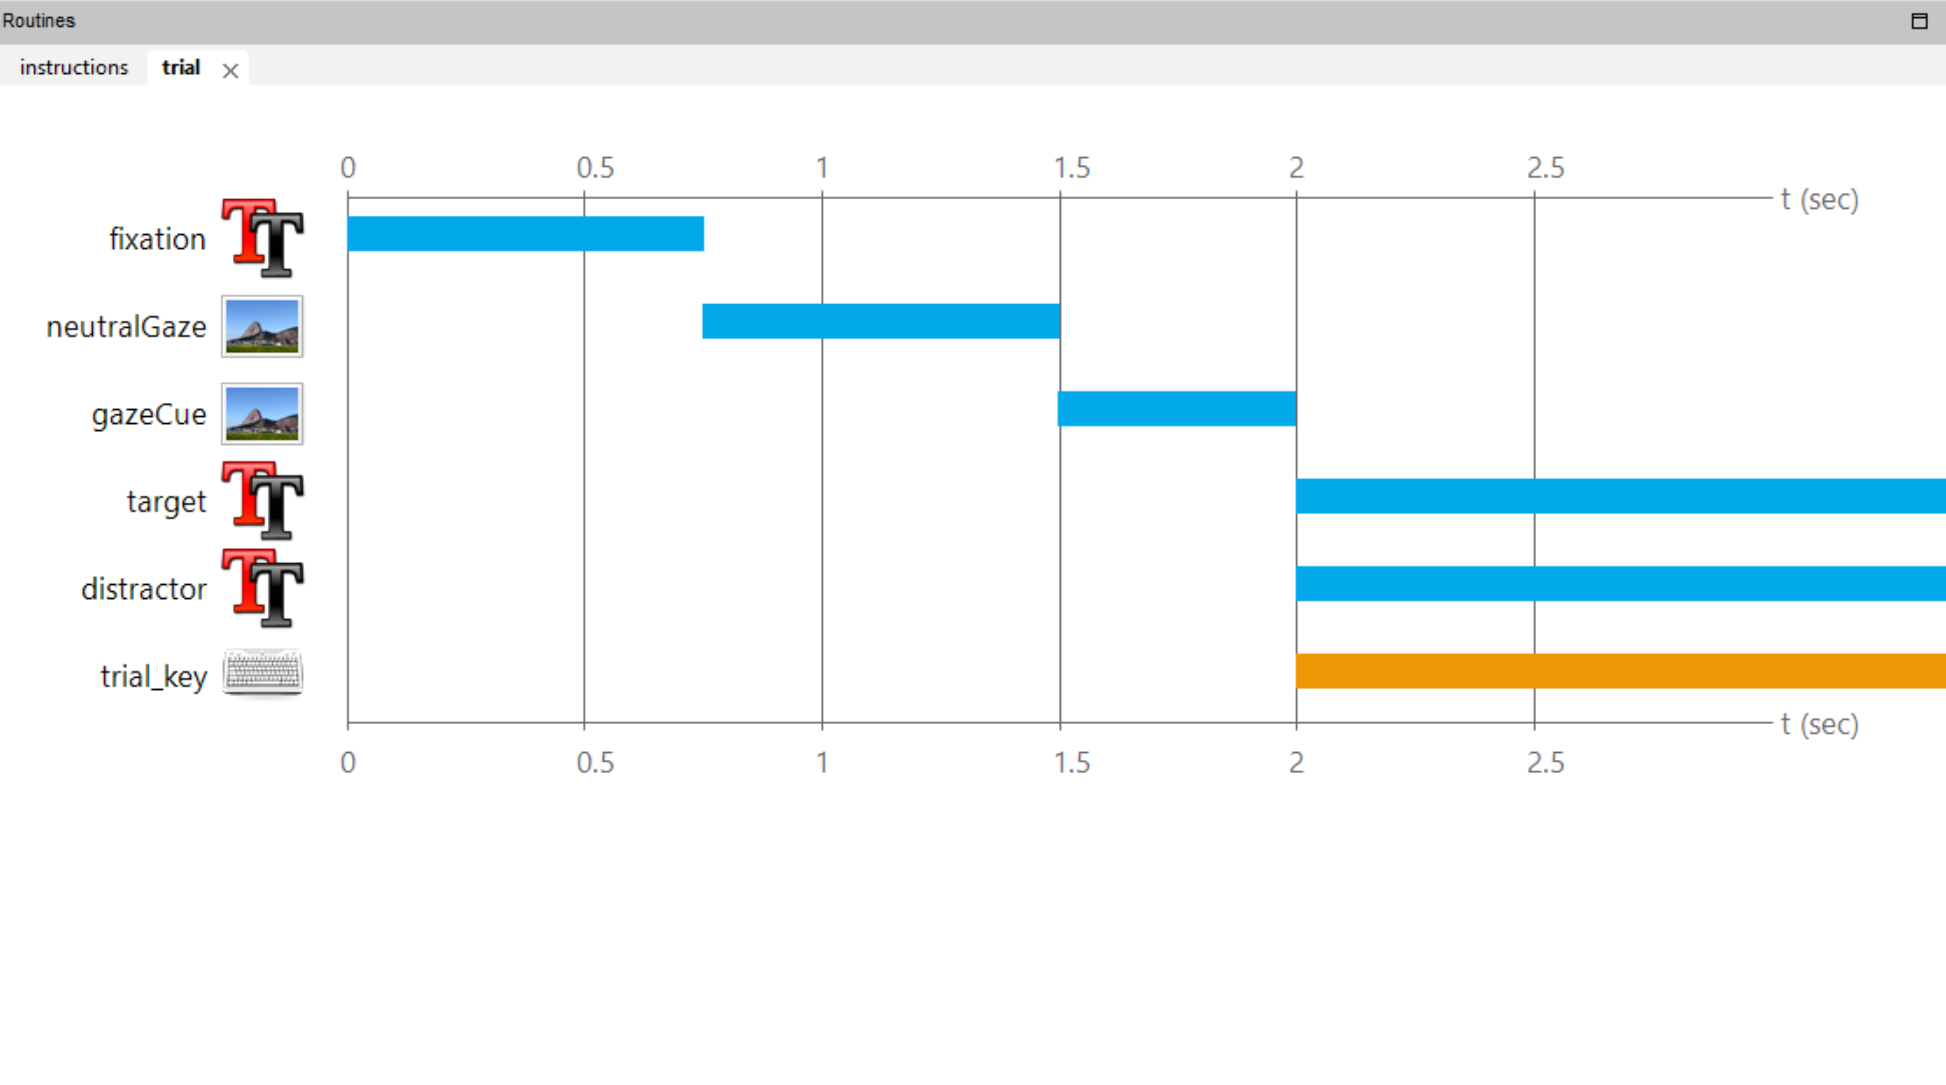
When you are ready, click run button and see if your experiment runs correctly so far and you can press the z or m keys when you see the target and distractor.

Currently our study has one trial, and it is the same for everyone (i.e. hard-coded). Of course in the real experiment there will be all combinations of trial delivered to participants. We could of course create a routine for every trial but this is horribly inefficient. Instead, we will use a Loop to go over the trial routine and change the parameters for each trial dynamically.
Back at the start of this tutorial, we created an excel file that had all combinations of trial in it. We will use this as our trial list. If you imagine each row of the table as a trial and the Loop object in PsychoPy simply picks a row and presents that, then the next, then the next and so on.
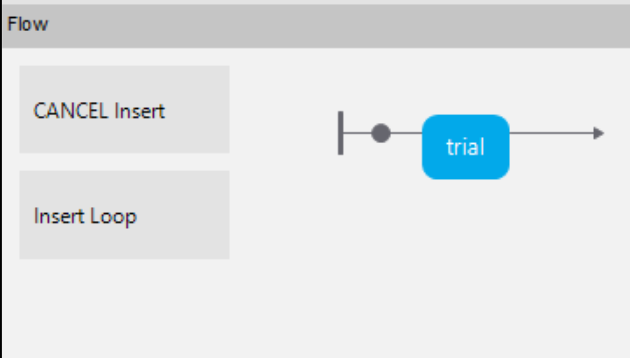
Lets put our Loop in place around the trial. To do this we simply need to click on Insert Loop in the Flow. You will notice when you first click it, some text will appear at the bottom that says:
Click where you want the loop to start, or CANCEL insert. First thing to do is to set the start of the Loop. In this study our loop begins just before the trial routine as shown by the black circle in the picture below. Once your black circle is here, simply click.
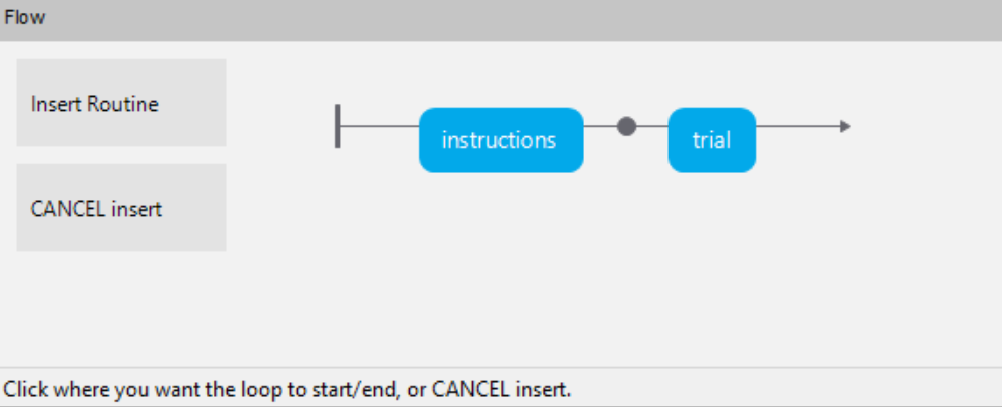
After you click the start, it will then ask where the end of the loop is and give you control of another black circle. Our loop ends after the trial routine as shown below. :
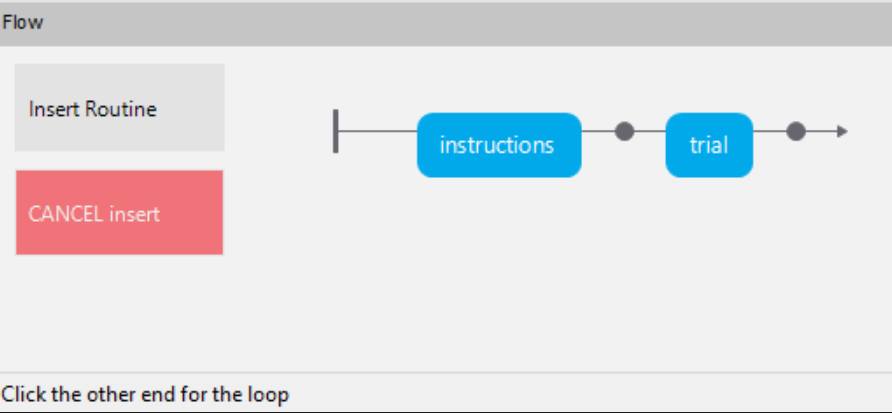
Once your circle is in place, simply click.
After you set the end, another window will appear called ‘Loop properties’ (shown below). This is where we can direct the loop to be based off our Excel table and set it up for our needs.
Lets keep the loop name as trials as this is decent description of what the loop represents.
Under Conditions we can click Browse and select our trials.xlsx Excel file.
Once you do this you will see (pic below) PsychoPy has read the table and is telling us that there are 8 conditions (trial types), each with 6 parameters (columns).
We want to run over this file 3 times to make 24 total trials (basically participants see 3 of each type of trial), so I have set nReps to 3.
I have left loopType as random so it shuffles the 8 rows each time, and left the isTrials box ticked so our data file looks sensible.
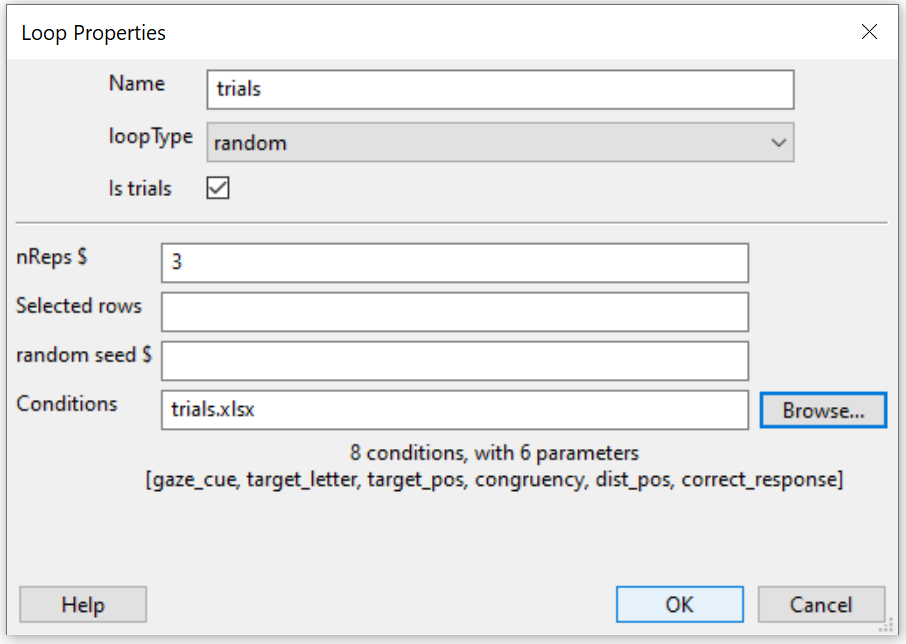
Once you have set this up, click OK.
You will see in the Flow that a Loop has been created around our trial routine. Every routine within that loop gets repeated how ever many times you have set up in your Loop Properties. You can see that it reports 3x8 random, which is how many times the contents of the loop are run.
If you need to look into the Properties of the loop again, simply click the loop name (trials (3x8 random)).
Internally what we have done here is set up 8 variable names based on the 8 column names in our excel table: gaze_cue, target_letter, target_pos, congruency, dist_pos, and correct_response. Each run through the loop, these variables will have different values. So, if we look at an excerpt of our table (shown below)..
| gaze_cue | target_letter | target_pos | congruency | dist_pos | correct_response |
|---|---|---|---|---|---|
| left | F | left | congruent | right | z |
| right | F | left | incongruent | right | z |
| … | … | … | … | … | … |
… our values for the first run through would be
gaze_cue = left
target_letter = F
target_pos = left
congruency = congruent
dist_pos = right
correct_response = z
… and the next iteration of the Loop, the values would be
gaze_cue = right
target_letter = F
target_pos = left
congruency = incongruent
dist_pos = right
correct_response = z
These variable names are available for us to use in our trial setup so instead of hard coding say the letter F in our target object, we instead use the variable, which would be target_letter.
Lets get to work making those adjustments and making our trials work in the loop.
If you click the trial routine to show the contents of our trial, the first object that needs to change on a trial by trial basis is the gazeCue image object. Go ahead and click it to bring up the properties….
Right now, it looks like this:

In the Image field, we have an image path (img/gaze_left.png) which is hard coded to the left looking eyes. If we left this as is, it would show the left looking eyes on every trial, which of course we don’t want. We want to change this field to look at what is in our gaze_cue column to decide which direction the eyes look.
To achieve this, we are going to have to create what is called a string concatenation. Don’t worry, this is really quite easy.
Strings and Concatenation
In computer programming every object or variable has a 'type' and this dictates what we can do with it. Some common object types are integers (whole numbers, like 5) and floating points (like 2.5). If we think of integers, we can perform arithmetic (in other words operations/methods) on them like 5 + 4 to make another integer, 9, or 5 * 4 to make 20.

Another type is a 'String'. As you might guess, a string type is a combination (or String) of characters for example, "This is a string". A String can also be only 1 character like "b".

In Python (the language PsychoPy is based on), a string is identified and encased in double quotes " " for example, "This is another string".

Weirdly, Strings can have numbers in them like "5" but if it is a String, we can't do arithmetic on them in the same way. If we did "5" + "3" the output would be "53". What we have just done there is concatenated two Strings together, the "5" string and the "3" String.

An easier concatenation example would be using two Strings with letters in them: "Hello my name is " + "Kris". The output would be "Hello my name is Kris".

A final point to make here is that behind the scenes, a space (like between every word in this document) is also a character. The same goes for when we press enter to put a carriage return in our work. Even though we don't see anything, they are still technically classed as characters. This is something to remember when we dive a bit deeper into this.
If you recall from our excel file, in the gazecue column, it either just says “left” or “right”. We can use this String to piece together (or concatenate) a file path to our gazeleft.png and gaze_right.png image files.
The string concatenation we need to put in the Image field is the following (we will break it down an explain in a sec):
"img/gaze_" + $gaze_cue + ".png"
What I have done here is split the file path into 3 Strings.
The first bit: img/gaze_", is simply the first part of the path. It is common among all images.
In PsychoPy builder, we can reference variables by prefixing their names with a $ sign. The next bit: + $gaze_cue, is concatenating (as in the +) whatever is stored in the gazecue variable from our trial loop (the gazecue column in our Excel trial list). If you recall, that is either going to be “left” or “right”, which are both Strings.
Finally, the last bit is again concatenating (+) a common String among all file names: ".png", i.e. the file type.
So, if this was a ‘left’ trial (gaze_cue = “left”), the computer would piece together the following file path:
img/gaze_left.png
The last thing we need to change in the gazeCue image object, is set the image to be set on every trial. We simply do this by changing the dropdown menu next to the Image field from “constant” to “set every repeat”.
See my settings below:
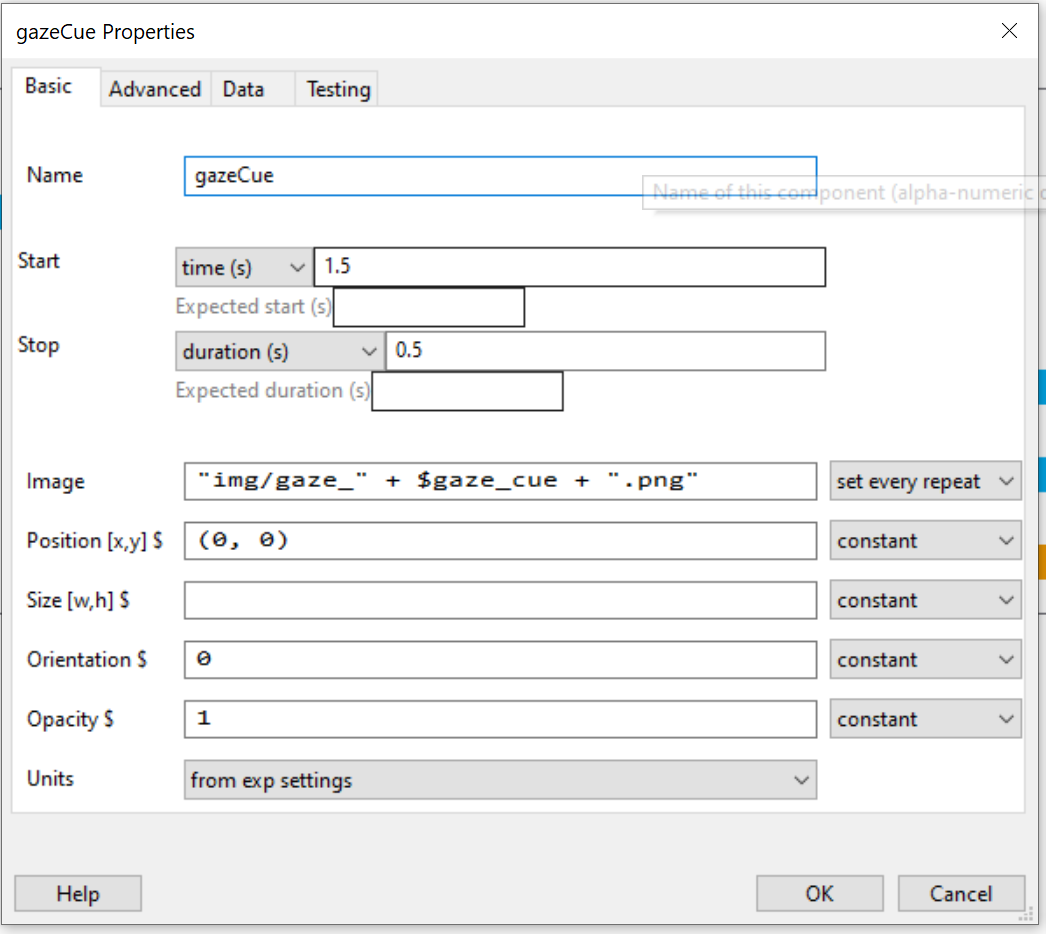
Next up we have the Target object. This needs two things to be dynamic, the Letter and its position. The fields of interest in our trial list are target_letter and target_pos.
Lets start with the easy bit, the target_letter.
Just like in the gazeCue, we need to use a variable (prefixed with a $ sign) to tell PsychoPy that the letter is set using whatever is in the target_letter column on that trial.
All we need to do for this, is in the Text box replace the letter F with $target_letter and set the field to update from constant (not at all) to set every repeat (set every trial).
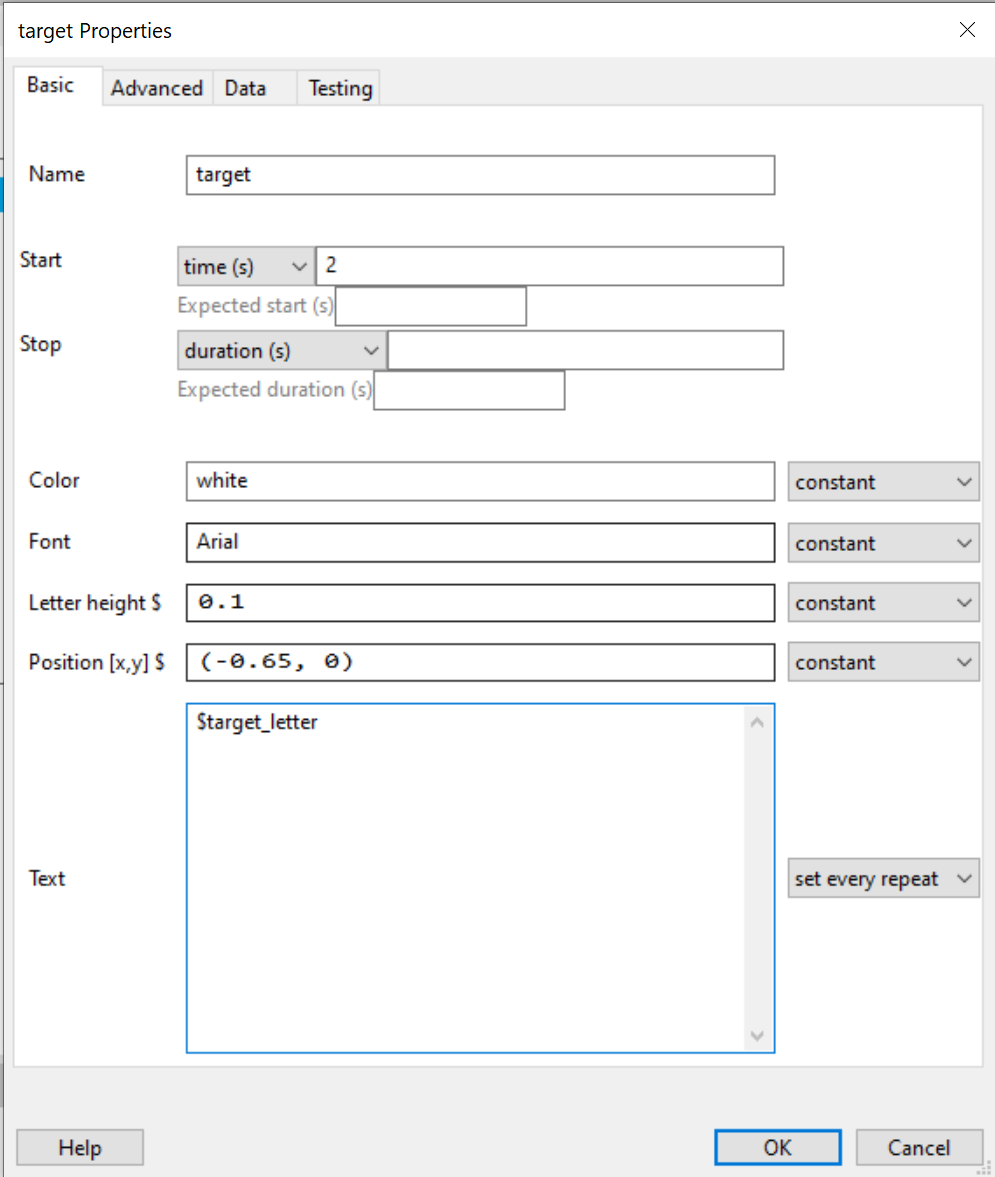
The next bit is a little bit more tricky as it involves deciding what side of the screen the target appears. If we look at our trial list we see that it says either “left” or “right”. PsychoPy requests positioning arguments to be coordinates (x and y), not just left and right.
We need some code to sort this out for us on a trial by trial basis. Click OK on your target object properties to accept your changes so far and return to the main trial routine window.
Click the code component in the Components pane. It might be under Custom.
![]()
You will be presented with quite a busy tabbed window.
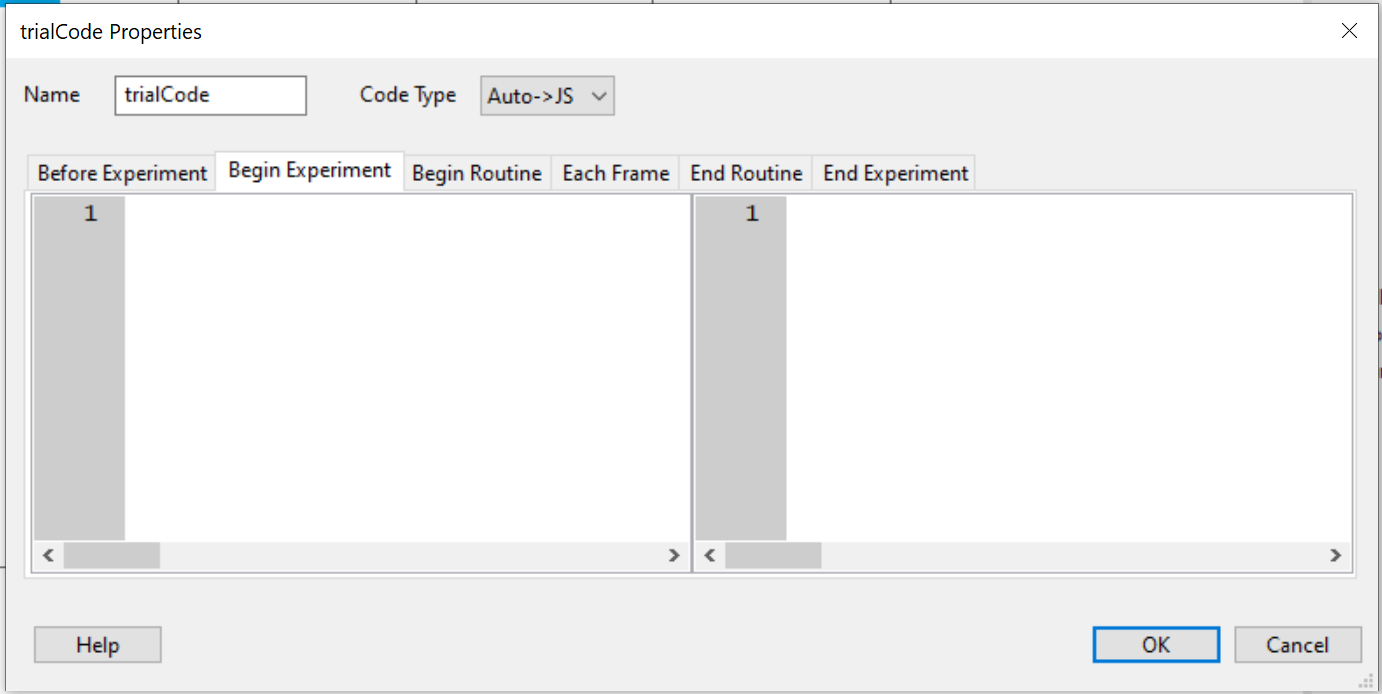
Code Components
PsychoPy is extremely flexible when it comes to making experiments, and code components are a way to inject your own code into it to customise things like feedback, custom values and flow etc.

Things get even more complicated now that you can have custom Python code (to run experiments locally on your machine) AND custom JavaScript code (to run experiments online).

The tabs dictate where in the experiment the code contained within them runs.

For example, you might want some code to only be executed at the beginning of the experiment (Begin Experiment Tab), such as deciding whether odd or even participants do a certain block order.

You might want some code to be executed at the beginning of a trial routine (Begin Routine Tab) to decide (like we will) where certain things will be placed on this trial. This is more or less the same as 'set every repeat' in your object property box.

You might want something to update frame by frame like a moving object. Finally, you might want things to happen after routines are finished, like logging custom conditions.
Lets start by giving it a useful name such as ‘trialCode’.
Now, lets make things clearer for ourselves for the time being, and change the Code Type from ‘Auto -> JS’ to ‘Both’. What this means is you type Python code in the left hand box, and JavaScript code in the right hand box.
For this code component, we are wanting to use the “Begin Routine” tab as what we are trying to achieve is to set a position for our target at the start of every trial routine (as the trial routine runs over and over again in a loop, each time with different settings).
I won’t make you learn the ins-and-outs of Python or JavaScript Programming so I have written the code out below for you and I will walk you through it in the next paragraph or two.
# This is a comment, and is designed not to be read by the computer and is simply here for programmers to leave notes. you start a comment with a #

# Lets use an if statement to decide what to do when the target_pos is left or the target_pos is right

if target_pos == "left":
    targetPosition = [-0.65, 0]
elif target_pos == "right":
    targetPosition = [0.65, 0]
First of all, copy and paste all of that code into the left box of the Begin Routine Tab, like pictured below.
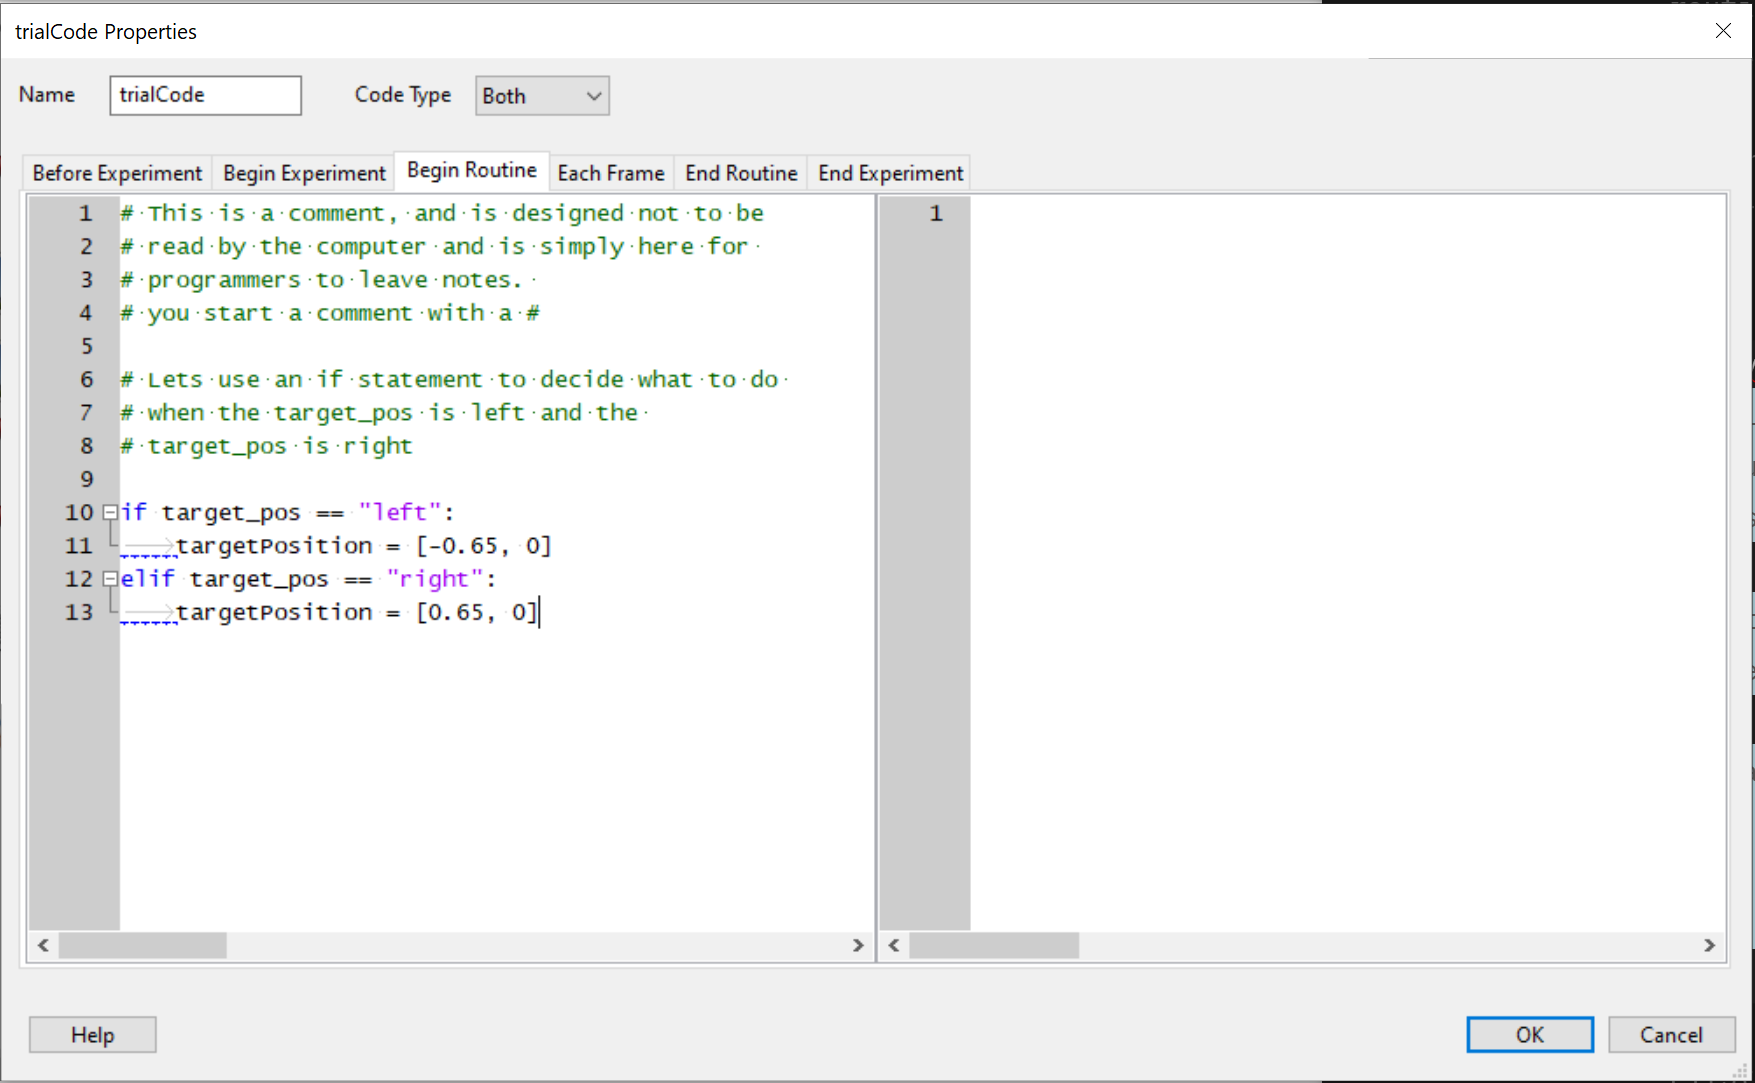
What this code does is read the variable target_pos from our trial loop and if it is equal to (==) the string "left", it creates a new variable called targetPosition and assigns it a 2-item object called a list (which is denoted by square brackets []) of [-0.65, 0]. If you recall, the -0.65 is an x position to the left of the screen (minus number), and the y position is 0, meaning bang in the middle of the screen.
If however (elif, which stands for ‘else if’) the variable target_pos is equal to == the string "right", it creates a targetPosition of [0.65, 0]. Here the 0.65 is the right hand side of the screen, because its positive.
As you have probably guessed, a list can contain many objects, in this case our list contains two numbers. When you provide PsychoPy with position information, it expects it to be a two item list with an x coordinate, and a y coordinate [x, y].
Click OK to save your changes and return to the main trial routine window.
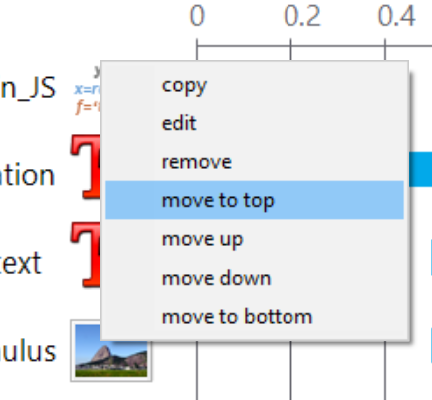
Earlier on, I mentioned that we should order the objects in our routines from top to bottom in the order you need each one. This is because behind the scenes they are created in that order. The caveat is that code components execute depending on what tab you put the code in (as explained in the Code Components section above. So, whilst its not really an issue, for logical purposes, lets move our code component to the top of our trial routine. To do this, simply right click its icon in the routine and select ‘Move to Top’
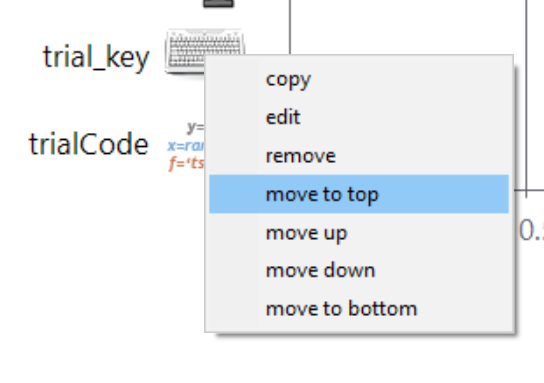
The last thing we need to do is head back to our target object and tell it to get positional information from the variable targetPosition and update this information ‘on every repeat’.
See the pane below:
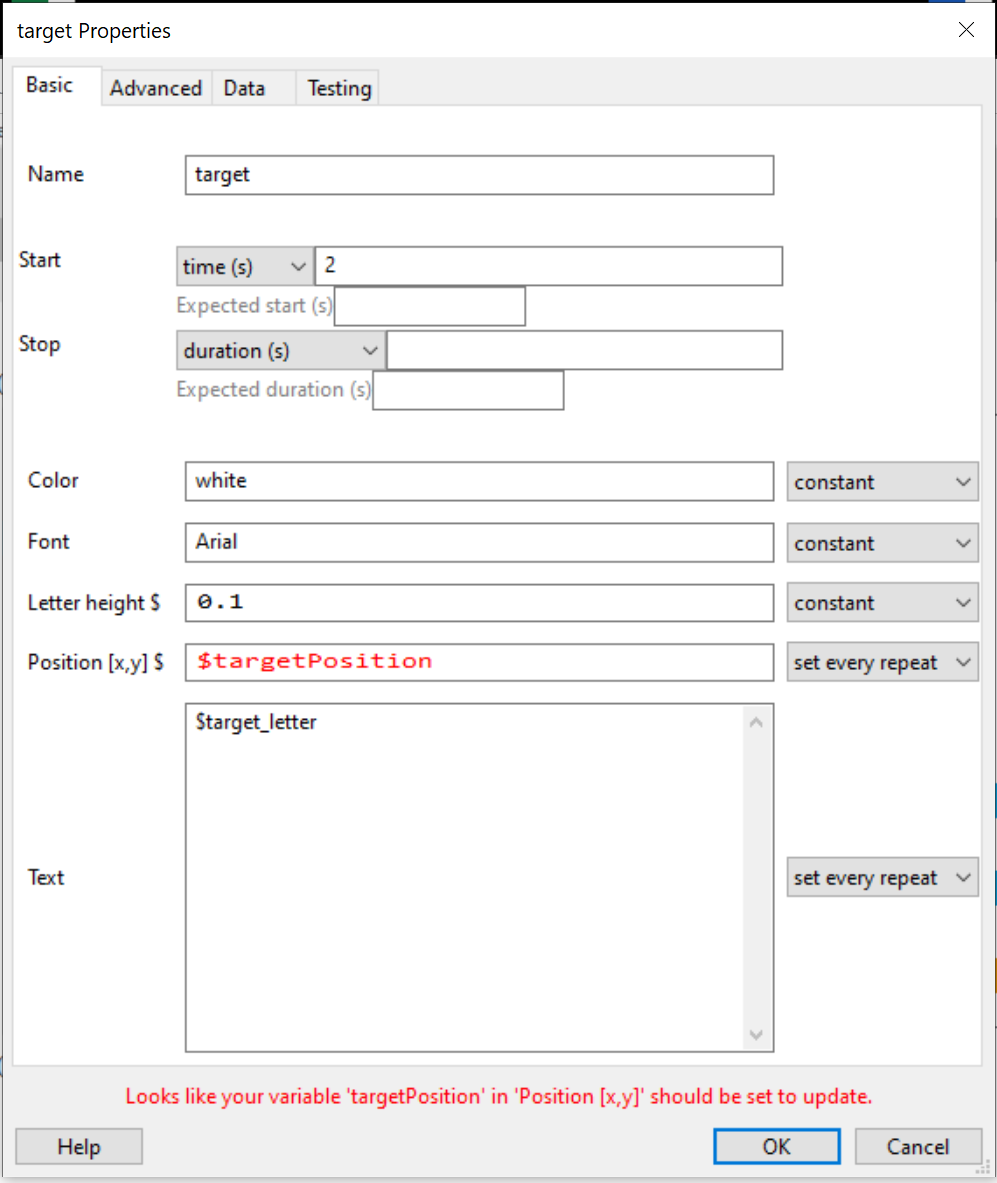
Click OK and return to the trial routine window.
Unlike the Target, the Distractor only needs to have one dynamic component, its position. Its position is always opposite the target. the letter (X) is always the same.
As its position is based on the target_letter, we can simply add a couple of lines of code into our trialCode component from before to simply assign a new variable distPosition at the same time as the targetPosition.
Go ahead and open your code component to the Begin Routine tab, and amend your code to what is below. Can you see what has changed?
# This is a comment, and is designed not to be
# read by the computer and is simply here for
# programmers to leave notes.
# you start a comment with a #

# Lets use an if statement to decide what to do
# when the target_pos is left or the
# target_pos is right

if target_pos == "left":
    targetPosition = [-0.65, 0]
    distPosition = [0.65, 0]
elif target_pos == "right":
    targetPosition = [0.65, 0]
    distPosition = [-0.65, 0]
What we did here is assign a distractor position (distPosition) variable in the same if statement that is the opposite x coordinate of the targetPosition. See below for my revised code component
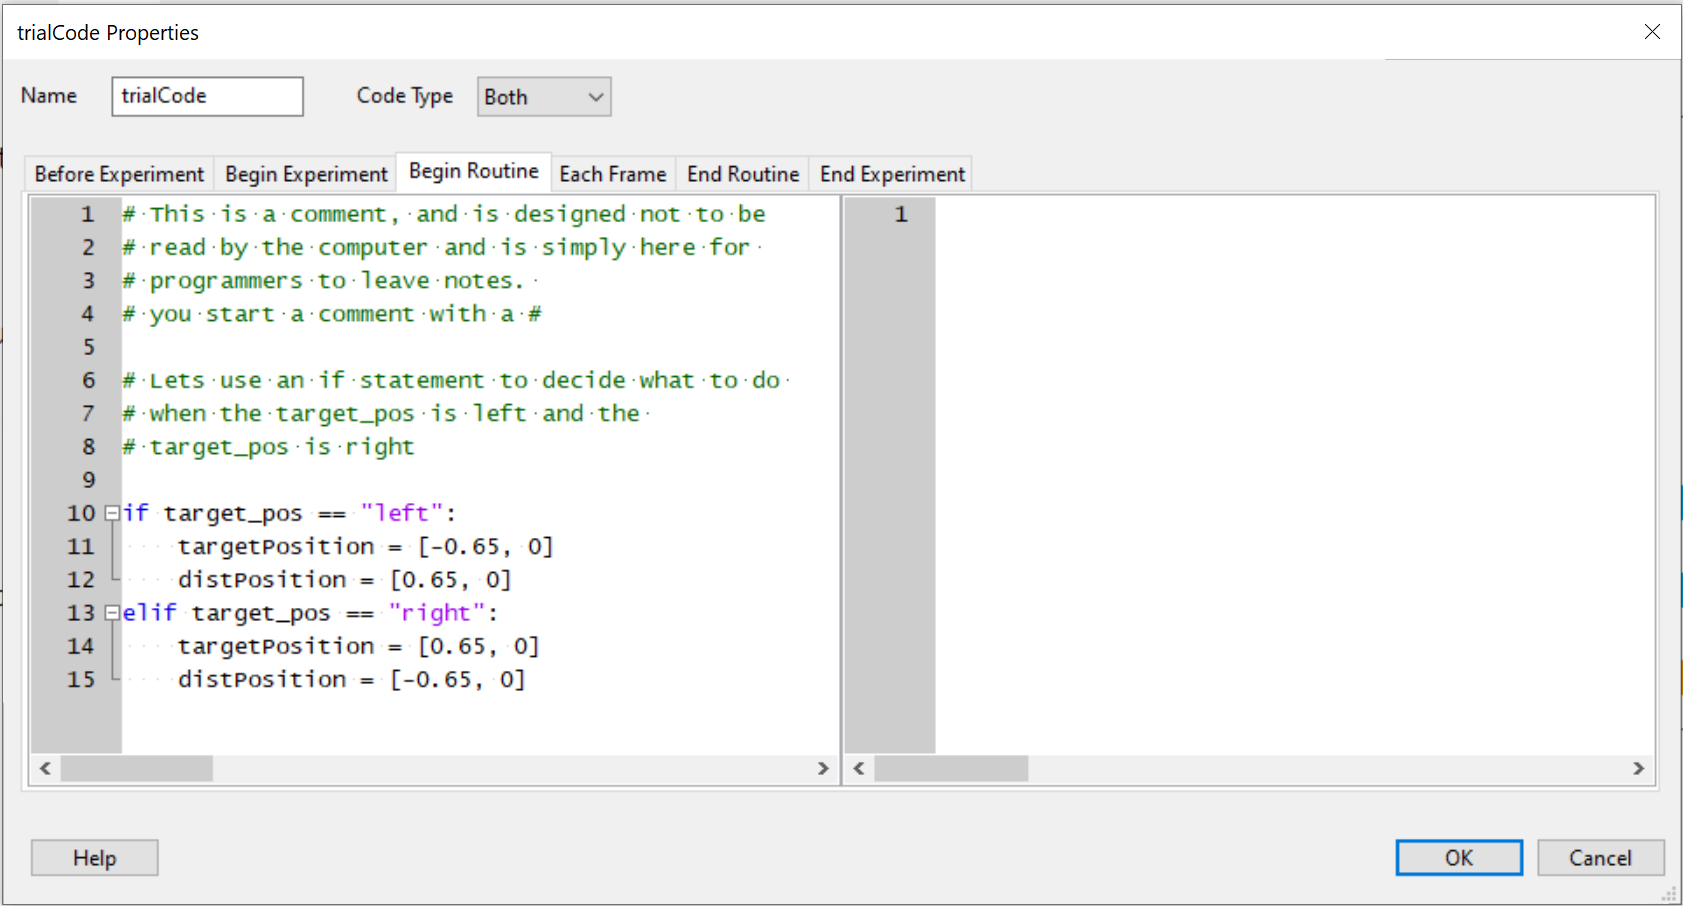
Click OK to save your changes, and open up your distractor properties.
All you need to change here is the position argument from its current value (0.65, 0) to the variable ($distPosition), and change the update dropdown box from constant to set every repeat. See below:
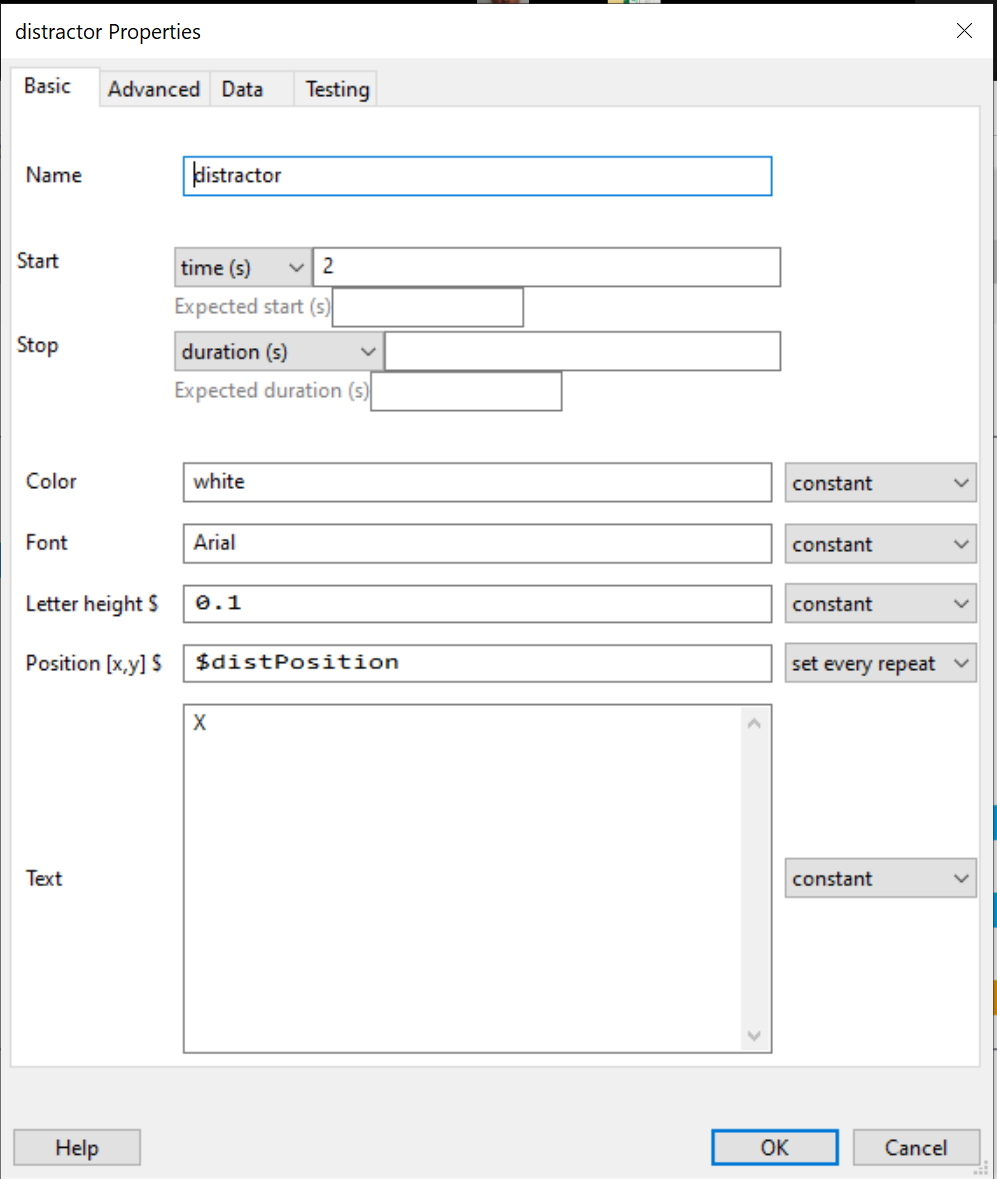
in our data file, it would be very handy to know what trials participants got right, and what they got wrong. We may for example only use the correct trials for any analysis.
Because we have a column in our trials list that tells us what is the correct_response, this is a very easy task. Simply go into your trial_key keyboard component and tick the box Store correct. Once you tick it, another box appears that simply says Correct Answer and we can give it a variable. Put in the variable $correct_response, and click OK to save your changes.
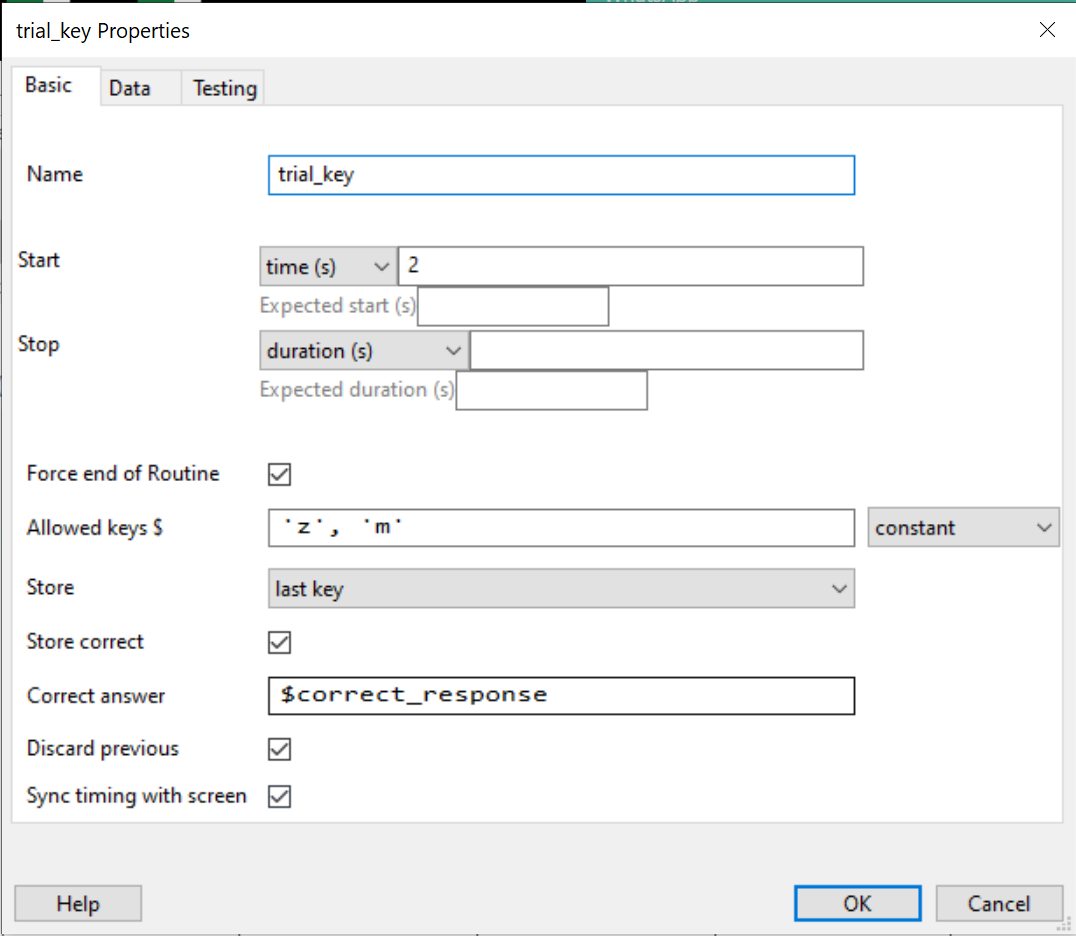
What this does is compare the key the participants press with what was in that variable. If they match, then it’s correct (1), if they don’t, it’s incorrect (0)/
You should be left with a Routine that looks like the following:
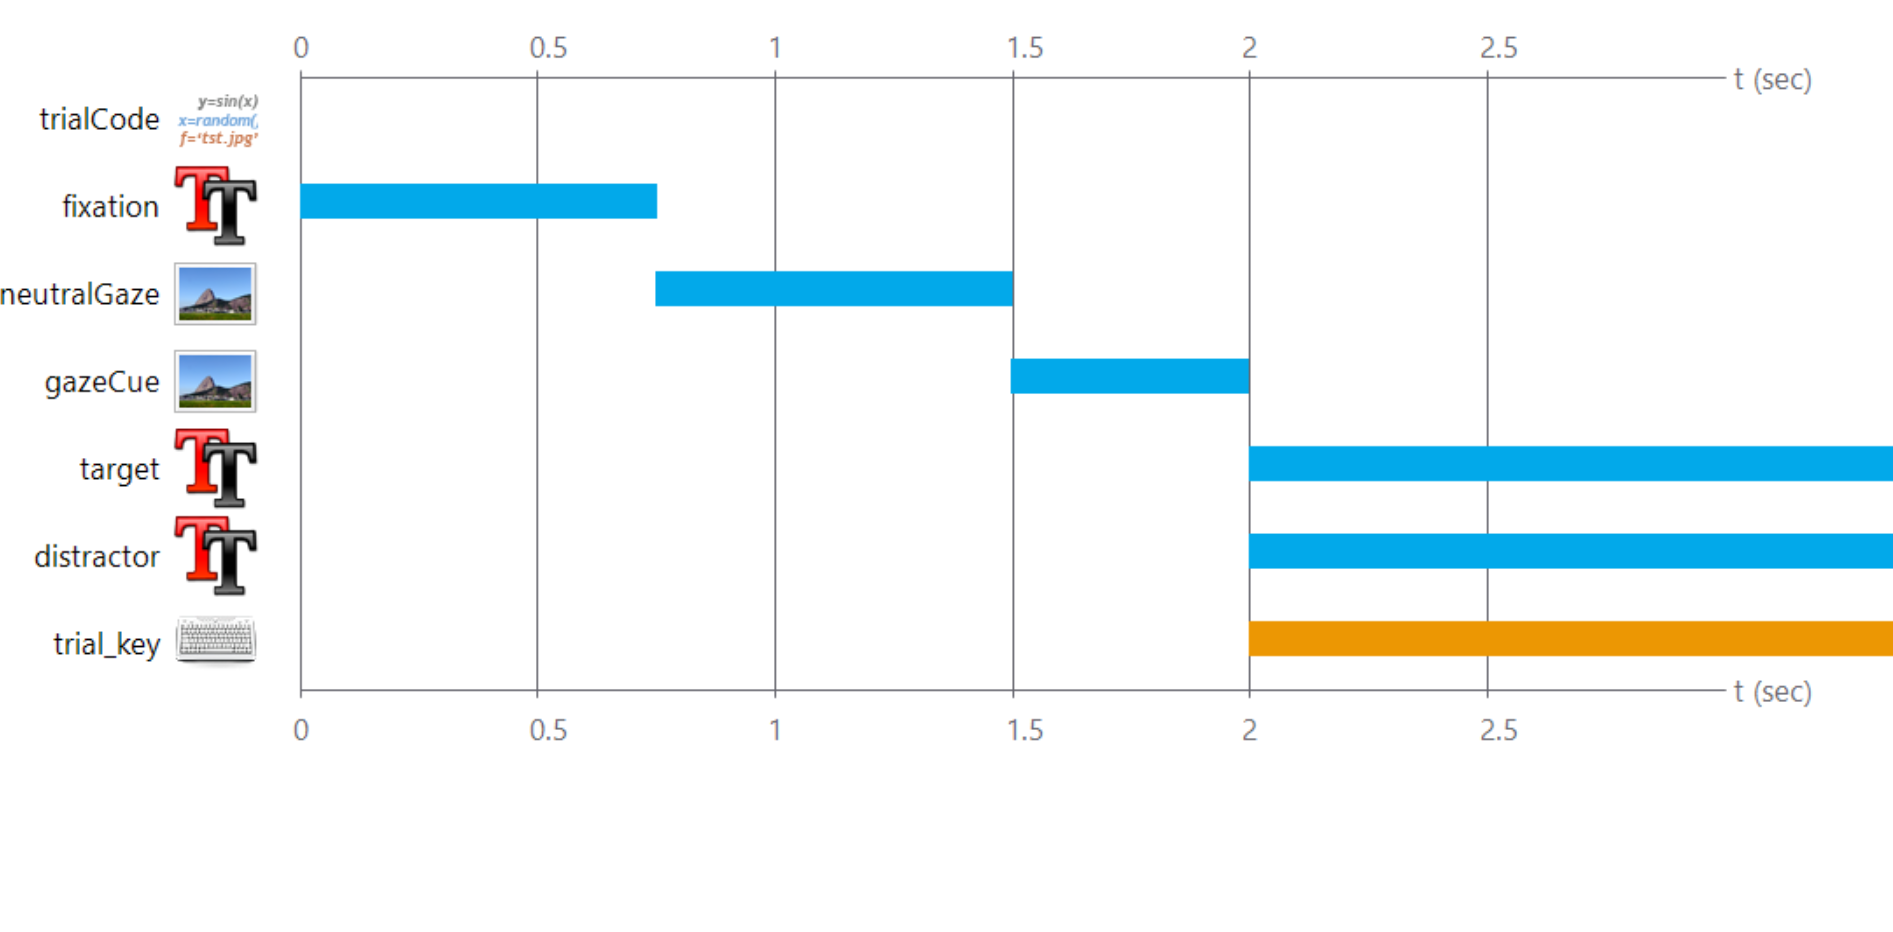

Go ahead and click the run icon to see if your experiment works. if it does, congratulations, you have created your first dynamic trial loop!
If it didn’t work, were there any errors? Remember when dealing with variables and so on, you must match the case of all variable names and their contents. For example, “Left” is different from “left”. Go back and check to make sure yours match. Similarly, the variable name targetPosition is different from one named targetposition.
This is the final leg of our experiment, setting up some feedback to the participant.
After each trial, participants will see a coloured circle, red if incorrect, green if correct. They will also either hear an incorrect tone if they got the trial wrong, or no sound if they got it right.
For this, we are going to create a new routine called feedback and place it just after the trial routine, within the loop like so:
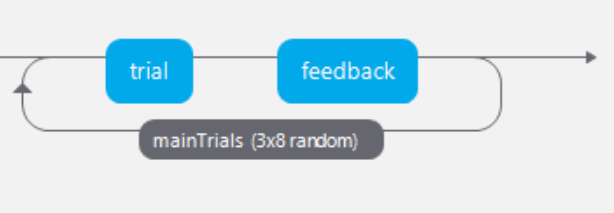
Open up your newly created blank feedback routine and lets put it together.
First thing we need is another code component so we can figure out a) what key the participant pressed, and b) whether it was right or not. Once we have done that, we can set up the colour of our circle and what sound file to play.
I have called my code component feedbackCode and once again set the Code Type to Both.
We need to find out what key the participant pressed in the trial_key component. To access this information we need a little primer on how components save information and/or their state.
Saving and Accessing Keypresses
We have a component called trial_key in our trial routine where participants either press 'm' or 'z' depending on if the target is an 'H' or 'F'. When participants press a key, this is logged and written to the data file. It is also available to us to use as we see fit in a code component *AFTER* the trial routine finishes.

Three key things are saved: the key, the time, and if it was correct or not. We can access this information in code by using dot notation.

To access the key that was pressed we can use the attribute trial_key.keys

To access the reaction time (time taken to press the key once the component started in the routine) using the attribute trial_key.rt

To access whether it was correct or not, we can use the attribute trial_key.correct
Now we know what key they pressed we can create another if statement to check whether they were correct. We could do this in a few different ways, but lets use the following code as a good peek behind the scenes on how we compare whether two variables are the same. Simply copy and paste into the left pane of the code component.
if trial_key.keys == correct_response:
    cirCol = "green"
    playSound = False
elif trial_key.keys != correct_response:
    cirCol = "red"
    playSound = True
Here we check if the two variables match, trialkey.keys, which will be the key they pressed for the trialkey component, and correctresponse which is from the column in our trial list. If they do match, we create a variable cirCol and set it to green (to form the colour of our circle, which we have yet to create), and another variable called playSound and set it to False. If however, they are incorrect (i.e. the trialkey does not equal (!=) the correct_response, cirCol is set to red and the playSound is set to True. both of these variables are Strings, can you tell?
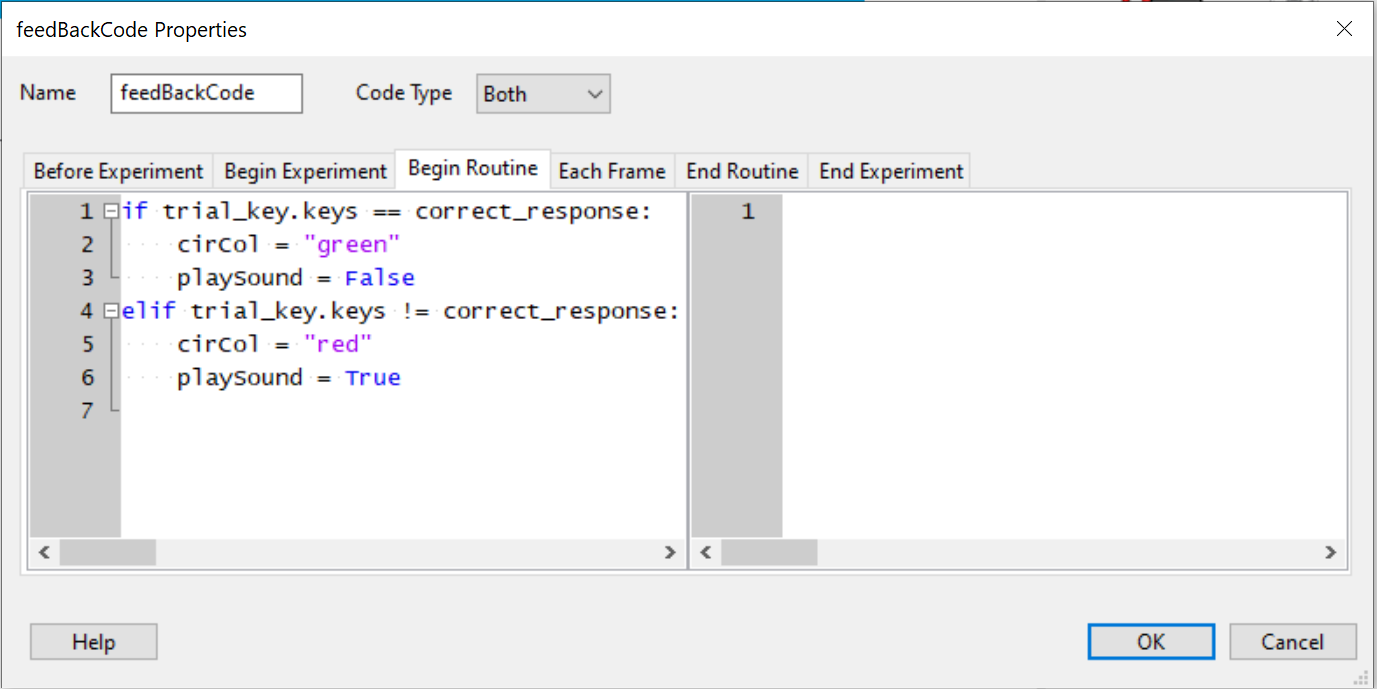
Click OK to save your code component.
We want a small circle to appear after every trial that either green if they pressed the correct key, or red if it was the incorrect key. Our code component above has taken care of deciding what colour to make the circle, but we need to create a polygon object to form our circle and set its properties.
For this we need a polygon component. Find it under Stimuli in the Components pane
![]()
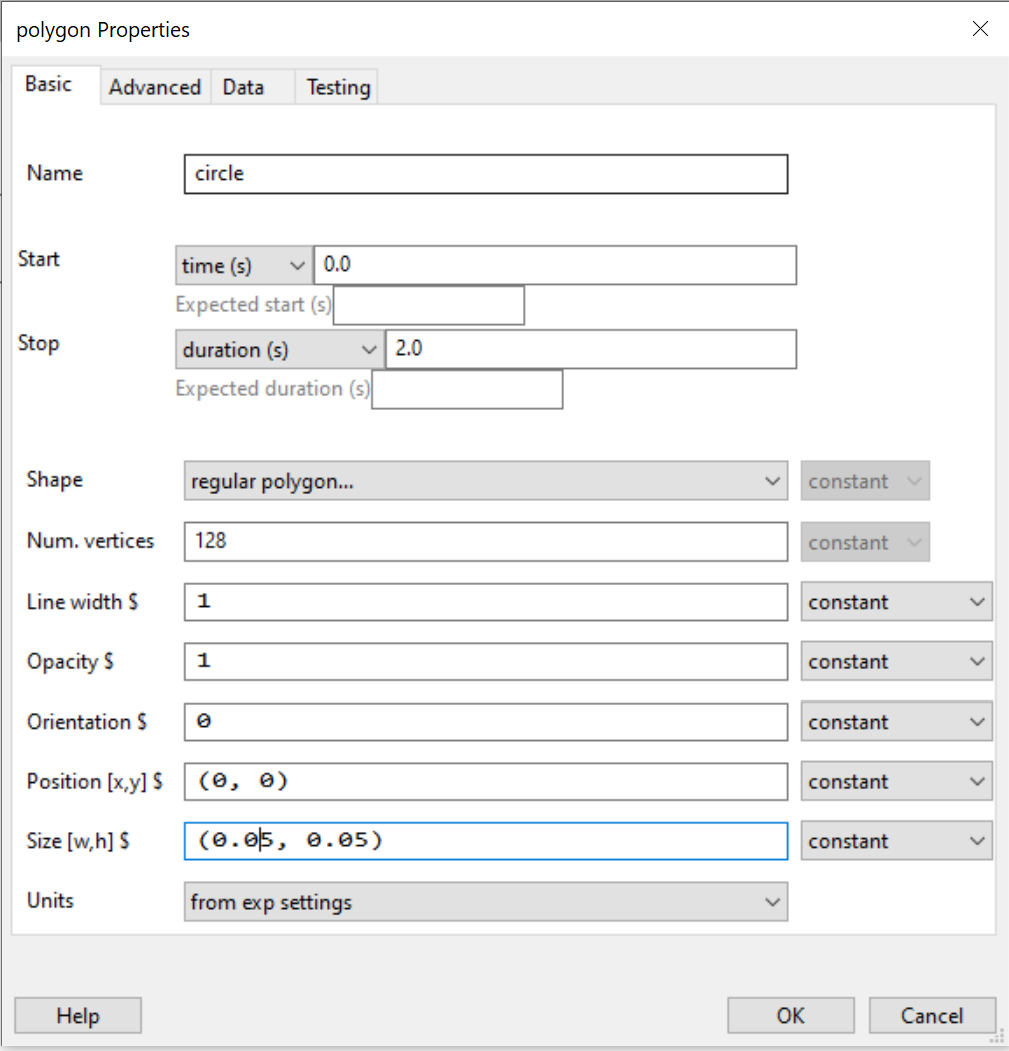
We have a few things to change here:
Lets begin with the Basic tab
Firstly, I have called mine ‘circle’ to ease of identification
I have changed the duration to 2.0 seconds
As our shape is not listed under the Shape field, we have to set it to regular polygon.... This basically means a custom shape.
I have set the number of vertices is set to 128. This is the amount of lines from the centre, the more you have, the more circle like your shape.
The size by default is huge, I have set it to (0.05, 0.05)
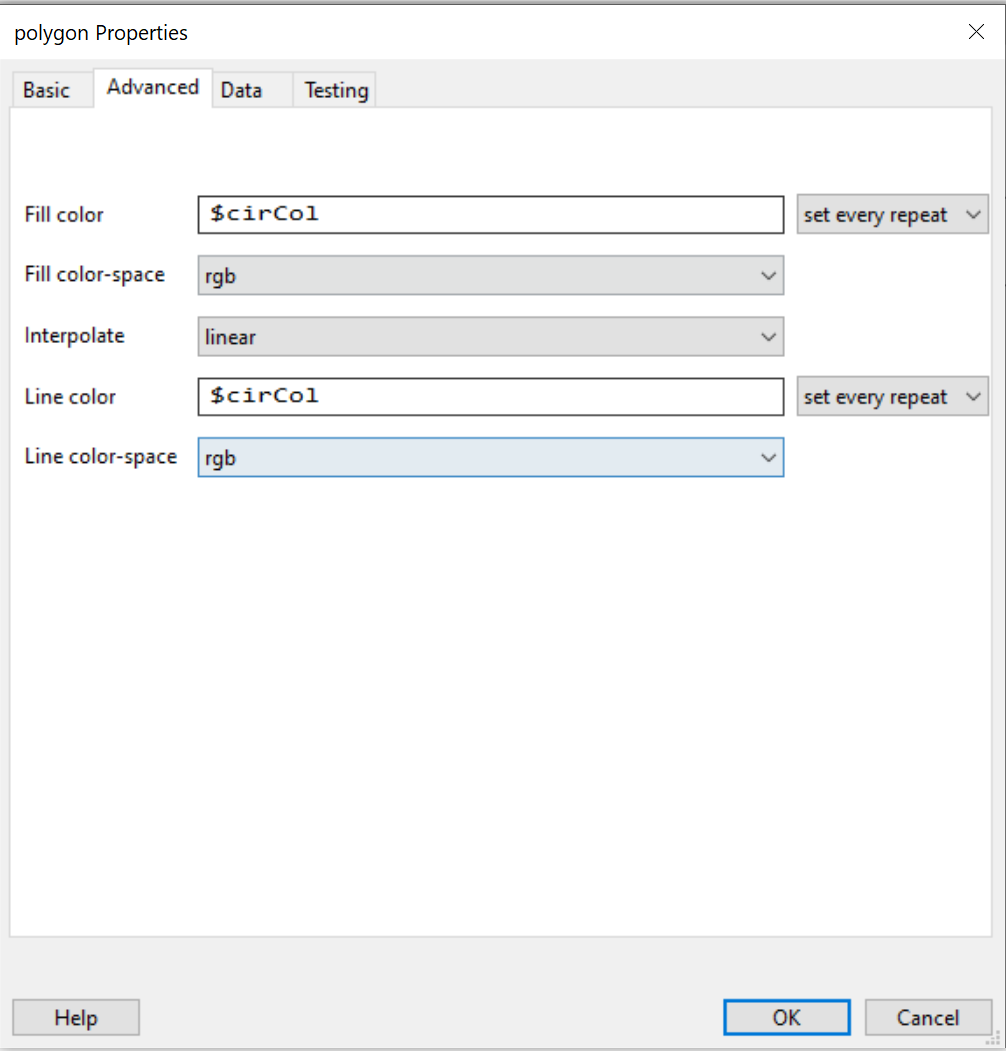
To make the colour dynamic, we need to move to the Advanced tab and under both Fill color and Line color, I have set the field to use the variable from our code component $cirCol. Also don’t forget to set the updater to set every repeat
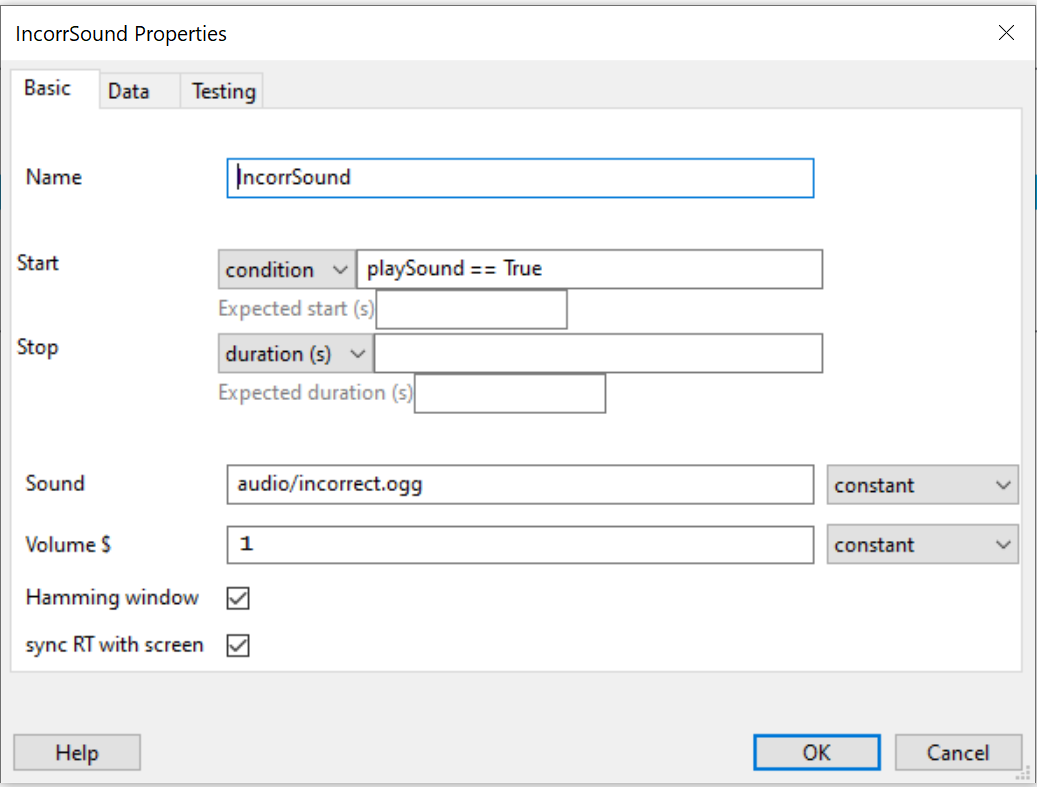
If our participants are correct, we don’t play them a sound. If they are incorrect however, we play them the file incorrect.ogg, which is in our audio folder.
Lets start by creating a sound component, i have called mine IncorrSound
![]()
Our audio file is located in the audio folder, so we need to enter this path in the Sound field of the sound component properties.
As mentioned, we only play a sound based on a condition (i.e. they are wrong). We can set the sound to only start if the variable we set in our code component above (playSound) is True. All we need to do is use the drop down box next to the Start field and instead of it being set to time (s), we can change it to condition. Now we need to provide the field with an expression to evaluate. In this case the component should only Start if the condition: playSound == True. Notice here I use == as the evaluator. This is because a single = in Python is to assign variables to things (e.g., myName = "Kris"), while to compare if something is equal to something else, we use double equals ==. Below is my expression:

We leave the duration field empty because for sounds, an empty duration simply means run ‘for the duration of the media that is being played’.
If you look at the image below you will see most of my settings are left at default.
Click OK to accept your changes.
Now, there is a slight error in logic here that we need to fix using some code:
If participants are wrong, and playSound is True, the sound component Starts playing our Incorrect.ogg sound file, which is a few ms long. Once its played, the component enters its FINISHED state so the script knows its done and we can move on.
However, if participants are correct (i.e., playSound = False) the sound component does not Start playing the audio file (because our expression was effectively “only start if playSound is True), and so gets stuck in an infinite loop where the component never enters its FINISHED state (because it never starts).
Logistically speaking, this means the trials progress perfectly when participants are incorrect. If they are correct however, they see the green circle and the program appears to hang because it is waiting for the sound to finish, when in fact it never starts.
Lets fix this by forcing the sound components status to FINISHED if playSound == False.
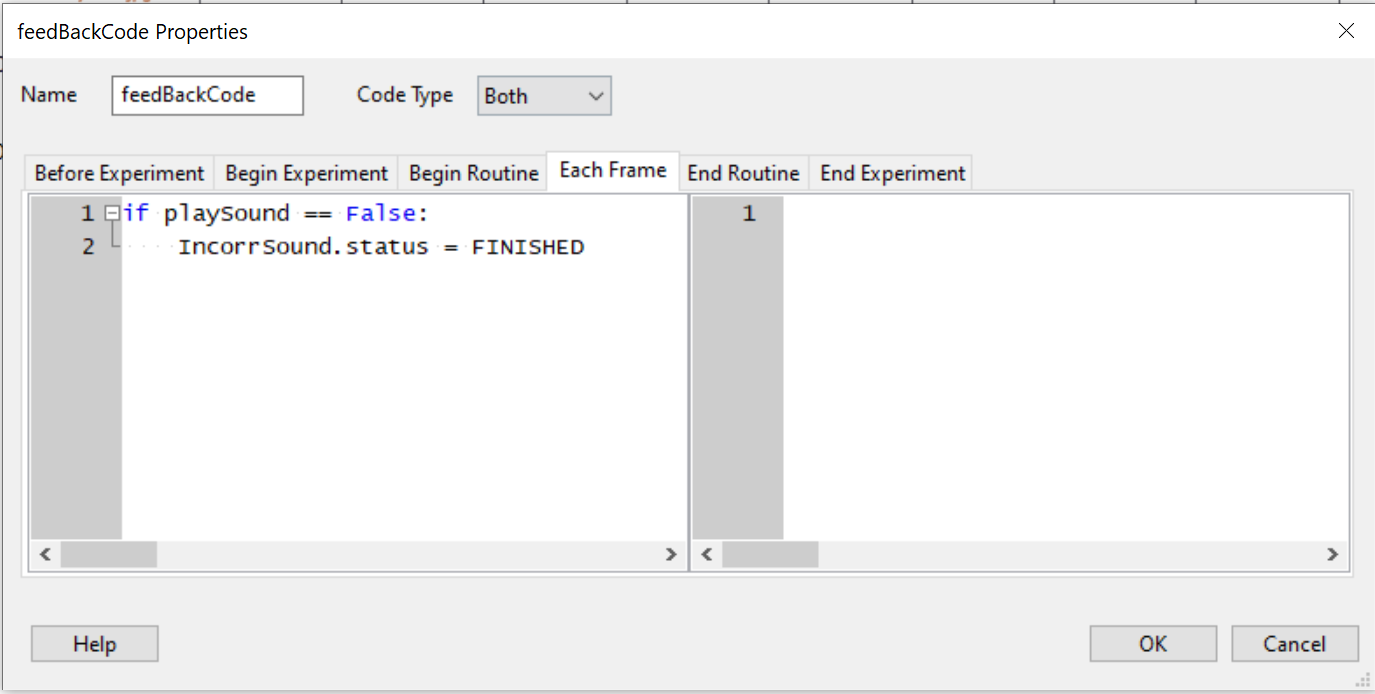
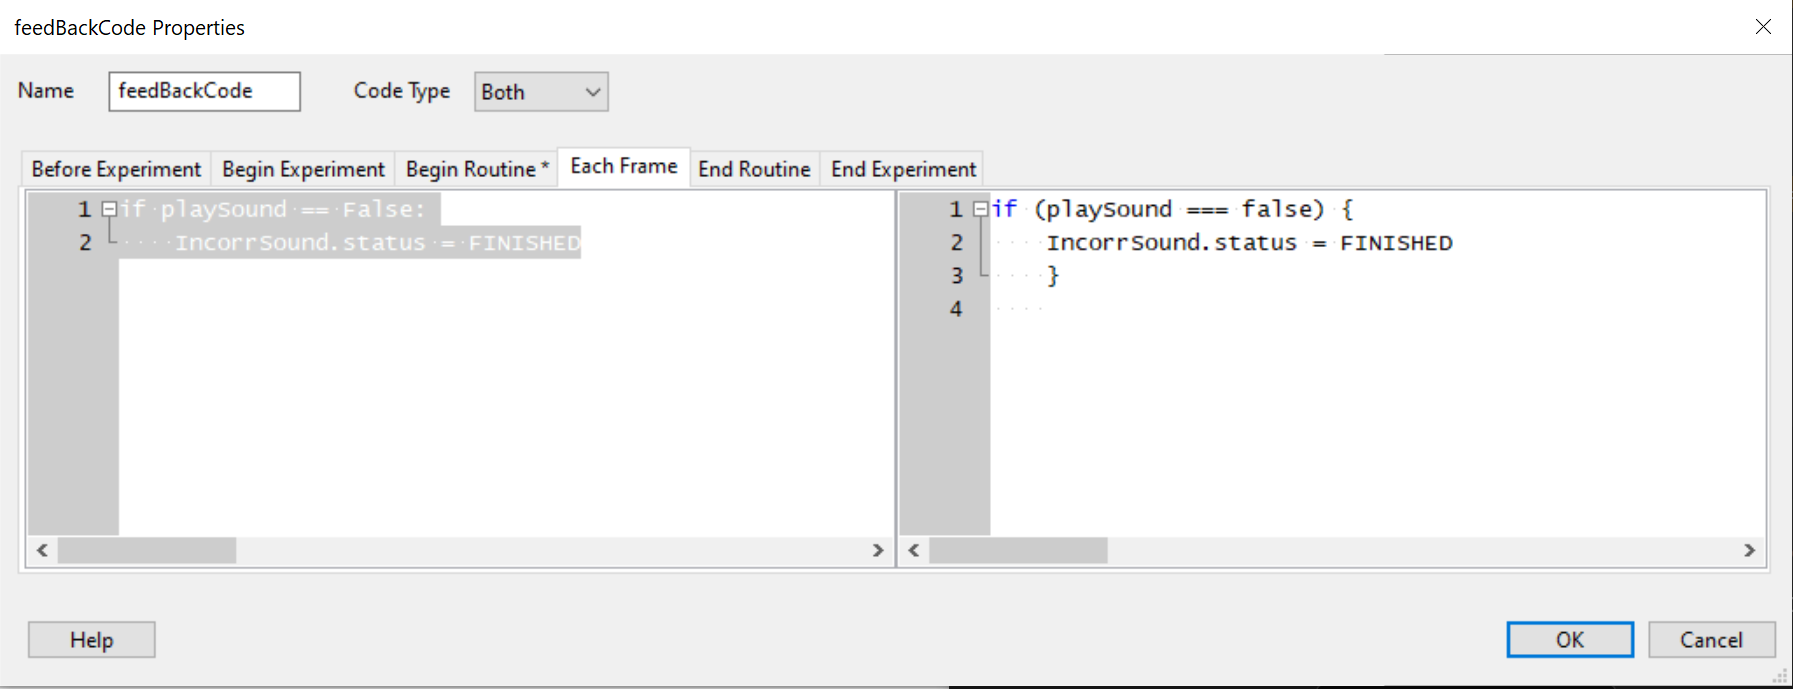
Open up your feedbackCode component from before, but this time we need to move to the Each Frame tab because we want this code to execute during the routine (once it has decided what the variable playSound is), not at the beginning.
Our expression will be really simple:
if playSound == False:
    IncorrSound.status = FINISHED
As you may gather here, if the variable playSound is (==) False, change the status attribute of the sound component to FINISHED.
The eagle eyed among you will notice that the word FINISHED is not encased in string quotes (" "), but is instead a variable. This is because behind the scenes, all PsychoPy objects define this variable called FINISHED. See below for my Each Frame tab contents:
Click OK to accept the changes.
Our Feedback routine should look like the following:

Ok, lets test our experiment!
Click the Run button and see if everything runs as expected.

If not, where does it seem to crash, are there any errors?
Finally, lets add a some text to indicate participants are finished.
Create a new Routine, call it end, and place it outside of the Loop at the end of the Flow timeline as shown below.

Open it up and add a Text component and call it endText

Make it start at 0 secs, and have an unlimited duration
Change the letter height to 0.03
Make the text as follows:
Thank you for taking part in this experiment, press Space to end the task.
There are no dynamic components, so everything should be left as constant
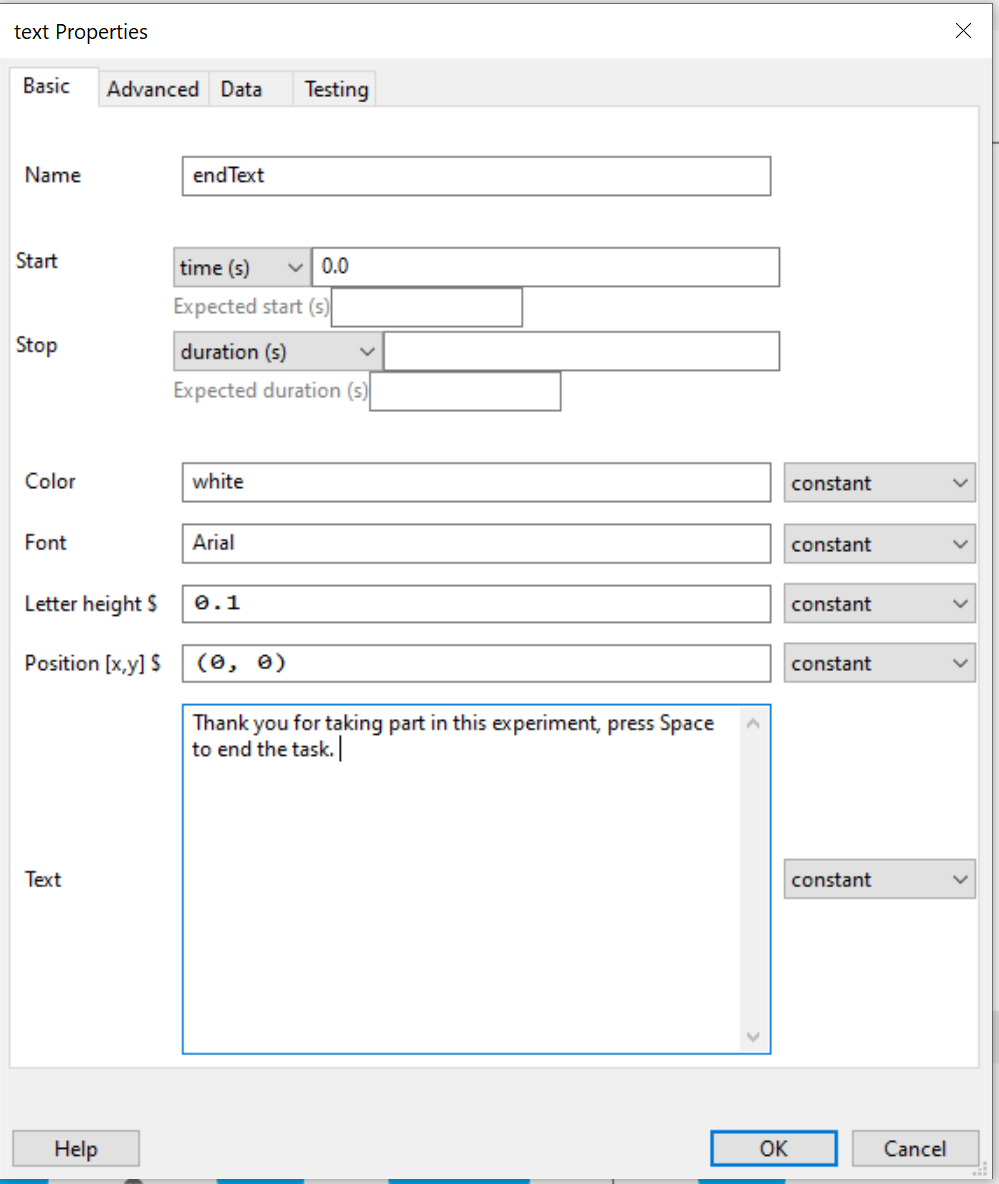
Click OK to save your changes.
Finally, we need a keyboard component called endKey that only accepts the space key

Set the start to 0 seconds, the duration to blank
Change the allowed keys to just 'space'
Store nothing as we don’t need to log this press
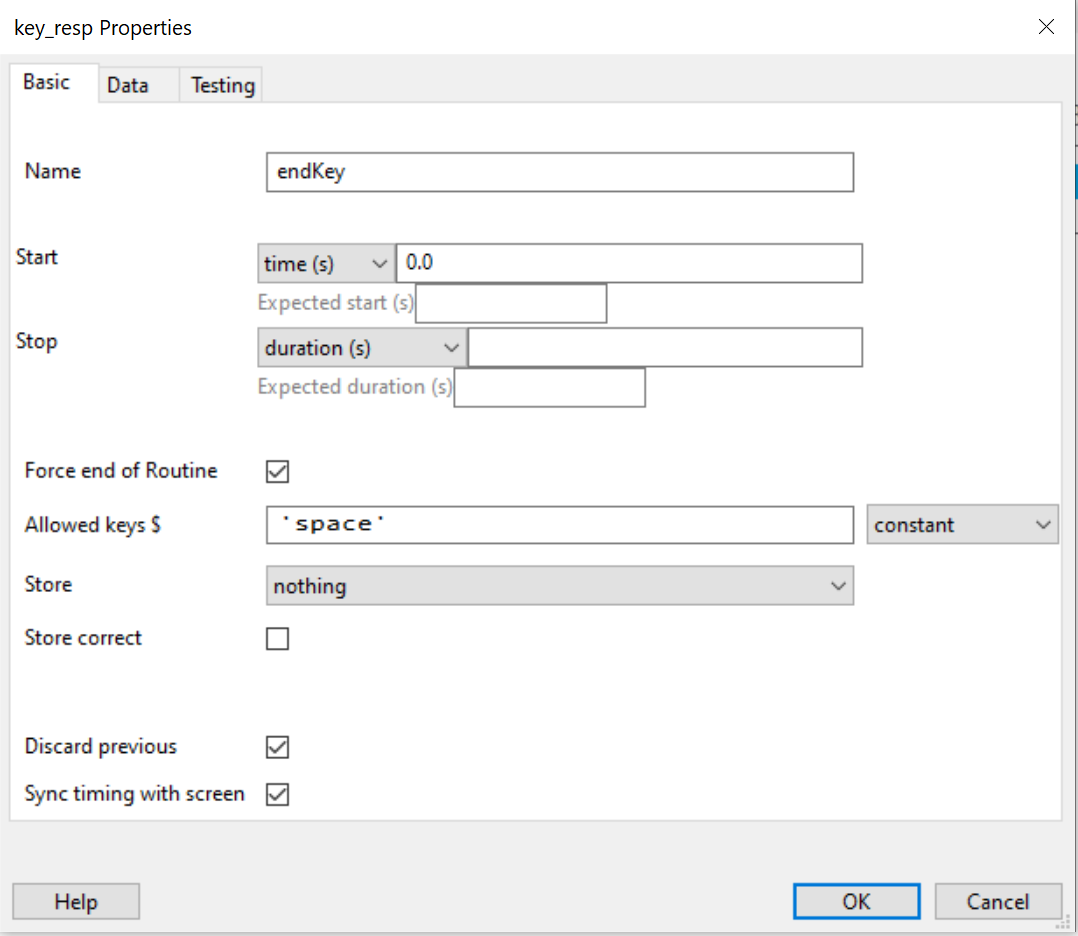
Click OK to save your changes.
Your routine should look like the following:

If all has gone smoothly, your program should work as you expected and all should be well.
If it does, make a note of where it went wrong and any errors and see if you can troubleshoot. If not, give me a shout.
Make sure you program works well before moving to the next step.
So, we want our Posner task to work online. First of all lets introduce the specifics of working online.
As you might have guessed, we need somewhere to "host” our code so we can get a URL of where to go to find our experiment on the web. We are quite interested in performance how our experiment works on the web, so we can be a bit more confident about our reaction time logging, and ensuring our stimuli arrive on the screen at the times we want them to. For this to work effectively we need to three things. i) the participant should have a relatively modern computer and browser that supports the latest web technologies, ii) an efficient script that works well, and iii) a fast and efficient server to host our experiment that prioritises performance and accuracy.
To handle the server side of things, we have departmental access to Pavlovia, which will give us a place to host our experiment, provide us with a URL, and store our data files.
Pavlovia is a paid service for capturing real data (@20p per run), however we can ‘Pilot’ our study to ensure it runs correctly without spending any credits.
What on earth is Git, and what is the jargon?

The storage of experiments is handled by a web service called GitLab, which is an online repository that houses coding projects. In this case, our project is our experiment. 'Git' refers to the popular version control system that allows one to easily see changes we make in code files, with the primary benefit of being able to rollback changes to any point.

Our workflow from now on will be to make changes to our local copy of our experiment using PsychoPy Builder and then 'pushing' (i.e. uploading/syncing) those changes to the server. Each time we do this, we will be asked for a log of changes we made compared to the version already on the server. The term we use when we apply/save changes to our experiment is called a `commit`, and we `push` that commit to the server. More on this later.Lets get you started with an account. First head to Pavlovia Register/Signup . Please use your northumbria.ac.uk email address (as in the future we can allow you to use our license.
Next up, we need to sign you into your account (so when we sync your project with the server, it goes to the right account). Simply open PsychoPy (no need for an experiment to be open, but also fine if it is), and click on the login/sign up button:

Enter your credentials and tick ‘remember me’ and sign in.
Now you are ready to upload a project and start making our Posner task online!
As you may know, the main language of the web is JavaScript. So far, we have used Python code components, and when we pressed the run button our experiment was compiled to a python script to run on our local machine.
PsychoPy Builder does an “ok” job at automatically translating custom python code to JavaScript, but sadly if we tried to do this, it would throw an error as there is something it does not understand. So, we have to manually translate a few things (mainly our code components) before we sync with the server.
When we run studies online we enter the scary world of unknowns, which makes our science minds melt a little. As we have a very visual task thats dependent on reaction times it makes sense for us to collect some data about screen resolutions and the browser participants did the task on. This info might be useful when we are doing our analysis to ensure we only use data collected in Chrome for example, to ensure consistency.
You can read about a huge comparison of experiment builders, how they perform online, useful considerations on web experiments in general, and Windows vs MacOS etc. here.
We also might want to exclude participants who are taking part on phones and tablets and only allow participants to take part if they are on a desktop or laptop.
To log this data, we need a code component. Lets insert one in our instructions routine right at the start of the experiment. I have called mine JScode and instead of having the code type as Both, I have simply selected JS, as we don’t need this code to execute in Python because it is online relevant only. I have placed the following JavaScript code in the Begin Experiment tab so that it is executed as soon as participants start the Experiment. Paste the code below into the Code Component.
//get browser info (inc window size)
var sUsrAg;
var nIdx;
function getBrowserId () {
 var browsers = ["MSIE", "Firefox", "Safari", "Chrome", "Opera"];
 sUsrAg = window.navigator.userAgent,
 nIdx = browsers.length - 1;
 for (nIdx; nIdx > -1 && sUsrAg.indexOf(browsers [nIdx]) === -1; nIdx--);

  return browsers[nIdx];
}

expInfo['OS'] = window.navigator.platform;
expInfo['browser'] = getBrowserId();
expInfo['xResolution'] = screen.width;
expInfo['yResolution'] = screen.height;

// Quit if mobile device
if( /Android|webOS|iPhone|iPad|iPod|BlackBerry|IEMobile|Opera Mini/i.test(navigator.userAgent) ) {
  quitPsychoJS('Mobile device detected. Goodbye!', false)
}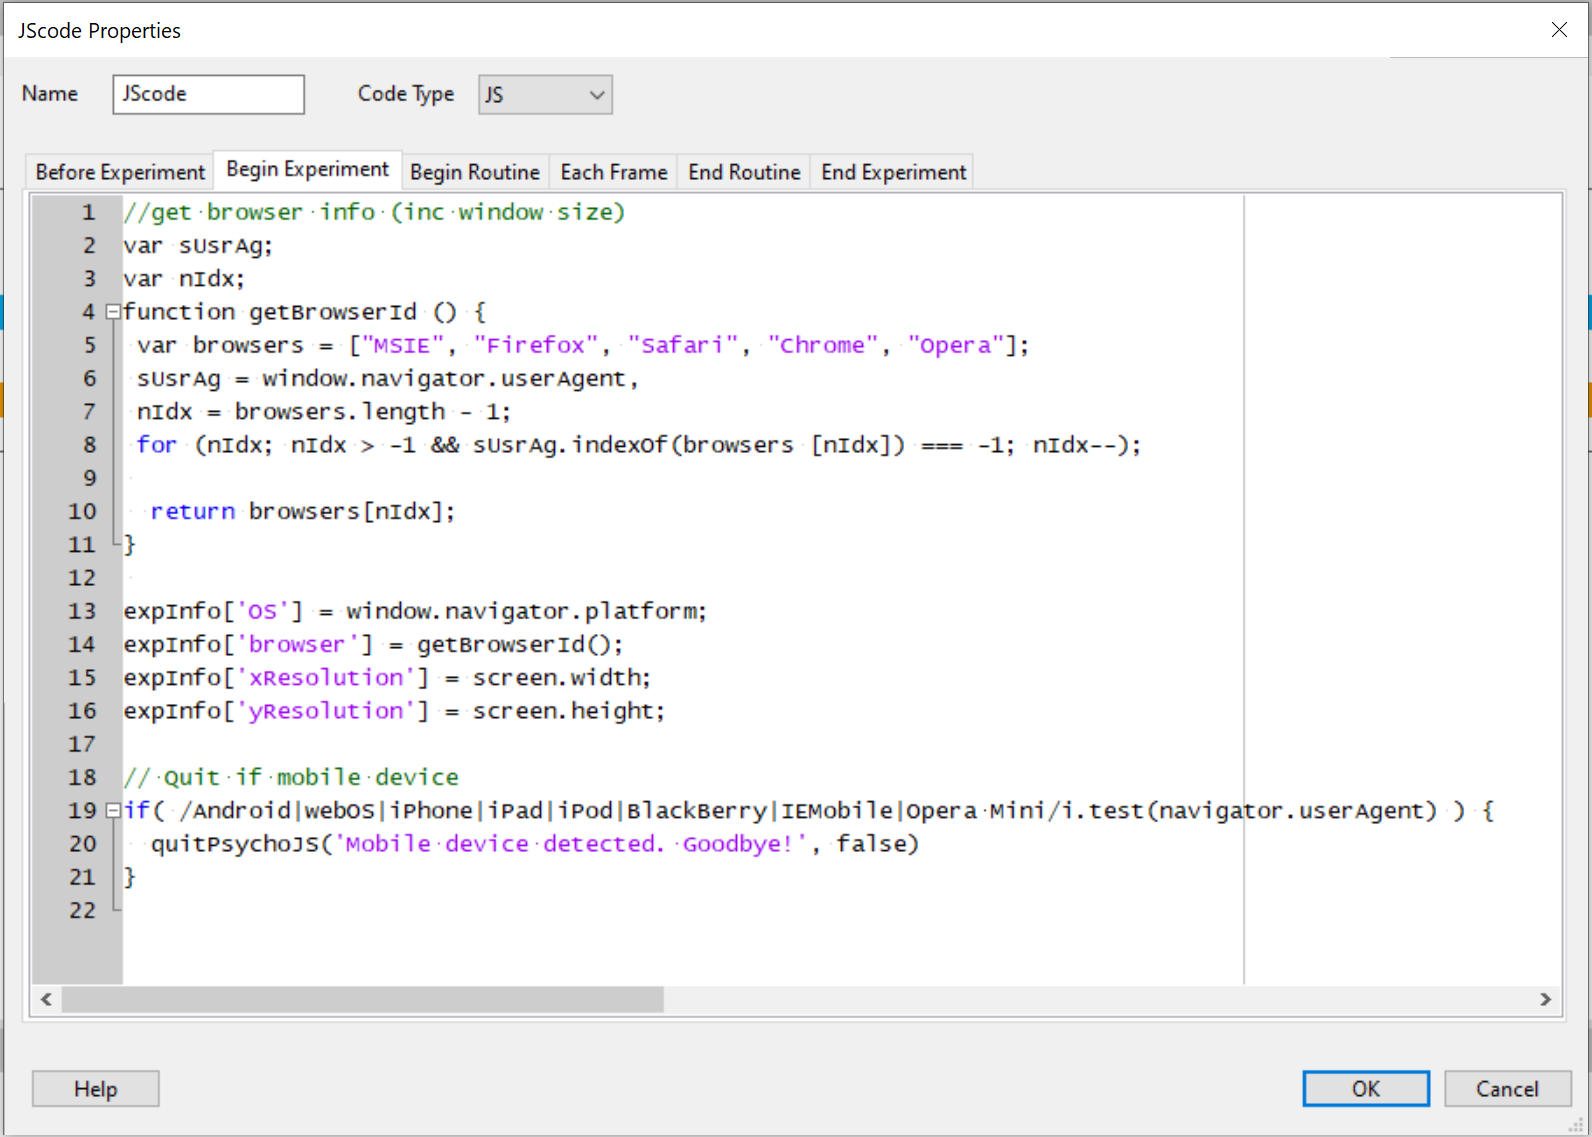
So, the first thing you might notice here is that comments are prefixed with a // and you see a lot more curly brackets { } (called braces) in JavaScript. Basically what this code does is firstly creates whats called a function to figure out what browser you are using. The code below that (starting with expInfo) adds various things to the data file by way of adding it to a hidden data object called expInfo (or in English, Experiment Information), which stores stuff like participant number, the date and time etc. Unlike other custom variables, we dont actually explicitly need to tell PsychoPy to save this information to file, its done automatically. Finally, the bit at the bottom is an if statement that assess what device people are using. If they are using any of the ones listed (e.g., Android) it will quit with a goodbye message quitPsychoJS('Mobile device detected. Goodbye!', false).
Click ok and move that code component to the top of your instructions routine.
Lets move to our trialCode component in our trial routine. If you remember, we selected code type Both, which allows for independent Python and JavaScript code to be entered.
We could let PsychoPy auto translate python to JavaScript but this doesn’t always work well, and there are many things it gets wrong, so its much better for us to translate manually.
In the begin routine code we are deciding the positioning of the target and distractor using an if statement. Thankfully, JavaScript also supports if statements in a very similar way. Our translation below demonstrates how similar things are:
if (target_pos === "left") {
    targetPosition = [-0.65, 0]
    distPosition = [0.65, 0]
    }
else if (target_pos === "right") {
    targetPosition = [0.65, 0]
    distPosition = [-0.65, 0]
    }
Notably, we lose the colon : in favour of encasing things in braces { }, and our expression to be evaluated is now encased in parentheses ( ). Our equality evaluation is now triple equals === too. Behind the scenes, the variables types in square brackets [ ] are different (but similar). In python, [ ] is a list, where as in JavaScript this is called an array.
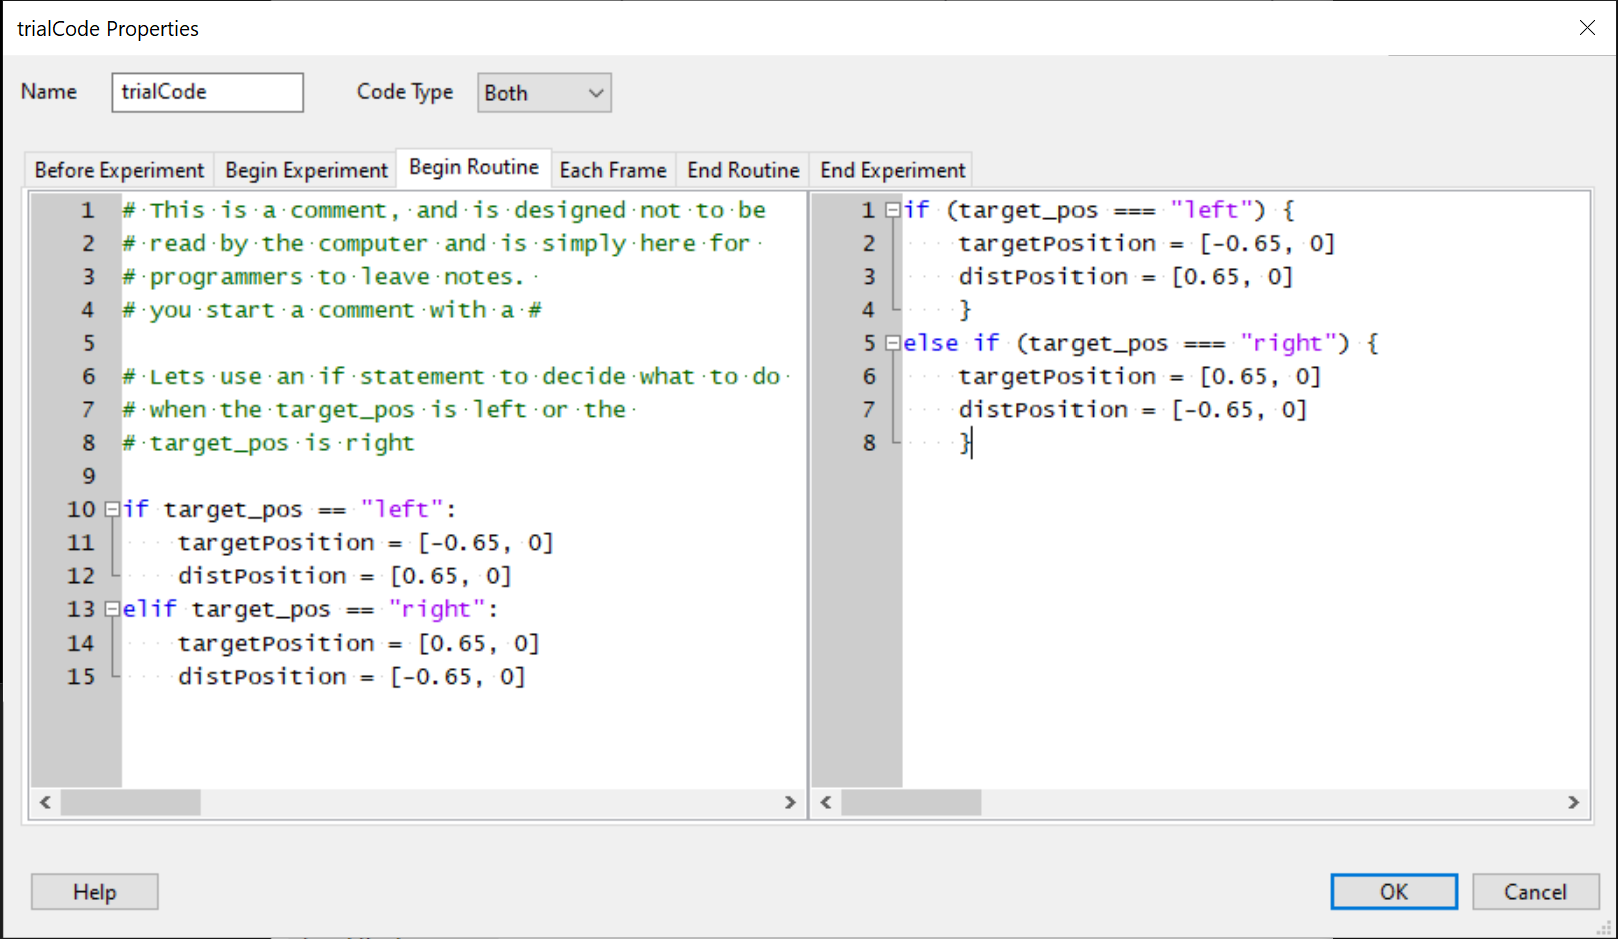
Once you have inputted your new JavaScript code, click OK to save your work.
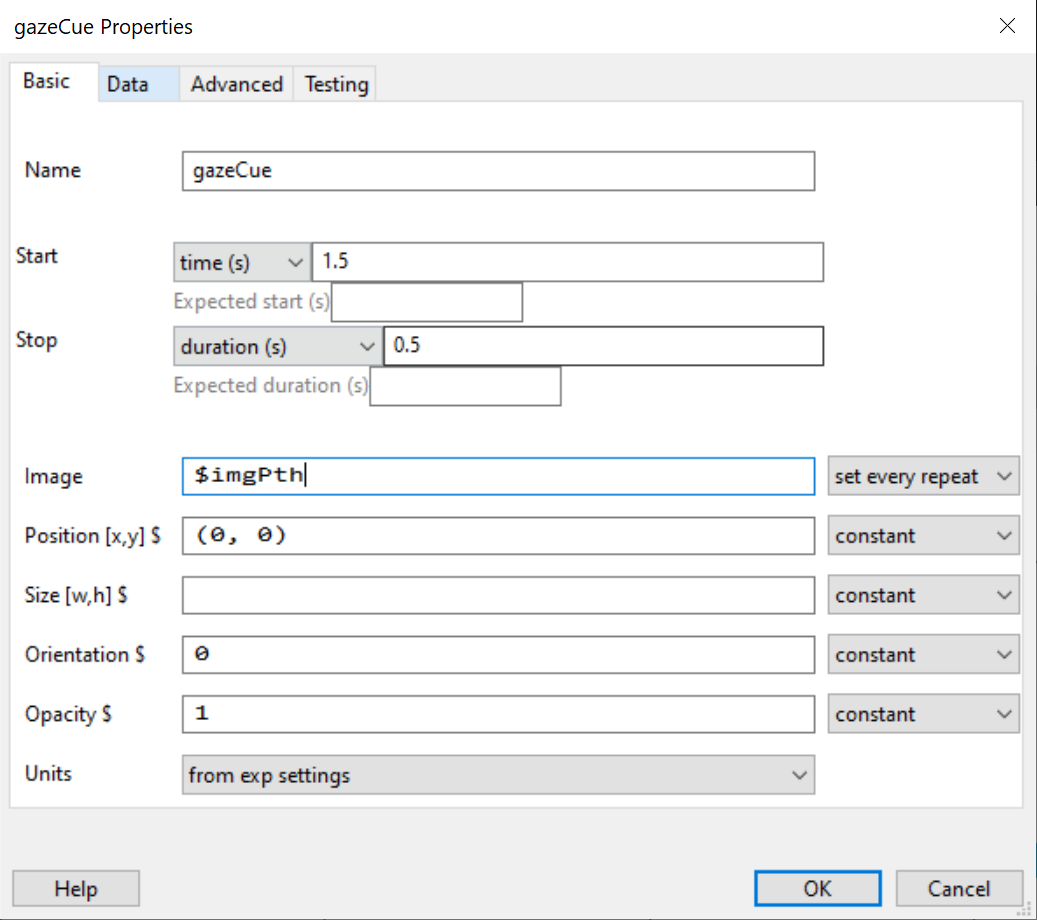
We stitched together our gazeCue image using strings earlier on in the gazeCue object under Image. We cannot do this for JavaScript (as the object properties boxes only accept python code. So, we must create our string as a variable in a code component and refer to it from the gazeCue properties.
Open up your trialCode component and lets do this for both Python AND JavaScript this time.
In python I have set a variable called imgPth to almost exactly the same string as we had in our gazeCue properties window, minus the $ sign (becasue the $ sign is only used to denote variables in properties windows):
imgPth = "img/gaze_" + gaze_cue + ".png"The JavaScript code is almost identical, can you spot the minor difference?
imgPth = "img/gaze_" + gaze_cue + ".png";The inclusion of the ; denotes a line end in JavaScript, something that isn’t needed in Python.
Here is my final code component:
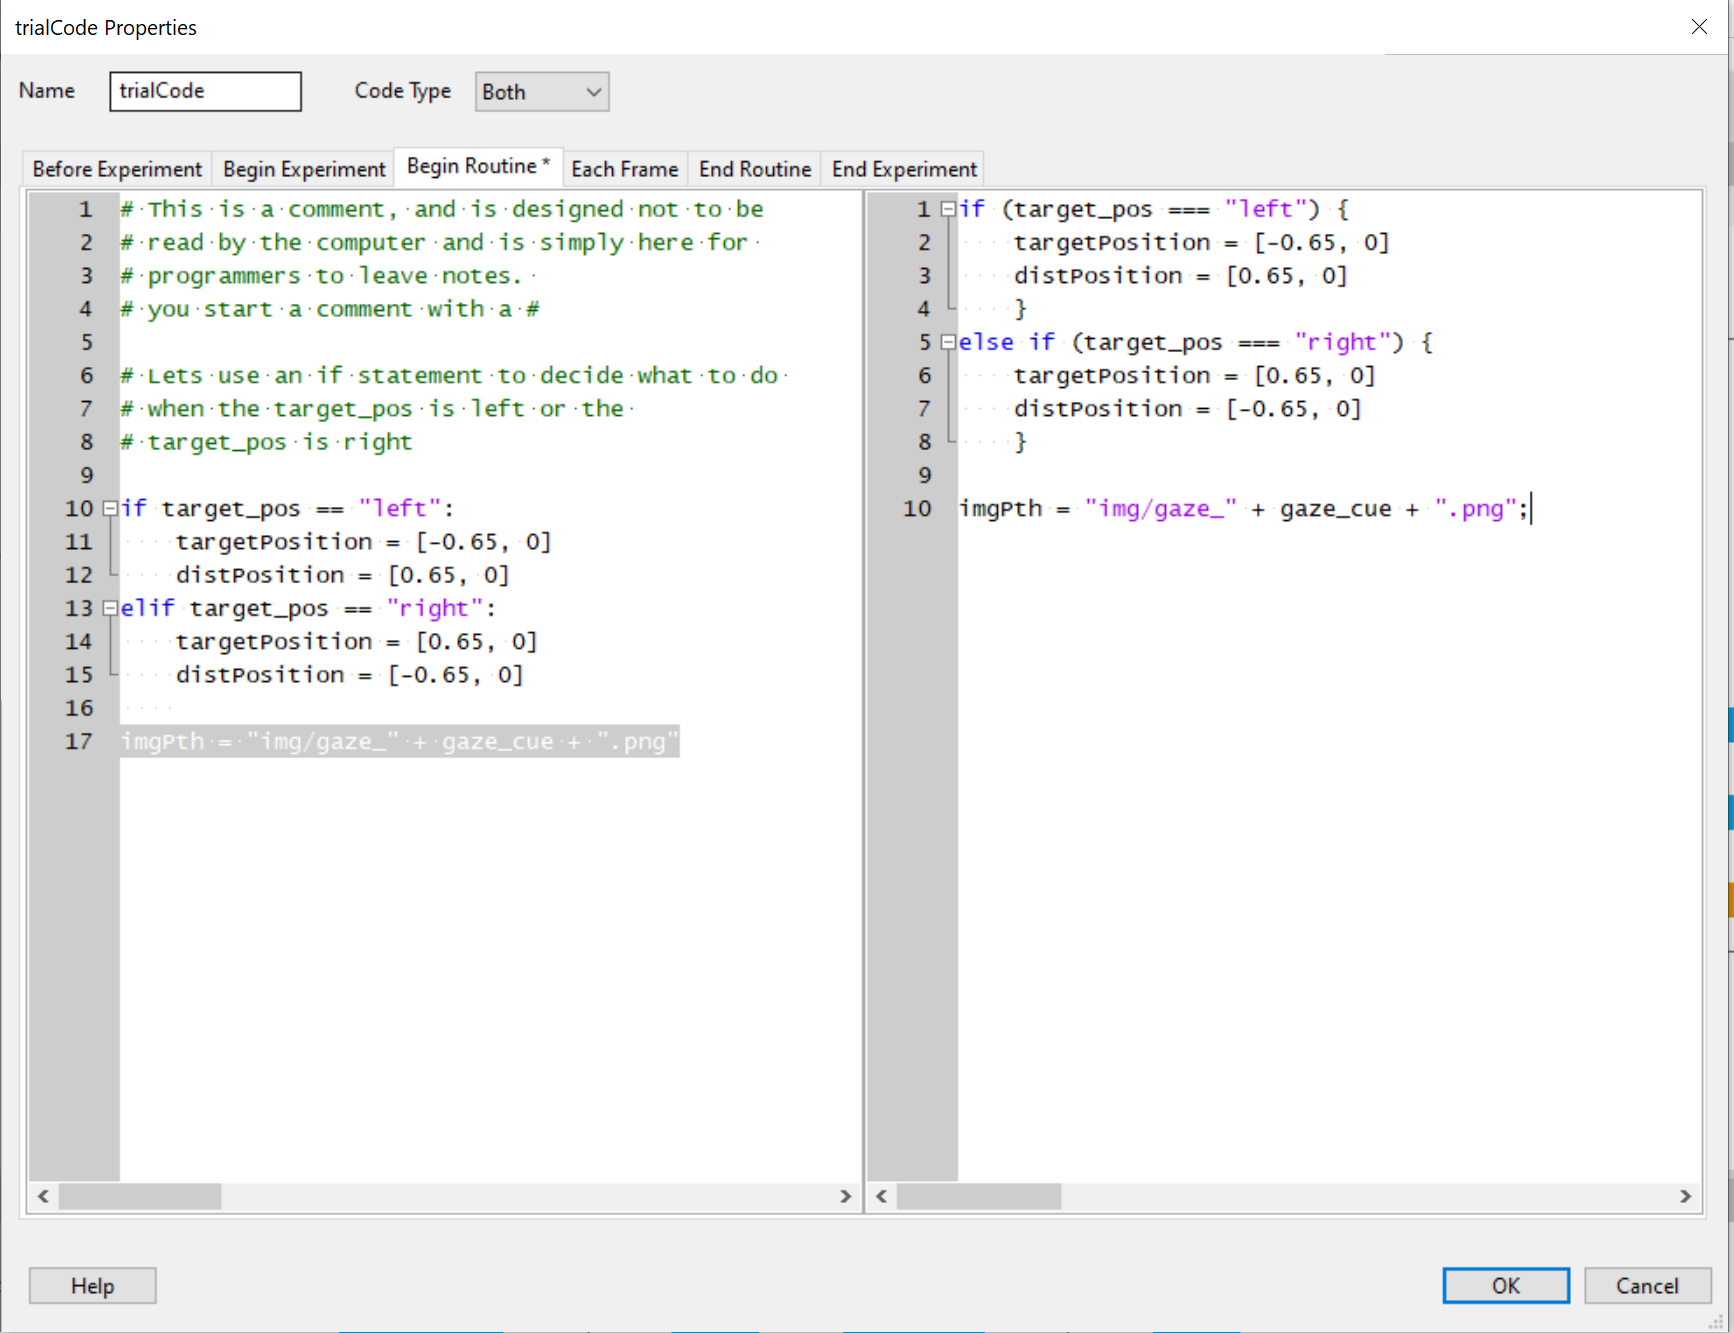
Now all we have to do is go into the gazeCue object and refer to our new imgPth variable, not forgetting the $ as its a variable in a properties window!:
In our feedback routine we have some code that control whether audio is played, and the colour of our circle. This also needs translating. We have both Begin Routine code, as well as Every Frame code to deal with…
In this block we decide what colour our circle is and set a boolean (True/False) term for playSound. Lets translate that if statement..
if (trial_key.keys === correct_response) {
    cirCol = "green"
    playSound = false
    }
else if (trial_key.keys !== correct_response) {
    cirCol = "red"
    playSound = true
    }
Notice here that the true and false values are now all lowercase compared to Python’s capitalised terms (True and False)? no? - me neither!, its an easy thing to miss.
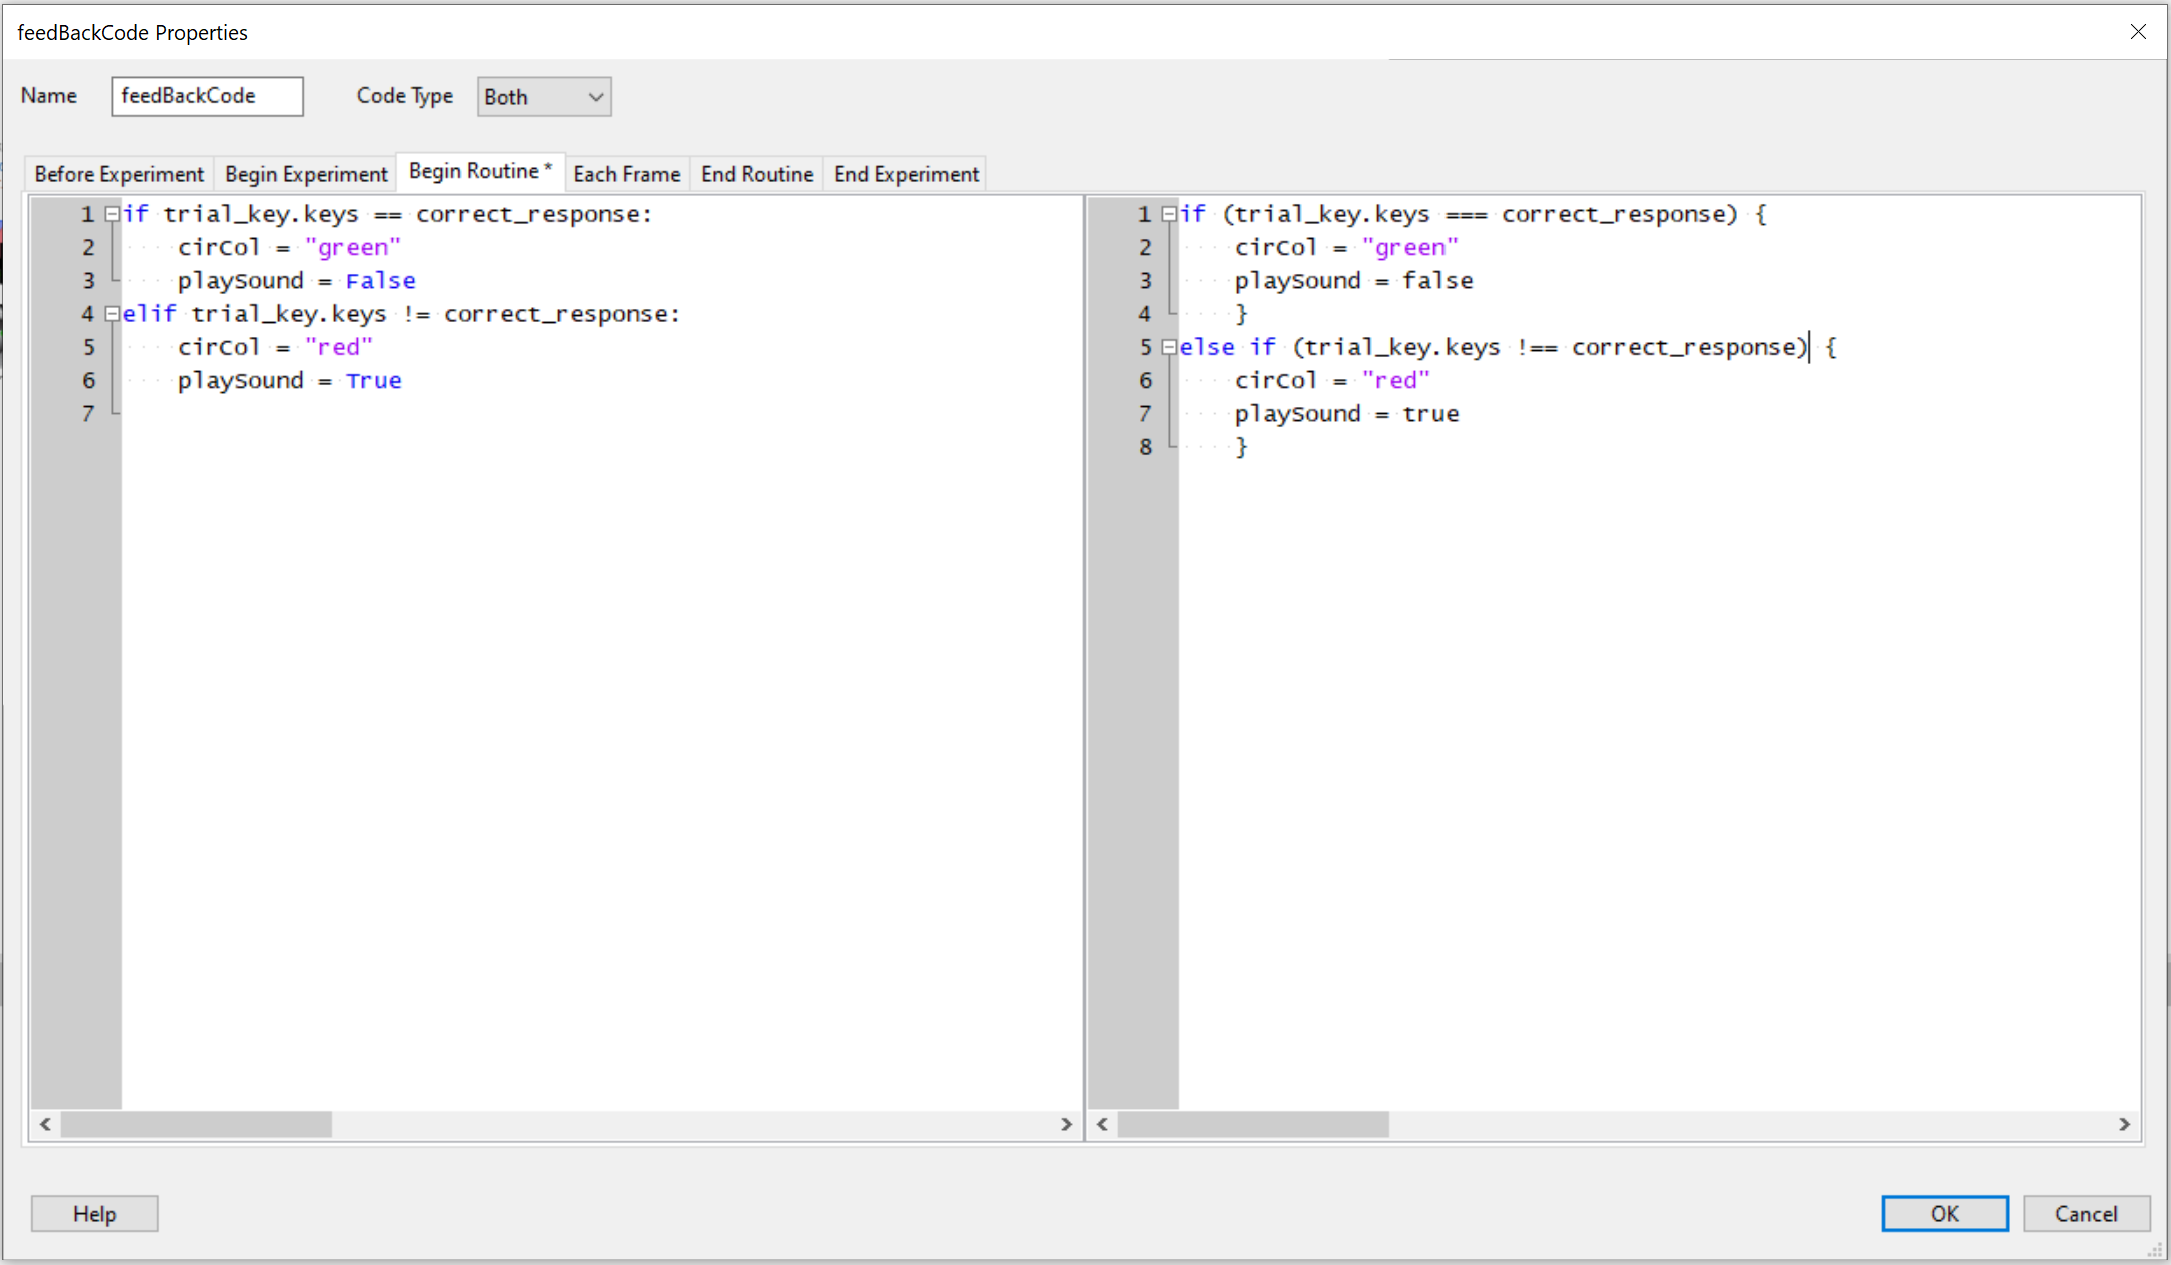
In the Every Frame tab, we had to hack our sound variable so that if it didnt need to play a sound, it set the object to finished otherwise our routine would never end. Without looking, can you make the translation?
if (playSound === false) {
    IncorrSound.status = FINISHED
    }
We also put some conditional code into the incorrSound component to start the sound if needed, rather than based off time. This was also Python code playSound == True. Can you guess the translation?
If you tried to change that code on the actual line, you probably got stuck as PsychoPy (probably due to error) was trying to evaluate Python code and thought you made an error. So, how do we fix this? - the answer is shorthand.
Our playSound variable is whats known as a boolean or bool. This basically means true or false (and at a lower order, 1 or 0). When dealing with these variables in if statements, we don’t actually need the == True because when the interpreter (browser javascript engine) reads this, it knows what to do. So, all we need to enter on this line is the variable name:
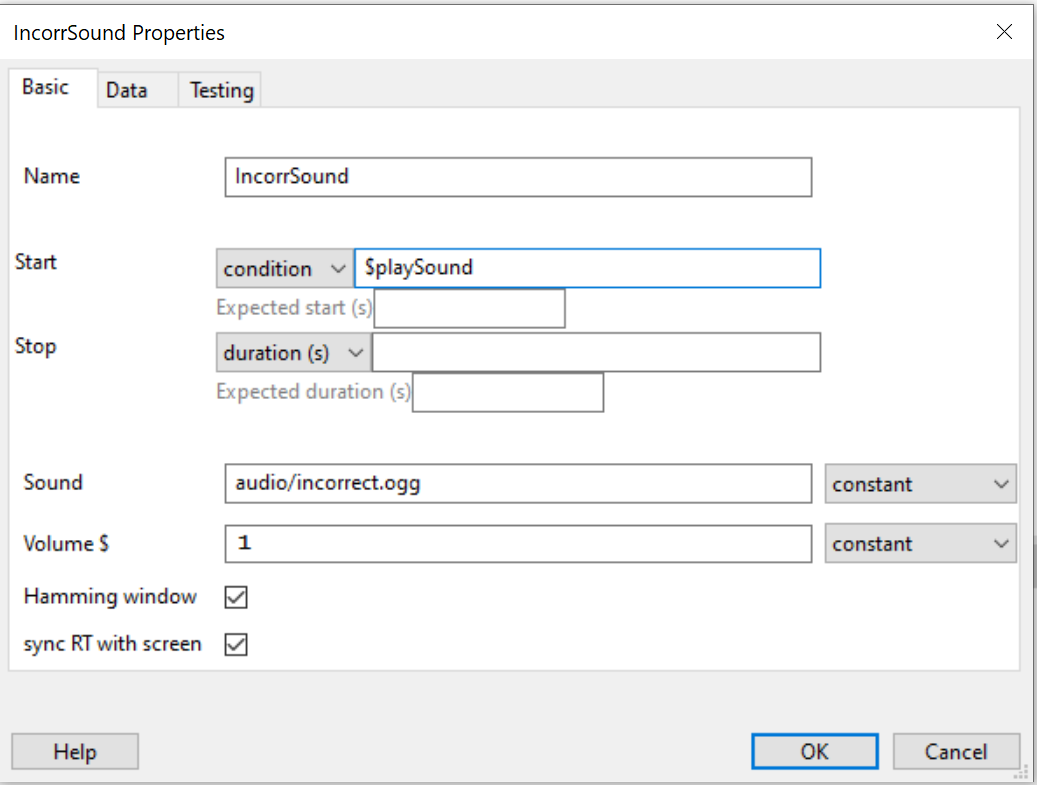
To illustrate, lets say our playSound variable is true (as in the participant was incorrect and the sound needs to play).
The if statement semantically is saying if ‘something’ evaluates as true. When our playSound is set to true, that sentence becomes if playSound evaluates as true, which further translates as if true evaluates as true, which of course is true (confused yet?!).
If playSound was false (as in don’t play my sound please), the sentence would be if playSound evaluates true (i.e. exactly as before), but it is further translated as if false is true, which is false, so it wont play.
That should be it for JavaScript translations. Save your work and lets sync!
IMPORTANT: before you sync any experiments to Pavlovia, please ensure that in your Experiment Settings under the Online tab, your Output path is set to simply html as the picture below.

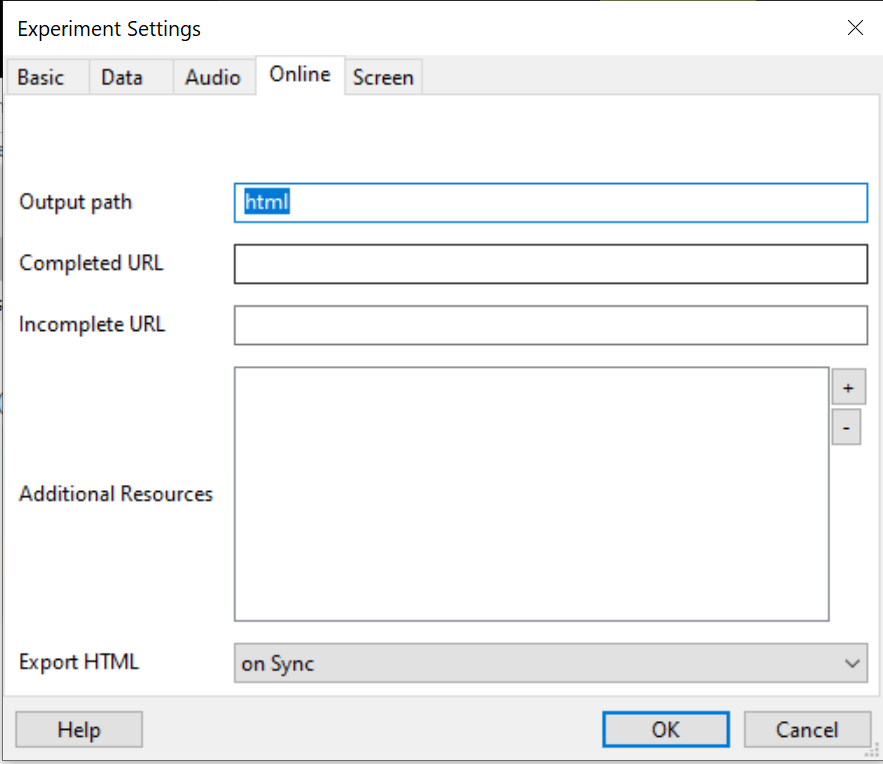
If you do not do this, things don’t work as expected because Pavlovia looks for an html folder structure when deciding what scripts to run.
On the top toolbar, you will see a row of similar looking icons, all of which relate to online experiments:

The one we want is the Sync icon.
![]()
Once we press it, PsychoPy will first check to see if it has a record of it on the GitLab server. If not, we will be asked to create a project, if it does exist, then it will initialise the ‘push’ of changes to the server repository. The first time you run this you may be asked to log into your Pavlovia account.
Hit sync and you should see the following message asking you to create a new project (on the server) because the server doesn’t recognise your experiment (as its the first time):
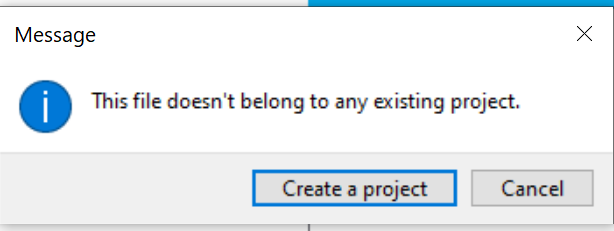
Click Create a Project
A new window appears asking you to name your project and give it some details. We can skip most of this and just give it a name. I called mine Posner_eyes.
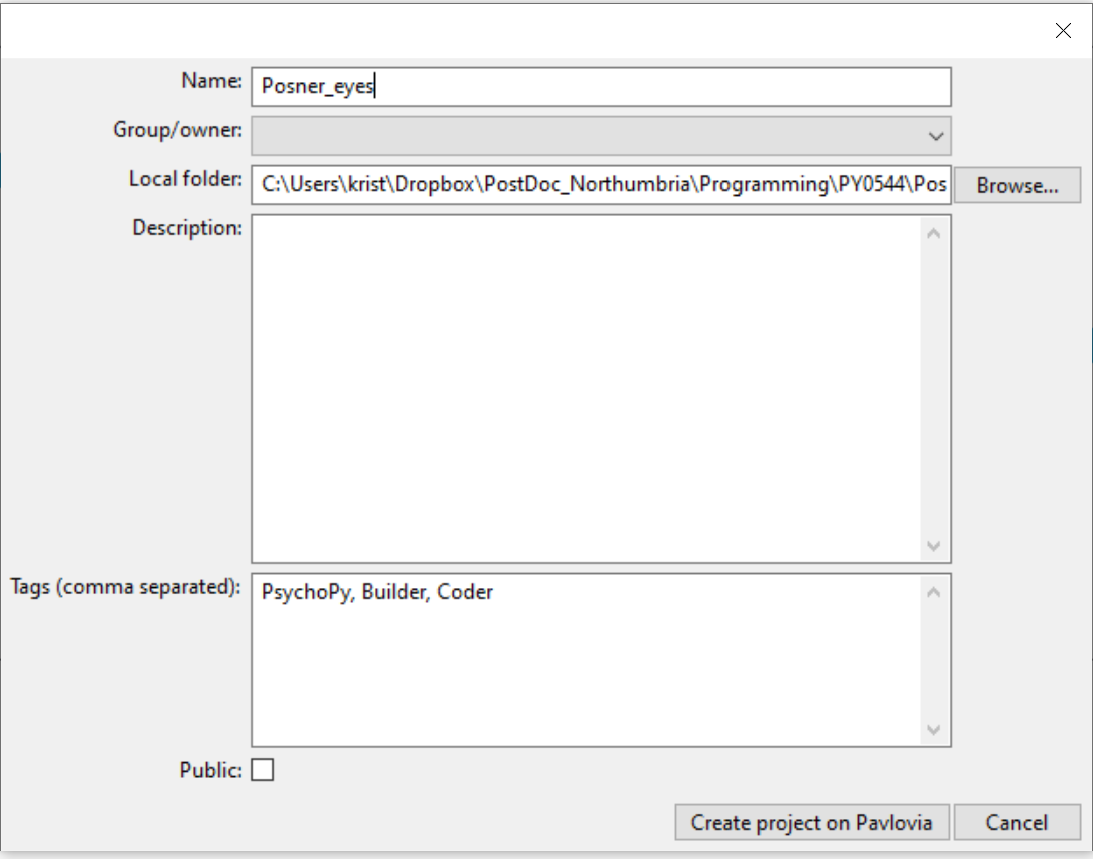
Then simply click Create project on Pavlovia
A third window appears asking you to provide some details on your ‘Commit’. This term simply means commit changes, or ‘save’ changes'. think of this a little like when you save a document with the same name and it asks whether you want to replace that file. in the Summary of changes, I have just written initial commit
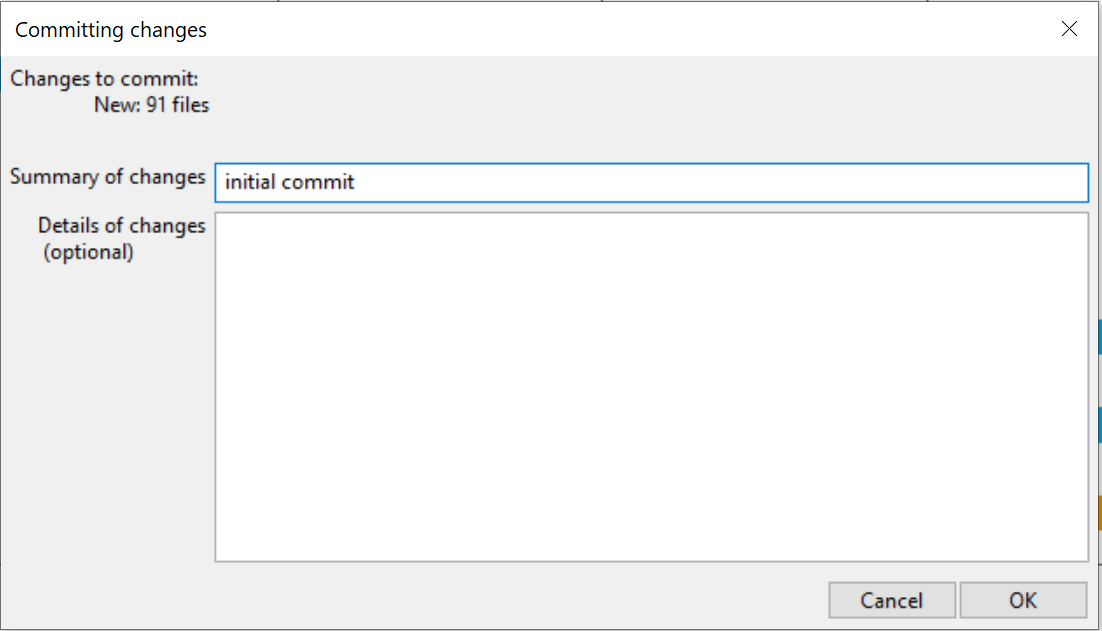
Click OK to ‘push’ (send) those changes to the ‘remote’ (i.e. remote server).
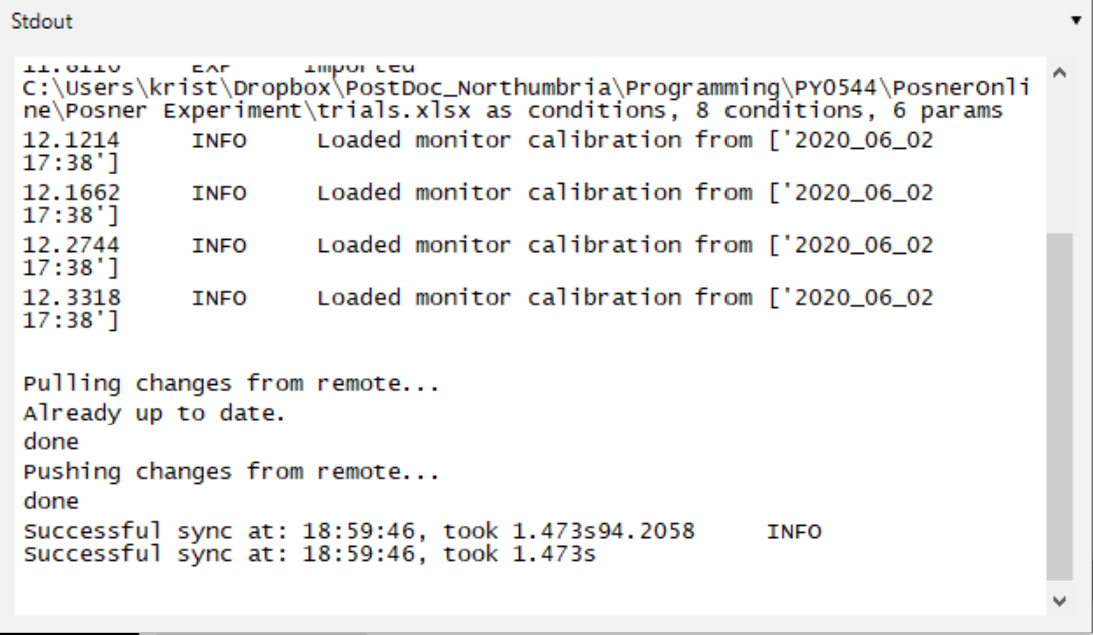
The program will appear to pause for a bit, and when it comes back to life, take a look at the bottom of the Runner window, and you should see success!
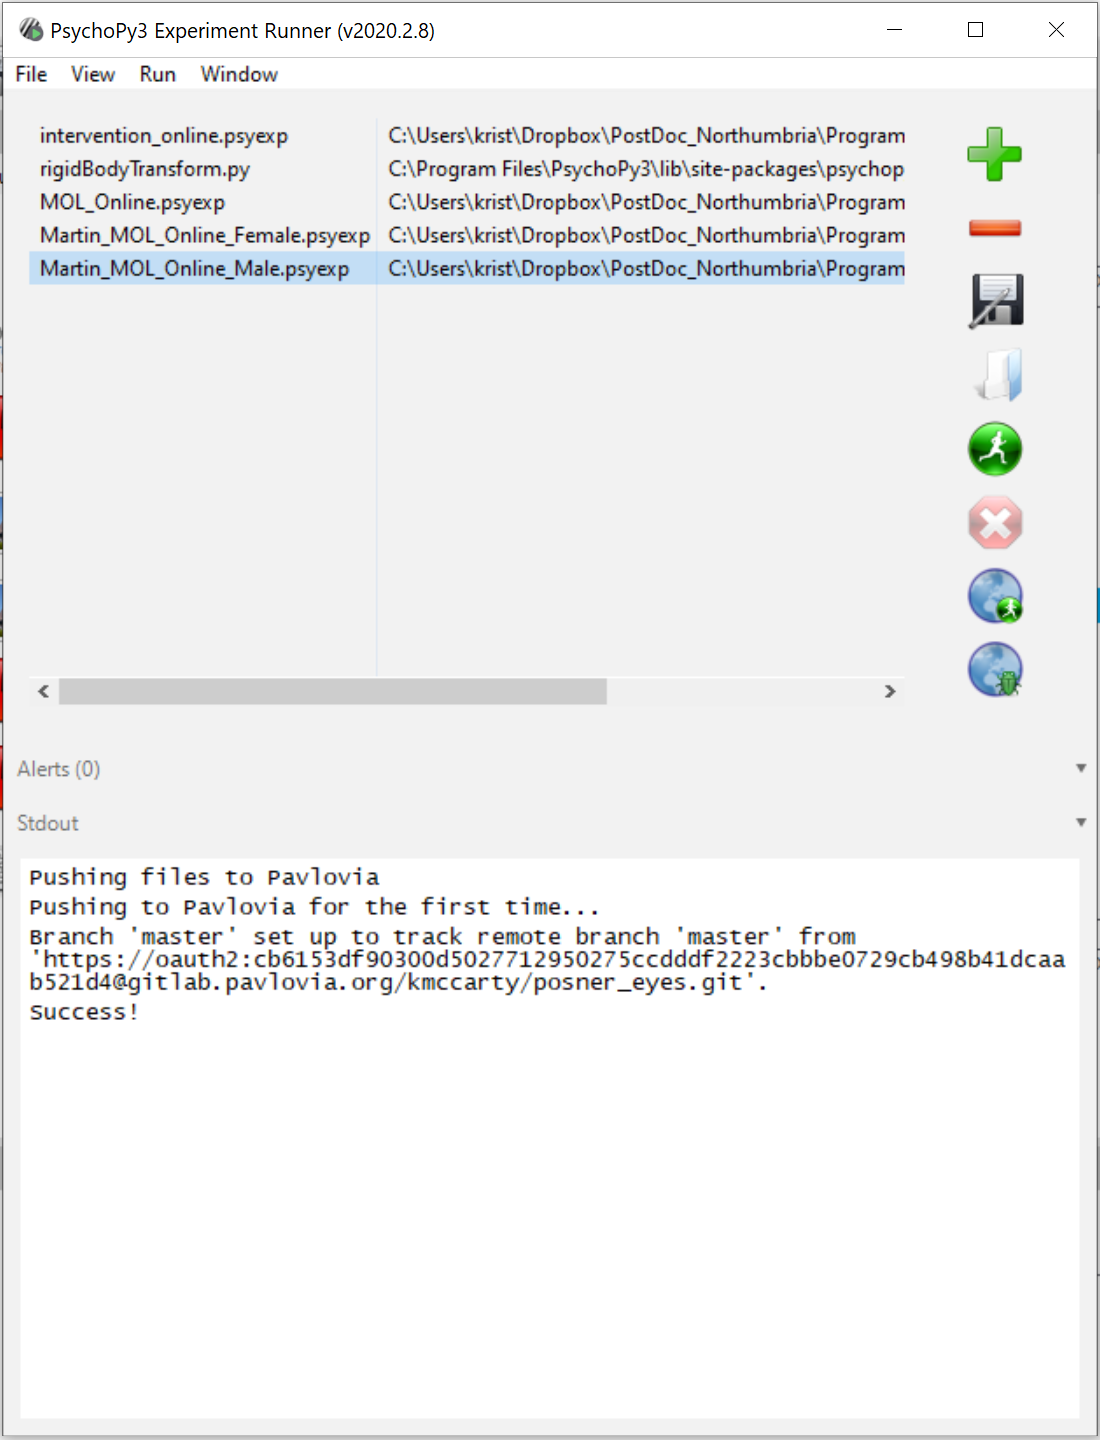
This basically says the push command and creation of the project on Pavlovia was a success!
Head on over to Pavlovia and sign in (top right).
Once you are signed in, go to Dashboard (top middle).
You should see your profile (like mine but without an amazing picture):
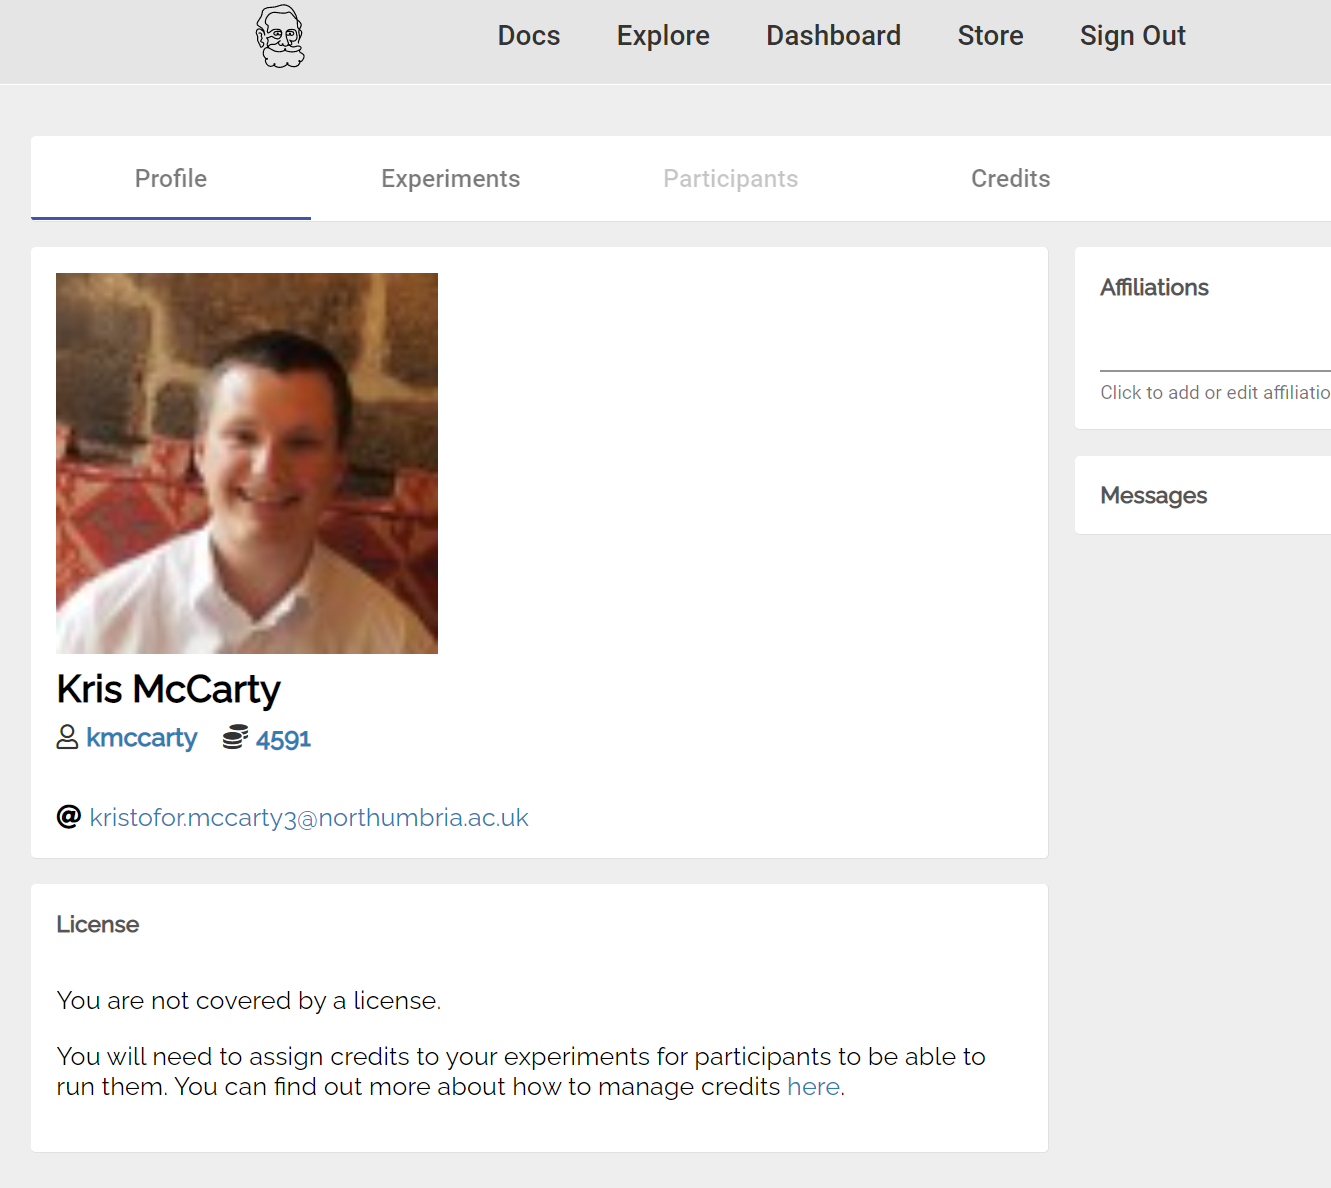
Click Experiments
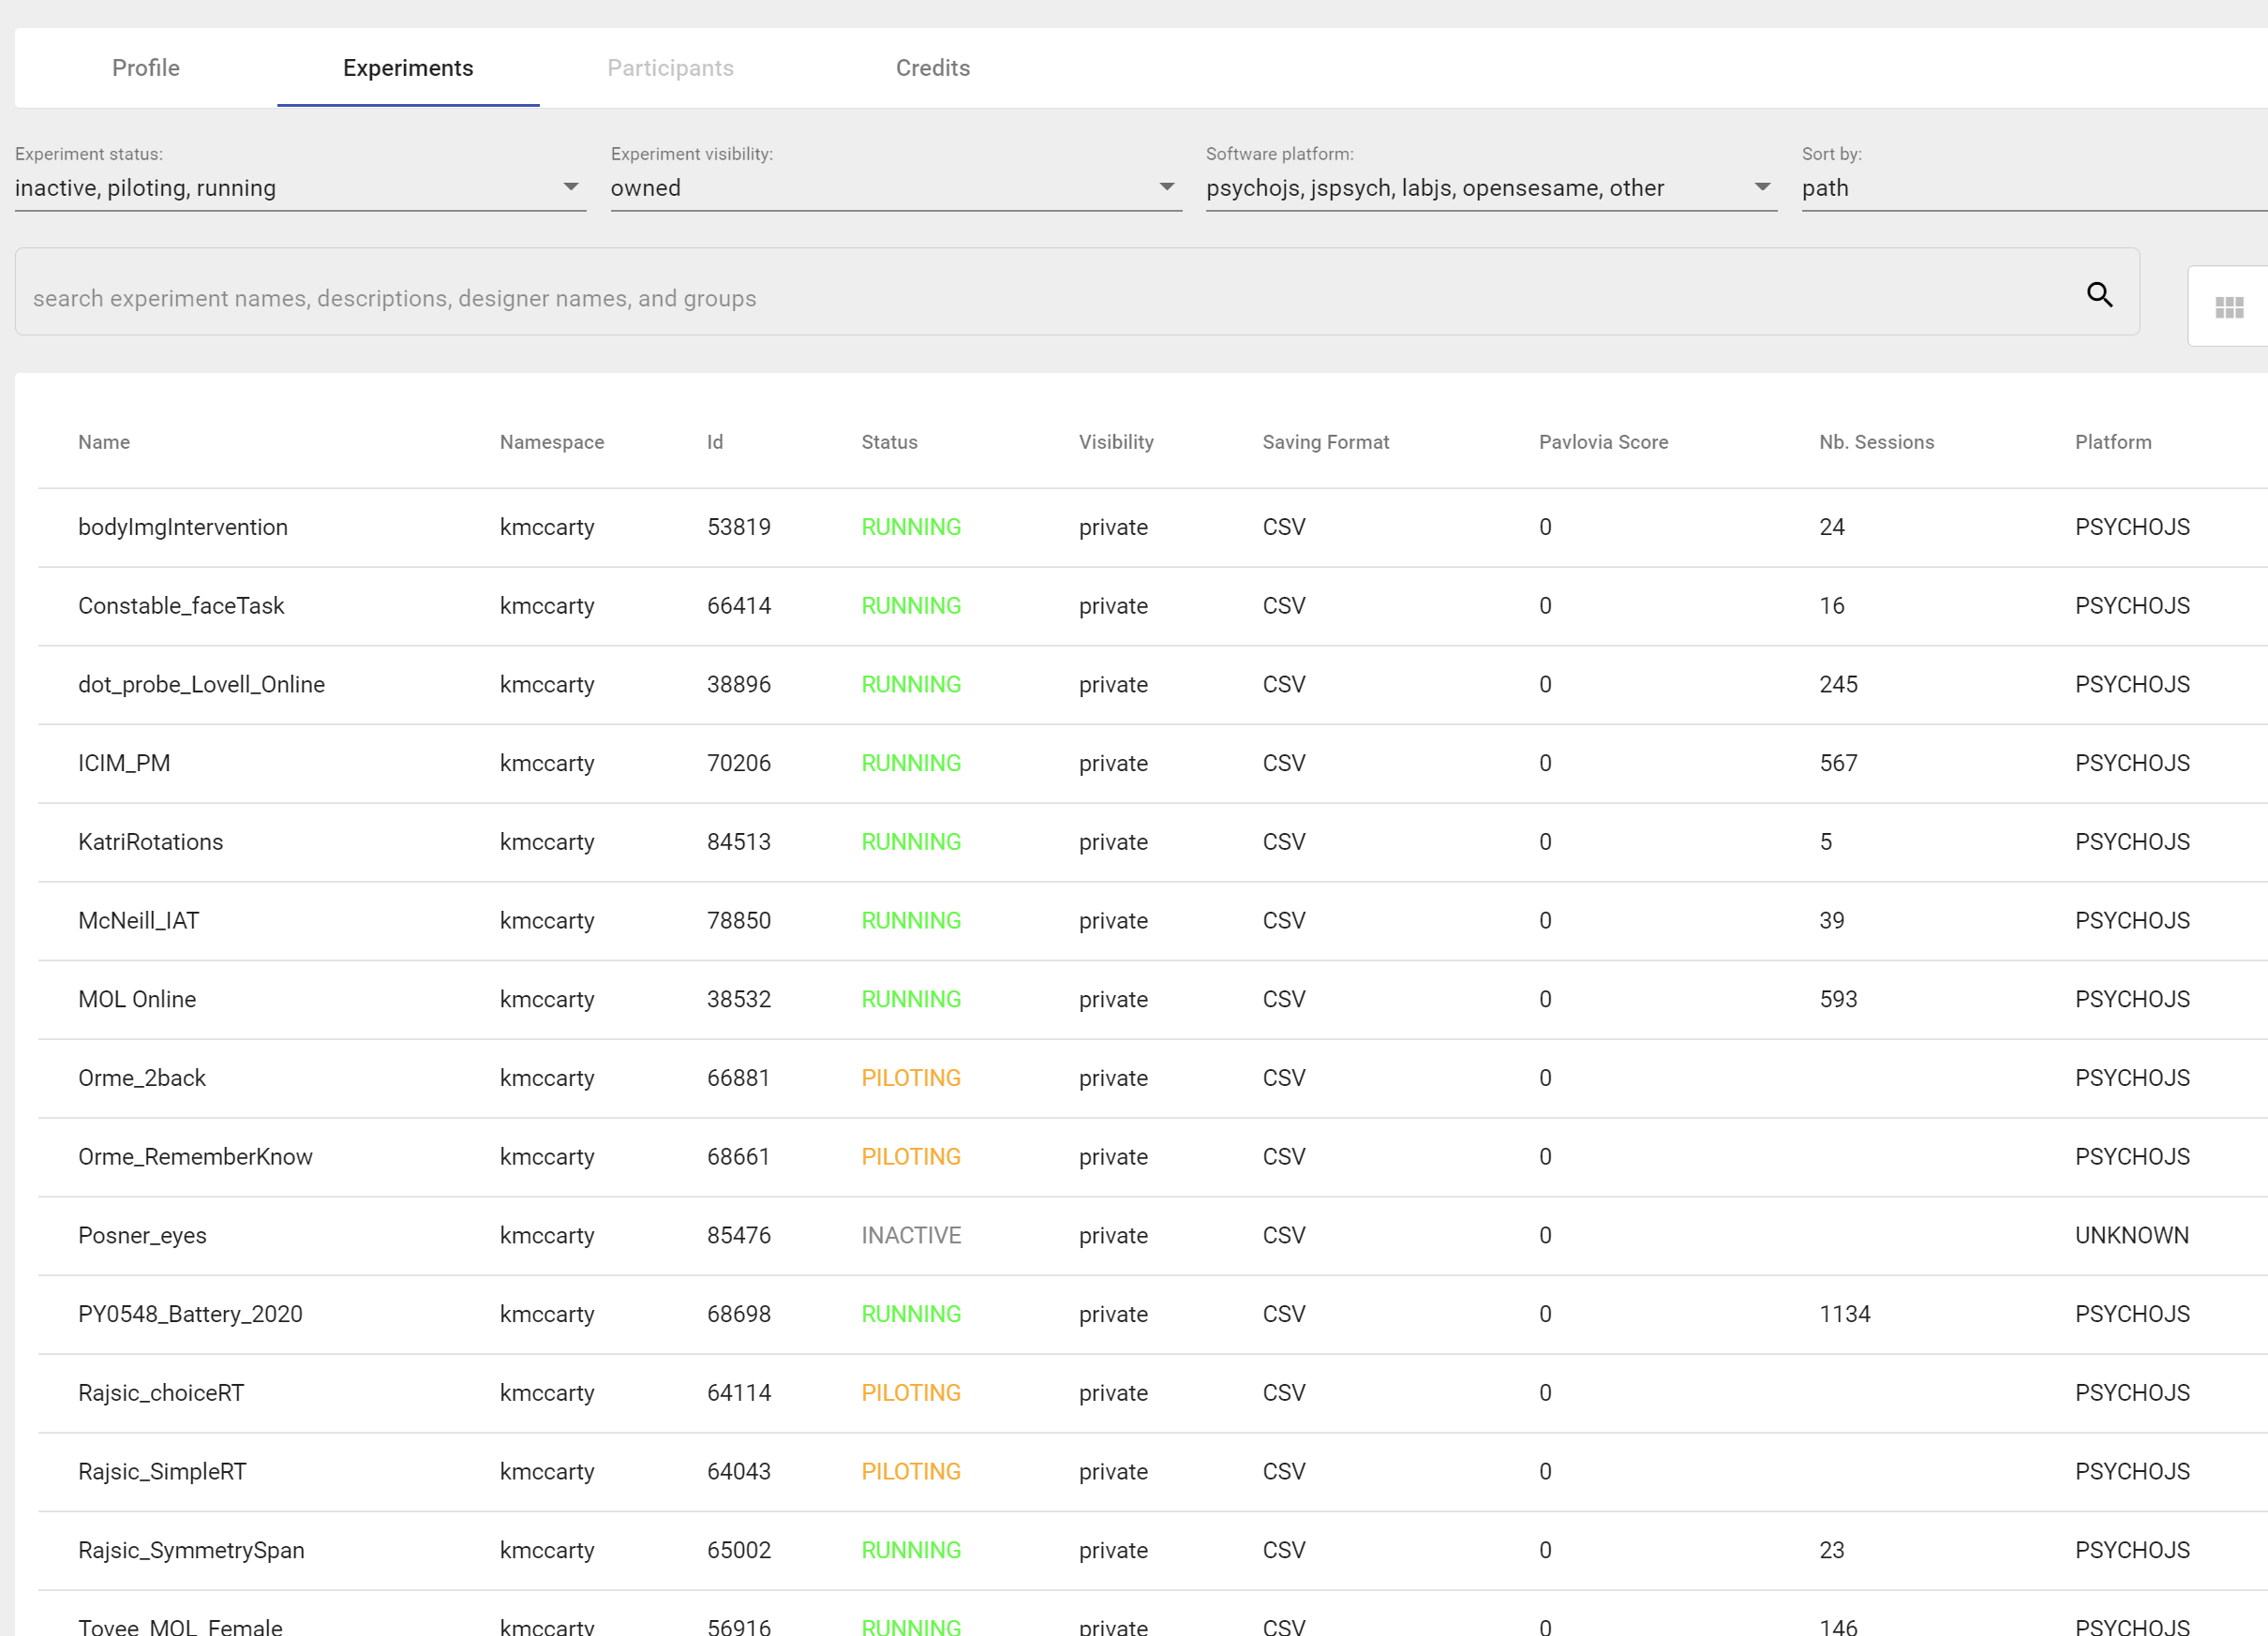
You should see your new Posner_eyes experiment in the table with the status as INACTIVE. Click it.

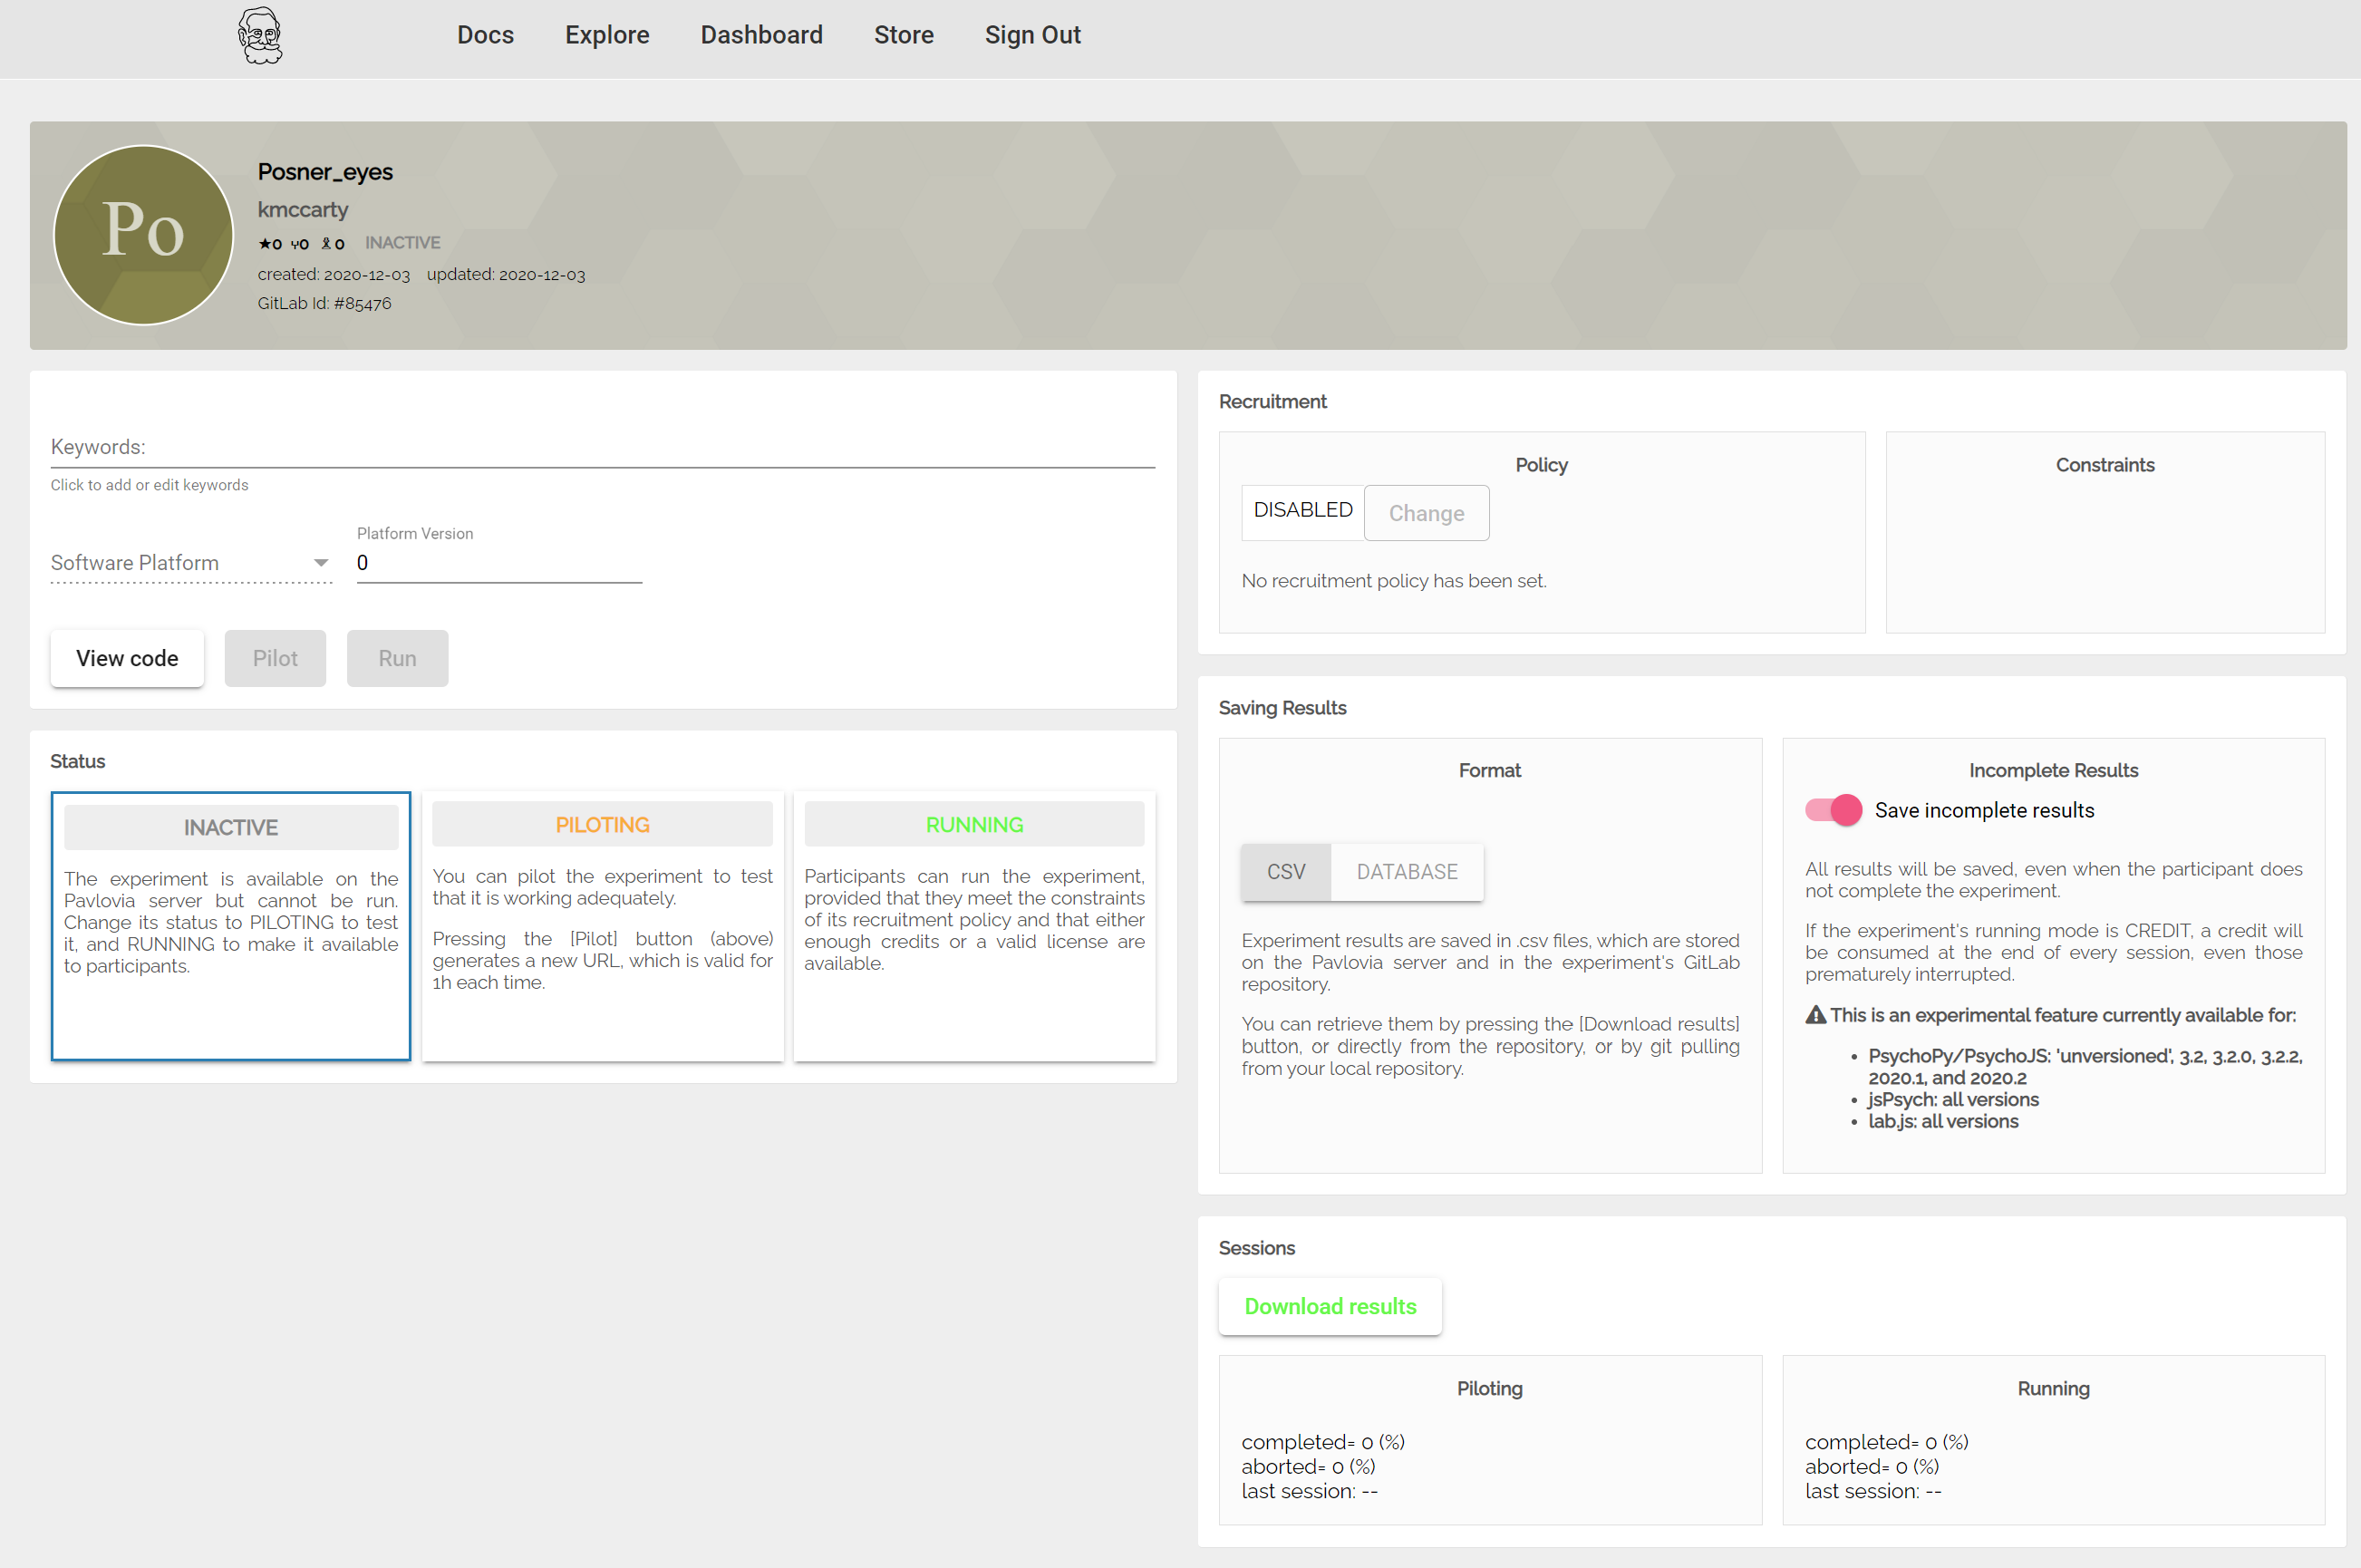
There are a few buttons, but what we are interested in is the ‘Status’.
We see here that Inactive means the experiment is on the server but cannot be run. Piloting is where we can pilot the experiment to test if its working. Running is where you et a URL and can collect and save data.
Currently Pavlovia is a paid service where each run of a study costs 1 credit (20p). You guys don’t have credits but because we aren’t running this, that doesn’t matter. We just want to see if it works and we can do this by clicking PILOTING.

Experiments in this state are for testing to see they work and the data file downloads as soon as you are finished. To see if your experiment runs, we just need to click the Pilot button.

If all is well your experiment should start in a new browser tab. It will then download the necessary scripts onto your computer and wait for you to enter your participant code and click OK.
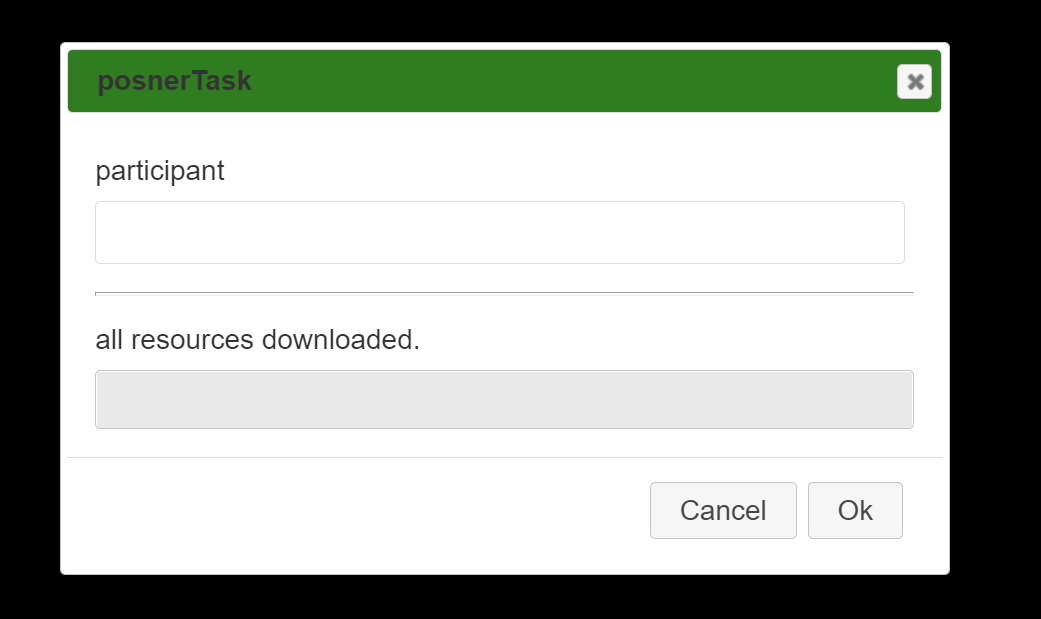
My experiment seems to start well, but when I press space to continue to my trials, I get a big red error:
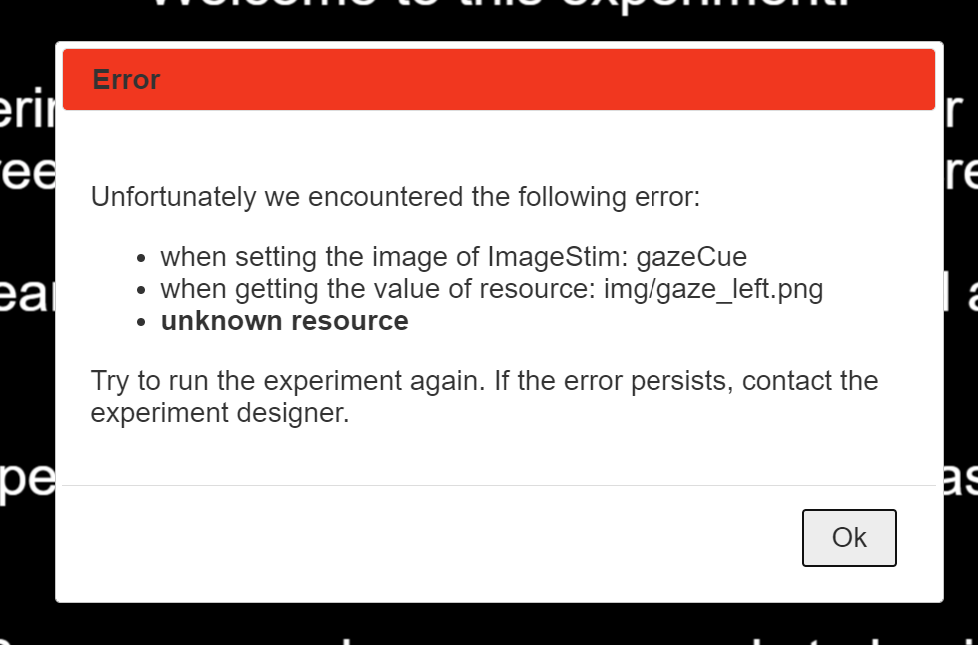
This is informing us that one of our pictures (in my case img/gaze_left.png) was missing! How has this happened? we did sync our project!
There is currently a bug in the Sync procedure in PsychoPy that leaves contents of folders out of the sync first time.
Close your window and open up the folder where your experiment is:
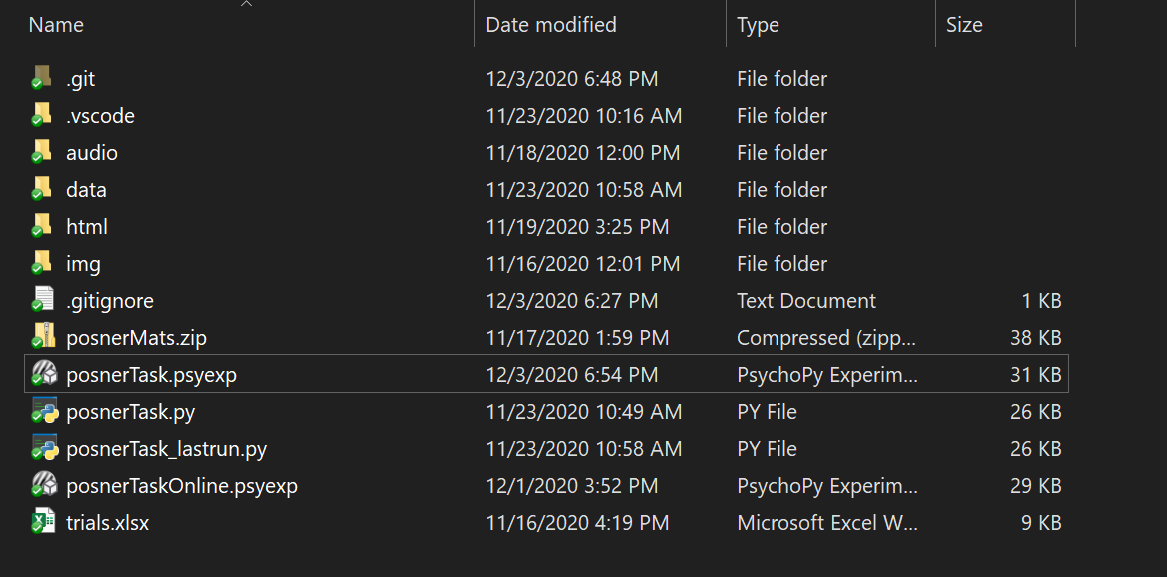
Copy your img and audio folders and paste them in the html/resources folder:

make sure your images are in the img folder and your sound is in the audio folder.
Open your experiment and sync again
![]()
This time our Comitting changes window indicates its found 3 new files!
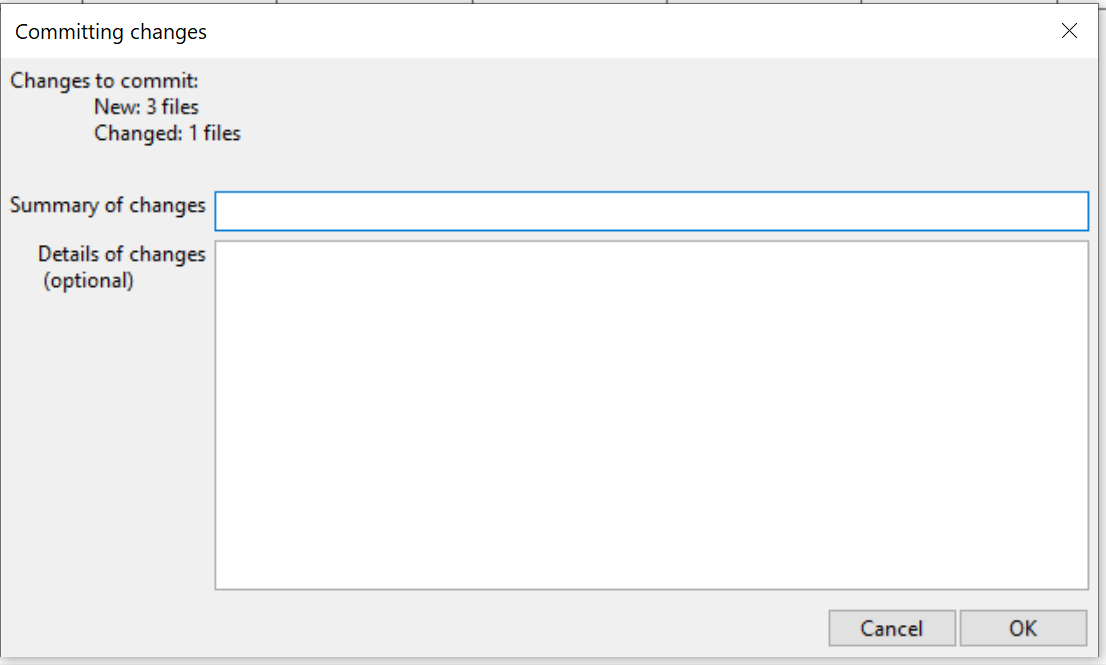
Add a brief message abbout whats changing in this commit and click ok. Your runner window should show something like this indicating its sync’d successfully.
Go back to pavlovia and press the Pilot icon again and see if that fixes things!
If your experiment doesn’t run correctly, we need to look for errors using the browsers Developer Console. If you are using Chrome on Windows you can access it by pressing Ctrl + Shift + i.
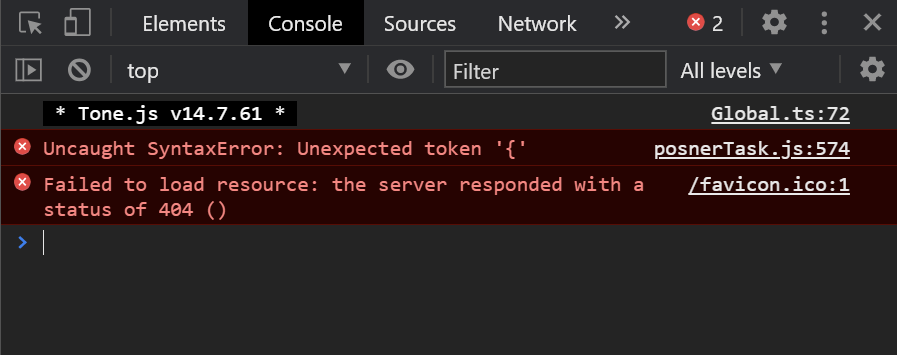
Big errors are in red like the above picture and these are probably whats causing you problem. As you can see in this error, its an uncaught SyntaxError: Unexpected Token ‘{’. If you look to the right of that, it handily tells you it is in the PosnerTask.js file on like 574.
Go to your html folder of your experiment and open the PosnerTask.js file using a code text editor such as Sublime Text or Atom and move to line 574 to see what the issue is.
For me this was the feedback code component where i forgot to close a bracket after correct_response:

So, if all went well you should have a fully working Posner Task that runs in the browser and locally!
A massive well done if you got this far, it was quite a journey. If you found errors, please see me about them and we can work through them.
Quite often we can to collect other information on our participants before they do the task etc.